.png)
User Guide
Managing your calendars
Creating your calendar
Welcome to the beginning of our user guide for the Calendar for Jira app!
In an order to start using our app, please navigate to the apps menu inside Jira and click on the app’s name:
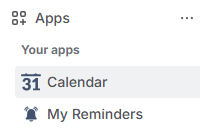
Jira apps - Calendar for Jira app
Once you open our app, you will be greeted with this screen:
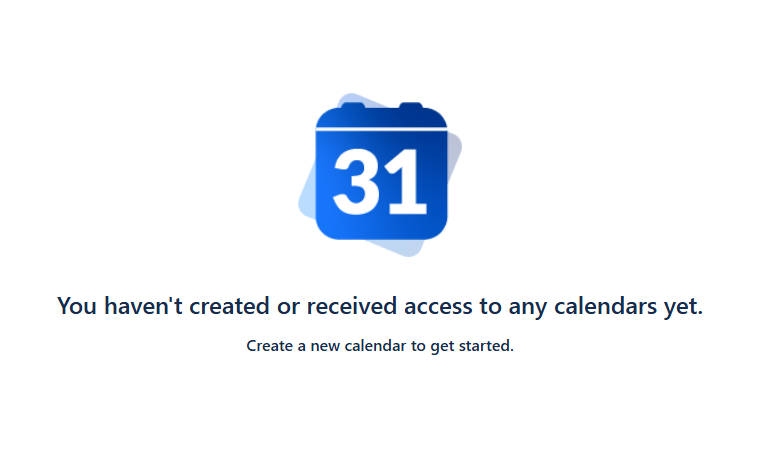
Create Calendar - You don’t have any calendars
Fear not, creating the calendar within our app is very easy as long as you follow our guidance. 🙂
To create your first calendar using Calendar for Jira app, navigate to the sidebar on the right of the main screen and click the Create button.
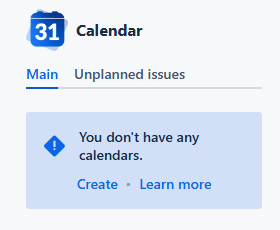
Create Calendar - Click the create button
This action will open the calendar creation window.
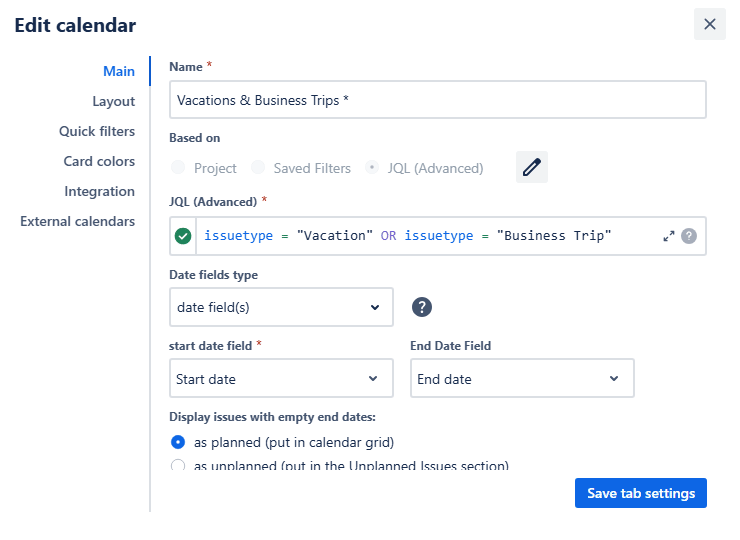
Main
In this section, you will configure the initial settings for your new calendar. Please note, you will have access to more advanced options after the calendar is created!
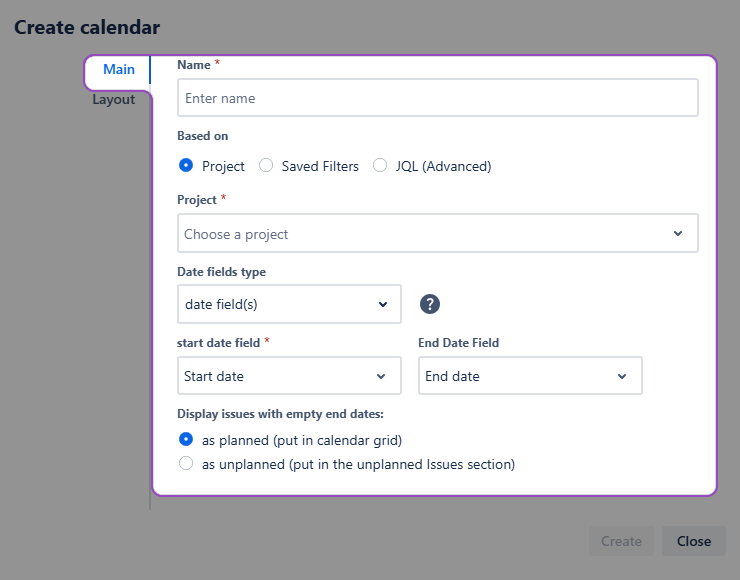
Calendar creation - Main
Name
We recommend naming your calendars by their main purpose to make the navigation in the future easier. If you need to share your calendar with your colleagues, a concise name will definitely save their time.
Based on
Our app allows you to create calendars based on various source types.
If you choose a Project option, you will be able to select one or more projects using the ☑️checkbox. The Calendar for Jira will display all issues with populated date fields from the selected projects on the calendar grid. Undated issues will appear in the Unplanned issues section.
Note: You will only see issues that you have permission to view.
Saved Filters option allows you to base your calendar on previously defined filters. Any changes made to these filters will automatically update the calendar.
Note: Ensure that these filters are shared with your team members for proper functionality.
Lastly, the information displayed in the calendar can be selected using Jira Query Language, or JQL. This option offers great flexibility and doesn't require any prior setup.
Note: We advise using a single line for the JQL input for optimal performance.
Date fields type
The placement of the issues on the calendar depends on the date field type you choose.
Due date option arranges the issues by the dates they are due. In this case, each issue will occupy a minimal time slot on the calendar grid.
Note: Due date is a system field and requires a Schedule Issue permission to edit—it includes dragging the issue onto the calendar grid and moving it across the grid.
Date field(s) option allows you to define how issue duration is displayed.
You can choose to use both a Start Date and an End Date. When you do, each issue will span the time between the two fields you select.
Alternatively, you can choose to use only a Start Date. In this case, issues will be placed on the calendar grid as a minimal, single-day time slot.
When you select an End Date field, you can also configure your calendar to handle issues that are missing this field. You can either choose to display them on the calendar grid with a minimal time slot or to collect them in the Unplanned issues section for later scheduling.
This option works best for the standard calendar view where the precise time frames are not specified.
Certain calendar views specify the time frames regardless of the date field type you choose. In those views, the issues will be displayed in all day section of a calendar if you use Date field(s) option.
Date-Time field(s) option is similar to the Date field(s) option, but uses Date-Time Picker fields for greater precision.
There are three ways you can utilize the Date-Time fields in our Calendar for Jira app:
Set both the start and the end date-times—this will allow the issue to be displayed throughout its duration on the calendar, regardless of the view.
Set only the start date-time—this way you can mark the beginning of an issue which has no set deadline.
Set only the end date-time—in this case, the date-time field will act similarly to the Due field, marking the deadline in a more precise manner.
Embedded dates are custom date pickers provided by our app. If the issue creation or issue edit screen don’t include proper date or date-time fields, and there is no possibility to change that (due to the required admin rights or it is not currently a priority) you can use embedded dates instead and access our Calendar for Jira app features instantaneously.
The embedded dates are located within the issue context section. Here, you can either provide a specific date and time for the issue or select the All day option, which indicates the work item will be active for the entire day.
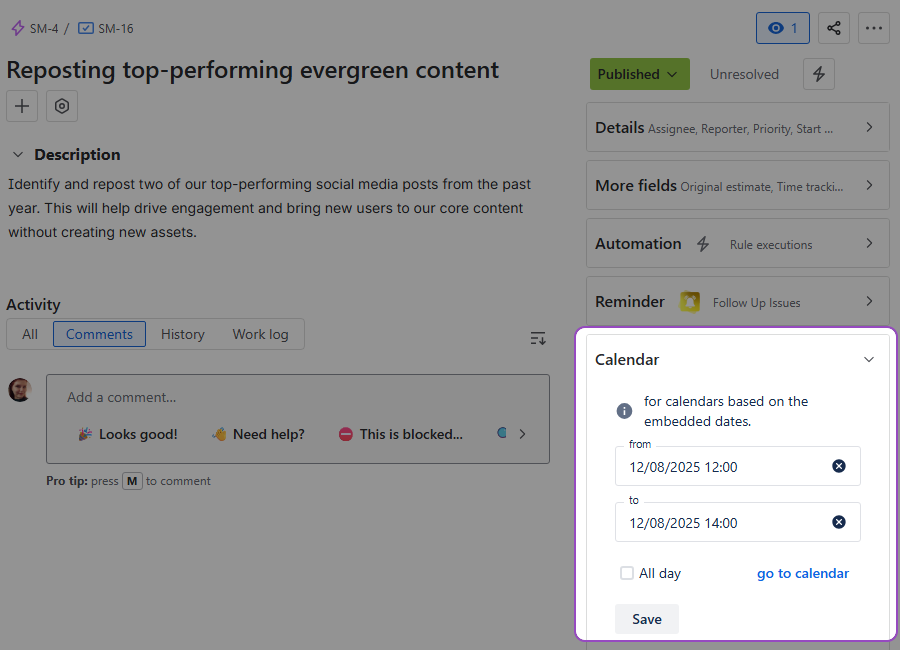
Calendar creation - Embedded dates
Upon installation, our Calendar for Jira app automatically creates Start Date-Time and End Date-Time custom fields within your Jira settings, which you can then incorporate into your project's screen configurations.
Until this configuration is complete, Embedded dates provide a temporary way to place issues onto the calendar grid. Please note that regardless of the method used, you will still need the appropriate permissions to edit the issue in order to modify its dates.
Layout
Customize the appearance of your calendar using the layout settings:
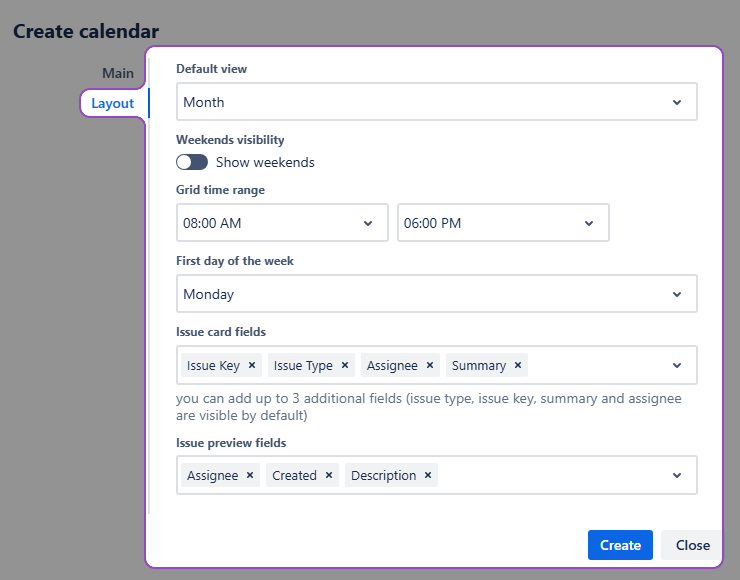
Calendar creation - Layout
Note: You can access layout settings once the required fields of the Main tab are filled out.
Default View
Default view option lets you choose what your calendar looks like every time you open it. Year, Month, Week and Day options describe the standard Calendar grid options with a different scale, meanwhile Timeline options exist for the chart-like calendar display.
Weekend Visibility
Weekend visibility simply lets you hide the weekends if you wish to do so.
Grid Time Range
Grid time range option allows you to adjust the time frames displayed in the calendar views of the week and day zoom options.
First Day of the Week
First day of the week allows you to choose either Sunday or Monday as the first day of the week.
Issue Card & Issue Preview Fields
Issue card fields and issue preview fields options allow you to customize the information displayed on the card (the basic calendar view) and the preview (when you click the issue).
Note: By default, issue cards display the issue type, issue key, summary, and assignee.
Once you’re satisfied with your calendar’s settings, click Create.
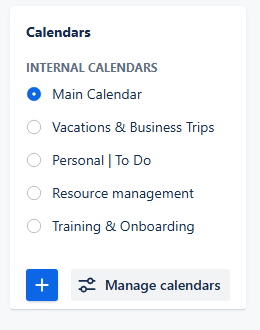
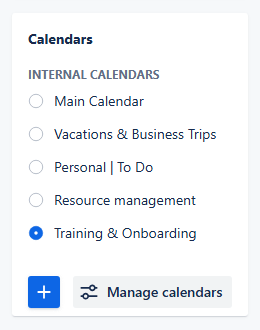
Congratulations, you’ve created your first calendar using our Calendar for Jira app! It will automatically appear in the Calendars section of the right-side menu. This section shows your Favorite calendars—select which calendars you would like to see here by marking them with a star in Manage calendars menu.
Editing your calendar
Once your calendar is created, you can customize it.
To access the calendar’s settings again, click the Settings button located at the bottom-right of your screen, directly below the Calendars section.

Editing calendar - Settings
The initial settings for your calendar are displayed here, and you can modify them at any time.
Alternatively, you can access the settings via calendar manager.
Open the calendar manager by clicking the Manage calendars button in the Calendars menu of your sidebar.

Editing calendar - Settings through calendar manager
In the calendar manager, locate the calendar you wish to edit and click the Edit button. It will open the calendar settings.
Editing Calendar - Inside the calendar manager
Once you open the settings you will see that, in addition to the Main and Layout tabs you're already familiar with, you'll find advanced settings in the new tabs.
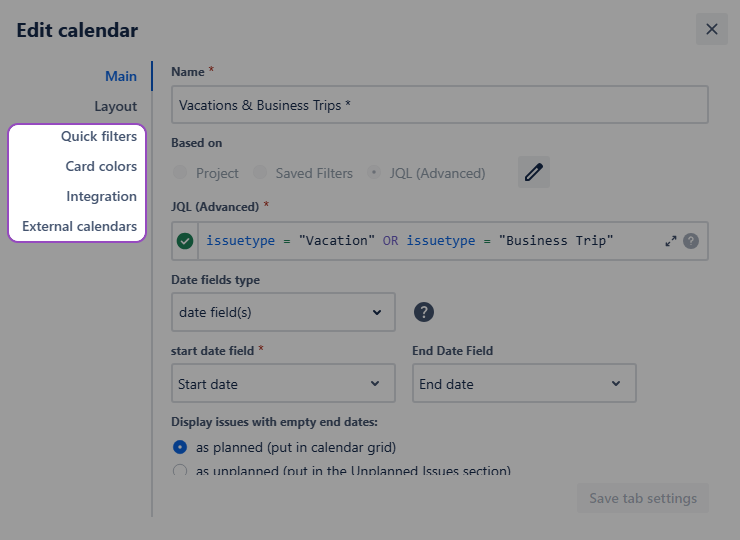
Editing calendar - New tabs
Those settings are covered in the separate pages:
Always remember to click the Save tab settings button to confirm any changes or when switching between tabs.
Editing calendar - Saving the changes
Accessing your calendars
Our Calendar for Jira app provides flexibility in managing which calendars are visible in the sidebar's Calendars menu. You can select specific calendars to be readily accessible or choose to keep them hidden and access them only via the Manage Calendars option.
Calendar manager
Here's how to customize your sidebar calendar list:
Access the calendar manager by clicking the Manage Calendars button in the Calendars menu in the sidebar.
Accessing your calendar - Manage calendars
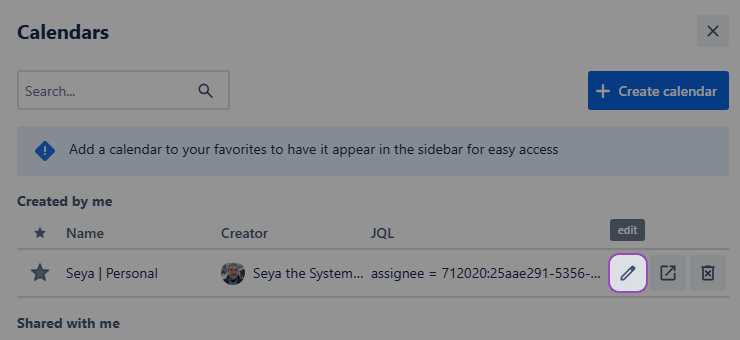
Let’s go over the main components of the calendar manager:
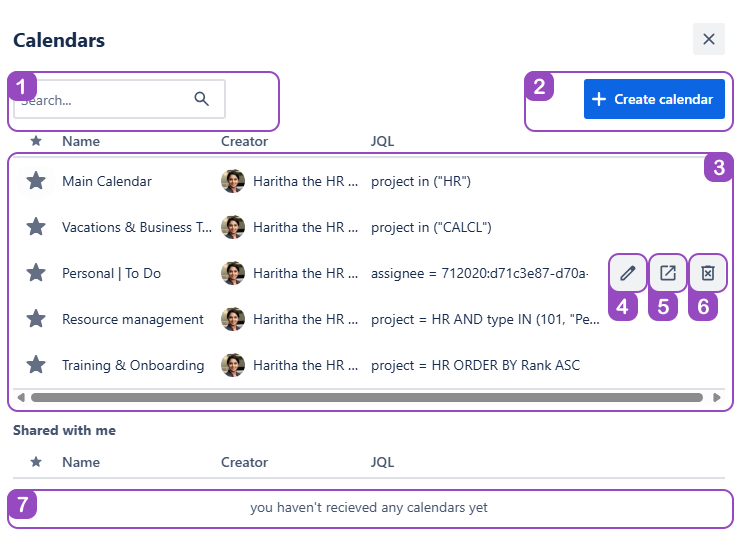
Accessing your calendars - Calendar manager
Search: Quickly find the needed calendar by the name.
Create calendar: Access the calendar creation tool directly from the calendar manager.
Calendars: All your calendars are stored here.
Edit calendar: Access all of our editing tools from the calendar manager.
Open calendar: Switch to the calendar you selected.
Delete calendar: Remove the calendar you no longer need.
Warning: Once the calendar is deleted, the settings related to it—quick filters, card colors and attached external calendars—will be permanently deleted as well.
Shared with me: All shared with you calendars will be displayed here.
Managing Favorites
When you create new calendars in our Calendar for Jira app, they at first automatically appear in the Calendars menu. It is indicated by the filled-out star icon next to the calendar’s name:

Accessing your calendars - Calendar within Favorites
To remove a calendar from the sidebar display, click the filled star icon next to its name. The star will change to an outline, indicating that the calendar is no longer a Favorite. Non-favorite calendars are not displayed in the Calendars menu of the sidebar.
Similarly, if you would like to add the calendar back to favorites, click the star outline button—the star will fill out, indicating that the calendar had been added back to Favorites.

Accessing your calendar - Adding or removing calendars from favorites
After this, the calendar will also appear in the Calendars menu of the sidebar. The changes will also be confirmed by a notification pop-up:
Accessing your calendar - Notifications
Switching between calendars
Switching between the calendars in the Calendars menu is very straightforward. Click on the name of the calendar you’d like to view or edit—the application will redirect you to that calendar.
Switching between calendars
If you wish to access one of the calendars which are not in your Favorites, you can do so from the calendar manager menu:

Accessing your calendar - Opening a calendar through the calendar manager
Note: Quick filters, Card colors settings, non-JIRA events and External Calendars are linked to your individual calendars. Switching between them will make the calendar app display the settings related to the selected calendar.
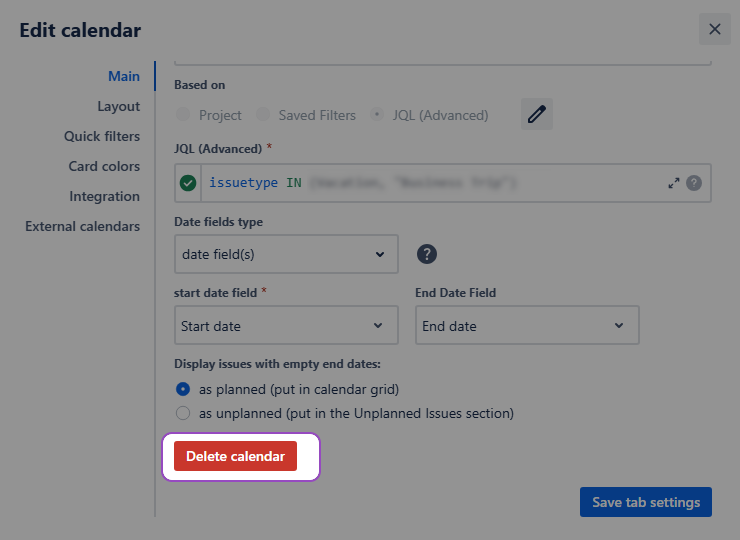
Deleting your calendar
It is important to keep your calendars up to date and rid of the ones that are no longer needed or out of date.
You can delete your calendar in two ways:
From the right side of your screen, navigate to the Manage Calendars menu and click the trash bin icon next to the calendar's name, then confirm the deletion.

Deleting calendar - Delete through the calendar manager
Alternatively, open your active calendar's settings, go to the Main tab, and click the Delete calendar button at the bottom, then confirm the deletion.
Deleting calendar - Delete thought settings
Warning: Deleting the calendar will also remove all associated quick filters, card colors, non-Jira events and external calendars.
Filtering your calendars
Instant filters
Our Calendar for Jira App provides an Instant filtering system immediately after you create your calendar. This user-friendly feature lets you easily display issues in your calendar based on common properties like assignee, status, issue type, and priority, without any prior configuration.
To get started:
Navigate to the right side of the header in the main calendar view.

Filtering your calendar - Instant filters
Click the funnel icon located between the View Selection and Share buttons.
Filtering your calendar - Accessing instant filters
Click on a property to view its available options.
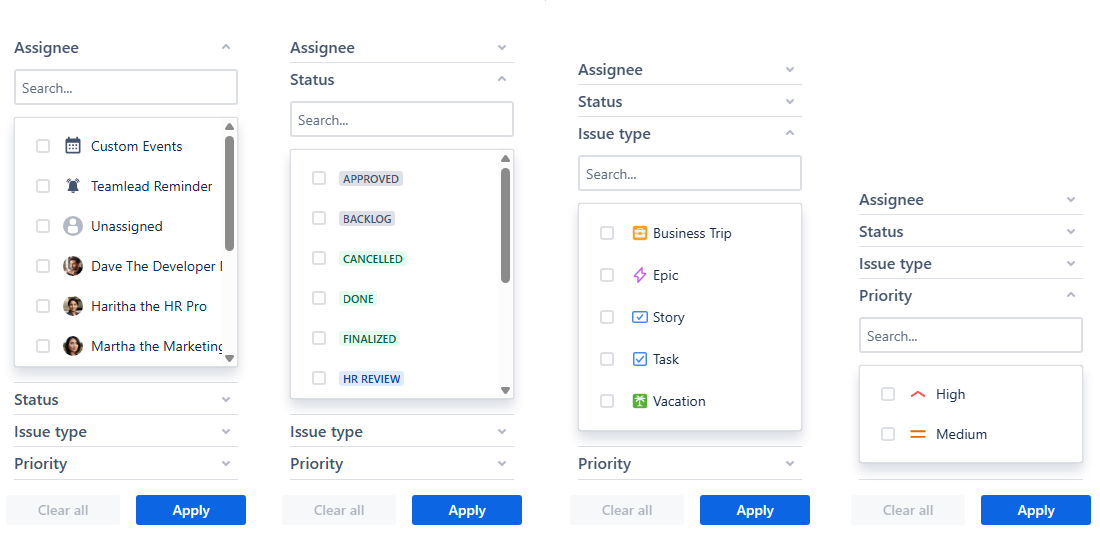
Filtering your calendar - Available options
As you can see, each property provides you with ready-to-use options to filter your calendar with. The search option is also available in case of a data-rich calendar to make it easier for you to find the required values.
Note: The options offered in these filters are based on the issues that are visible in your calendar. If you can’t find the needed setting even through the search option, check your calendar settings first.
Check the boxes next to the properties you wish to filter by. If you're looking for something specific, simply type it into the search bar. You can choose multiple options at once.
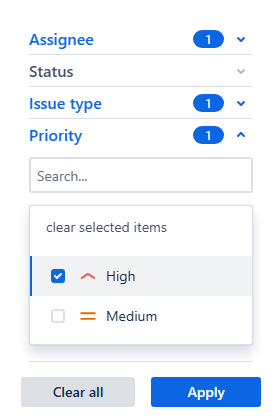
Filtering your calendar - Instant filters
Click Apply once you've made your selections. Your calendar will instantly show the filtered issues.
Note: Applying instant filters within different properties applies an AND condition.
Example: in instant filters, currently chosen properties are:
Issue type: Epic;
Priority: High.
The issues that satisfy the requirements of both of these active filters will be visible on your calendar.
JQL: issuetype = Epic AND priority = High
Applying instant filters within the same property will apply an OR condition.
Example: in instant filters, currently chosen properties are:
Issue type: Epic;
Issue type: Task.
Your calendar will then display the issues of either Epic or Task issue type.
JQL: issuetype IN (Epic, Task)
Quick filters
For users requiring more precise filtering than our Instant filters provide, our Calendar for Jira app features Quick filters. This advanced system allows you to create custom filters using JQL queries, which is particularly useful when needing more detailed control over what's displayed. You can also combine these filters to refine your calendar view.
For the sake of the example, the JQL provided here are relatively simple, and similar filtering could be achieved through instant filters. So what is the point of using quick filters at all?
Unlike Instant filters, which offer predetermined filtering options based on common work properties such as assignee, issue type, or status, Quick filters provide significantly more flexibility. They work with any query supported by JQL.
This means if your projects leverage a variety of custom fields—like work locations, departments, specific clients, or marketing task categories—you can create tailored Quick filters to precisely narrow down your view. This allows you to slice and dice your calendar data exactly how you need it, providing great insights into your team's activities.
Here's how to set up Quick filters:
Navigate to the left side of the header in the main calendar view.

Filtering your calendars - Quick filter row
Click the + Add quick filter option located beneath the Zoom menu. You can also reach these settings by going to the Settings of your currently active calendar and selecting the Quick filters tab.

Filtering your calendar - Accessing quick filters

Filtering your calendar - Quick filters settings
Provide a name for your filter and then enter the JQL that will define its criteria. Ensure the query is supported by JQL.
Filtering your calendar - Quick filters settings
Click the + button to add this filter to your list of Quick Filters.
Once you've configured all your desired Quick filters, ensure they are applied to your calendar by clicking Save tab settings.
The newly created filters will appear as clickable buttons above your calendar. Click a button to turn the filter on, and click it again to turn it off. You can activate multiple filters at the same time.

Filtering your calendar - Quick filters on the filter row
Note: Activating more than one quick filter applies an AND condition. Consequently, only issues that satisfy the requirements of both (or all) currently active filters will be visible on your calendar.
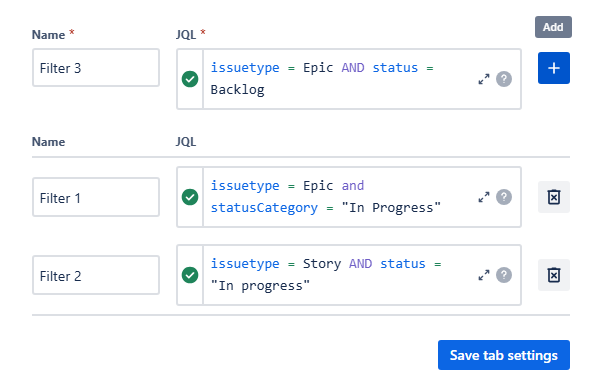
Example: in Quick filters, currently chosen filters are created with the following queries:
issuetype = Epic;
issuetype =Task.
Your calendar will then display no issues, because there can be no issue with two issue types. (JQL issuetype = Epic AND issuetype = Task).
Coloring your cards
The card coloring system implemented in our Calendar for Jira app lets you visually differentiate your issues by type, status, status category, or any other property recognizable by JQL. This enhances the visual clarity of your calendar and improves its usability.
For example, have a look at this calendar over here without any color rules applied:
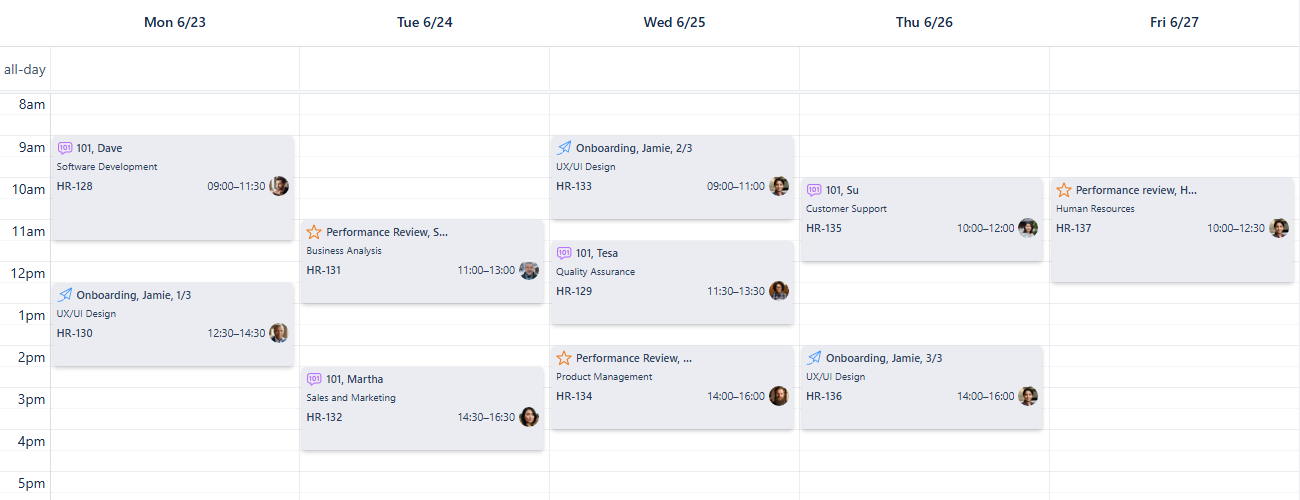
Coloring your cards - Example with no color rules
It can be challenging to distinguish between work items at a glance, even with the help of work type icons. That's where our powerful card coloring feature comes in to make things much clearer.
To get started:
Click the Settings button located at the bottom-right of your screen, below the Calendars section.

Coloring your cards - Open settings
Navigate to the Card Colors tab.
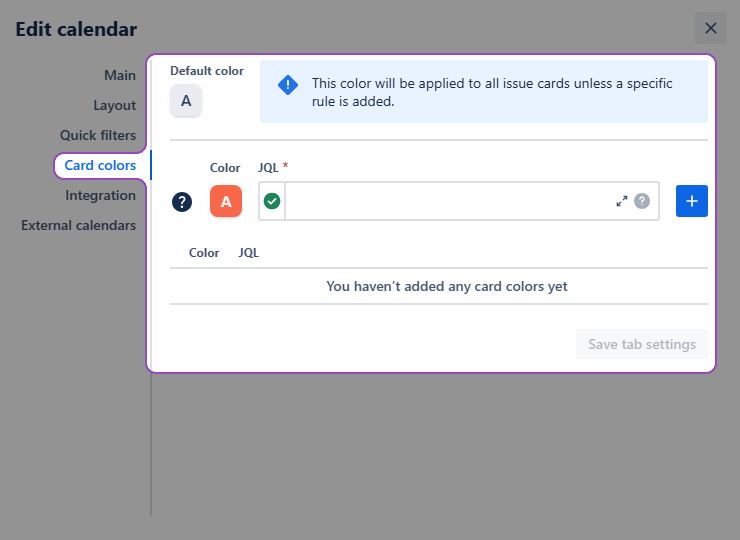
Calendar settings - Card colors tab
Choose the desired color for the issues you want to highlight.
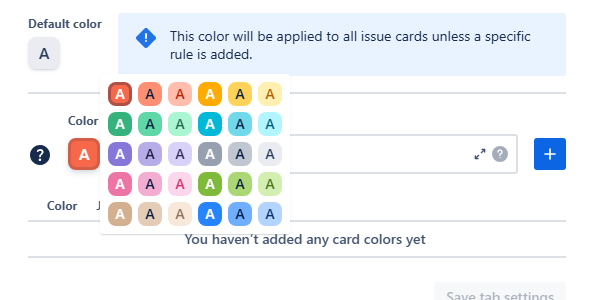
Coloring your cards - available color options
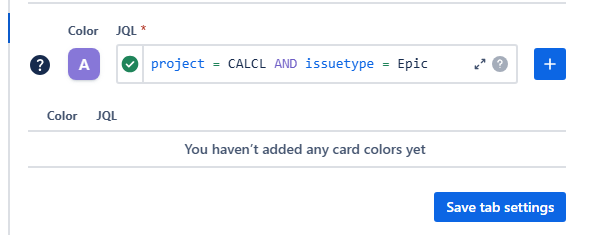
Enter a JQL query to define the specific issues that should receive this color.
Here’s our small tip on finding the correct query for your card colors.
Coloring your cards - Using JQL
Click the blue + button on the right to add the color rule to the list below.
Coloring your cards - Adding a new rule
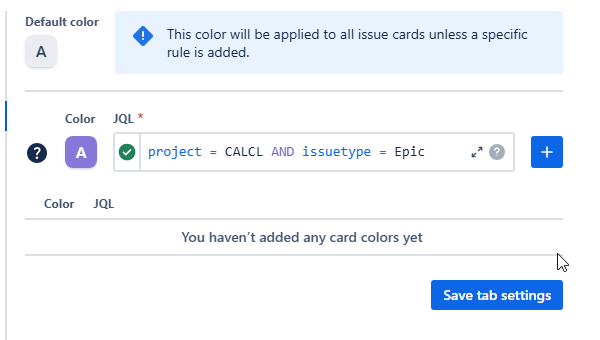
You can prioritize your color rules by dragging them up or down the list. Issue cards will display the color associated with the first rule they match.
Once you’ve added all the required rules to Card colors tab, click Save tab settings.
Congratulations, you’ve added some color to your calendar!
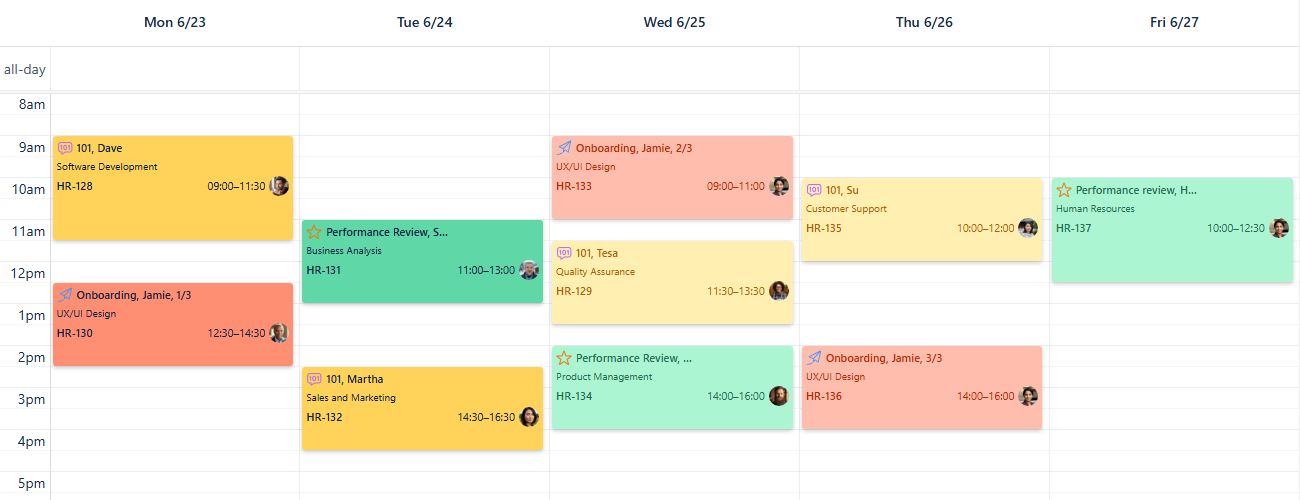
Coloring your cards - Color rules applied
Now it’s much easier to differentiate between the work items displayed on the calendar grid.
To familiarize yourself with the rules existing in another user’s calendar you can have a quick look at the Legend in the bottom of the sidebar on the right side of your screen:
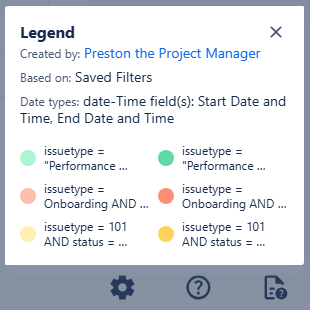
Coloring your cards - Calendar’s legend
Integrations
Info about Reminder for Jira.
External calendars
Info about integrating external calendars into your calendar.