.png)
Filtering your calendar
Instant filters
Our Calendar for Jira App provides an Instant filtering system immediately after you create your calendar. This user-friendly feature lets you easily display issues in your calendar based on common properties like assignee, status, issue type, and priority, without any prior configuration.
To get started:
Navigate to the right side of the header in the main calendar view.

Filtering your calendar - Instant filters
Click the funnel icon located between the View Selection and Share buttons.
Filtering your calendar - Accessing instant filters
Click on a property to view its available options.
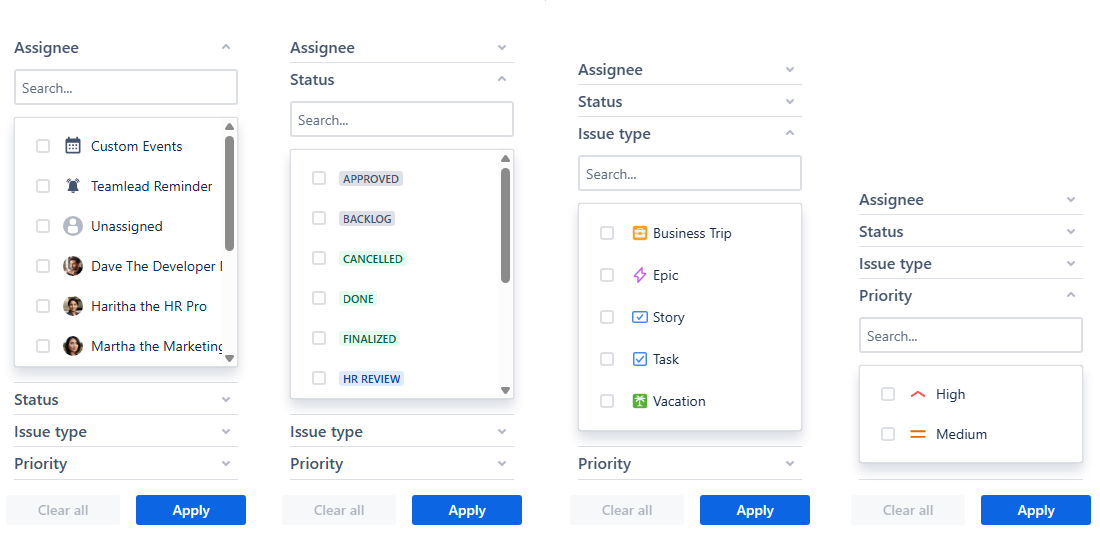
Filtering your calendar - Available options
As you can see, each property provides you with ready-to-use options to filter your calendar with. The search option is also available in case of a data-rich calendar to make it easier for you to find the required values.
Note: The options offered in these filters are based on the issues that are visible in your calendar. If you can’t find the needed setting even through the search option, check your calendar settings first.
Check the boxes next to the properties you wish to filter by. If you're looking for something specific, simply type it into the search bar. You can choose multiple options at once.
Filtering your calendar - Instant filters
Click Apply once you've made your selections. Your calendar will instantly show the filtered issues.
Note: Applying instant filters within different properties applies an AND condition.
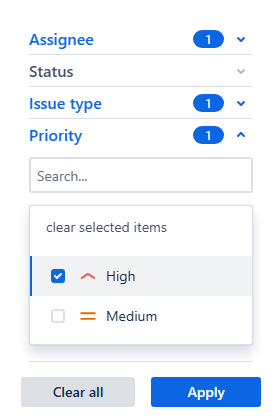
Example: in instant filters, currently chosen properties are:
Issue type: Epic;
Priority: High.
The issues that satisfy the requirements of both of these active filters will be visible on your calendar.
JQL: issuetype = Epic AND priority = High
Applying instant filters within the same property will apply an OR condition.
Example: in instant filters, currently chosen properties are:
Issue type: Epic;
Issue type: Task.
Your calendar will then display the issues of either Epic or Task issue type.
JQL: issuetype IN (Epic, Task)
Quick filters
For users requiring more precise filtering than our Instant filters provide, our Calendar for Jira app features Quick filters. This advanced system allows you to create custom filters using JQL queries, which is particularly useful when needing more detailed control over what's displayed. You can also combine these filters to refine your calendar view.
For the sake of the example, the JQL provided here are relatively simple, and similar filtering could be achieved through instant filters. So what is the point of using quick filters at all?
Unlike Instant filters, which offer predetermined filtering options based on common work properties such as assignee, issue type, or status, Quick filters provide significantly more flexibility. They work with any query supported by JQL.
This means if your projects leverage a variety of custom fields—like work locations, departments, specific clients, or marketing task categories—you can create tailored Quick filters to precisely narrow down your view. This allows you to slice and dice your calendar data exactly how you need it, providing great insights into your team's activities.
Here's how to set up Quick filters:
Navigate to the left side of the header in the main calendar view.

Filtering your calendars - Quick filter row
Click the + Add quick filter option located beneath the Zoom menu. You can also reach these settings by going to the Settings of your currently active calendar and selecting the Quick filters tab.

Filtering your calendar - Accessing quick filters

Filtering your calendar - Quick filters settings
Provide a name for your filter and then enter the JQL that will define its criteria. Ensure the query is supported by JQL.
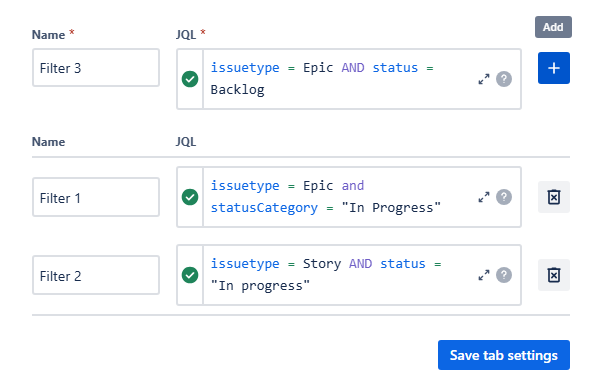
Filtering your calendar - Quick filters settings
Click the + button to add this filter to your list of Quick Filters.
Once you've configured all your desired Quick filters, ensure they are applied to your calendar by clicking Save tab settings.
The newly created filters will appear as clickable buttons above your calendar. Click a button to turn the filter on, and click it again to turn it off. You can activate multiple filters at the same time.

Filtering your calendar - Quick filters on the filter row
Note: Activating more than one quick filter applies an AND condition. Consequently, only issues that satisfy the requirements of both (or all) currently active filters will be visible on your calendar.
Example: in Quick filters, currently chosen filters are created with the following queries:
issuetype = Epic;
issuetype =Task.
Your calendar will then display no issues, because there can be no issue with two issue types. (JQL issuetype = Epic AND issuetype = Task).