Overview
You can collect customer's feedback regarding their satisfaction with your service.
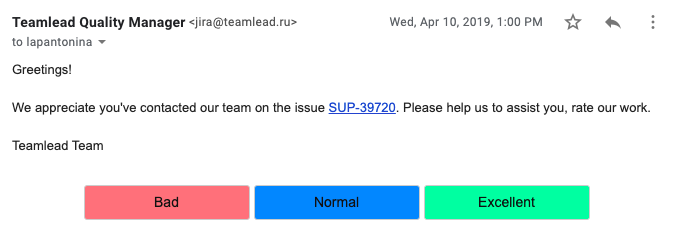
Set up the feedback request notification to be sent on the particular workflow transition. You can set up the notification text, question(s) and options to select for each one. Here is the example of the feedback message:
Setting Up
Go to HelpDesk Administration menu/ Customer Satisfaction.
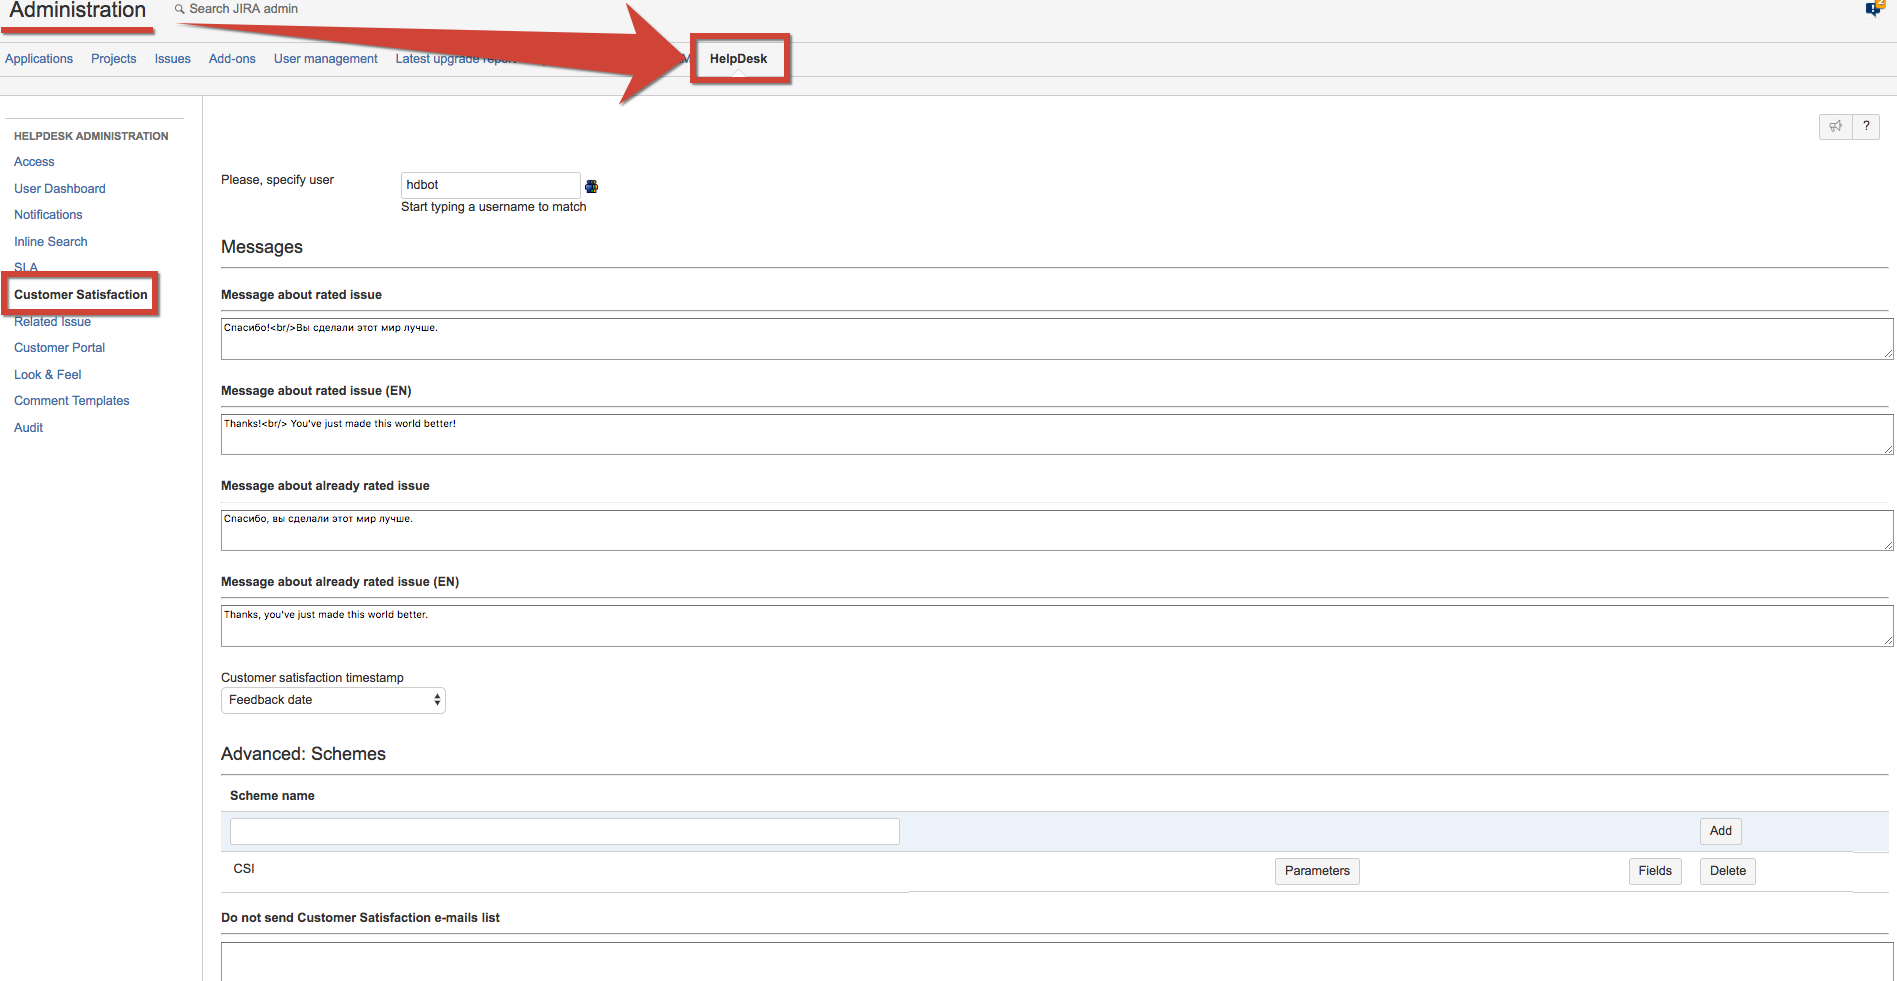
User
Specify user with administrators permissions on behalf of whom issues will be edited with survey's results.
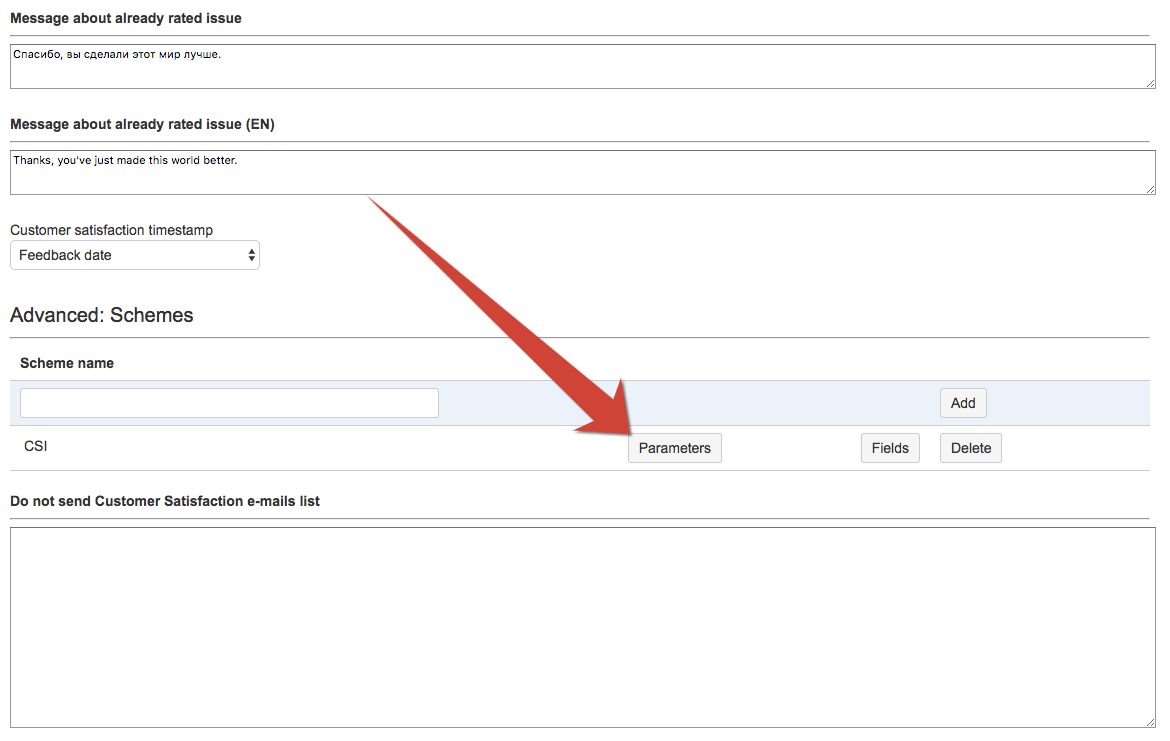
Messages
Input messages which will be shown to users after completing the survey:
|
Field |
Description |
|---|---|
|
Message about rated issue |
Create a message for users to be shown after the survey is finished on system's default language |
|
Message about rated issue (EN) |
Create a message for users to be shown after the survey is finished on English (is sent to users who's profile language is not system's default language) |
|
Message about already rated issue |
If the issue is already rated and rating fields were not discarted by post-function during transaction, this message is shown to user on system's default language |
|
Message about already rated issue (EN) |
If the issue is already rated and rating fields were not discarted by post-function during transaction, this message is shown to user on on English (for users who's profile language is not system's default language) |
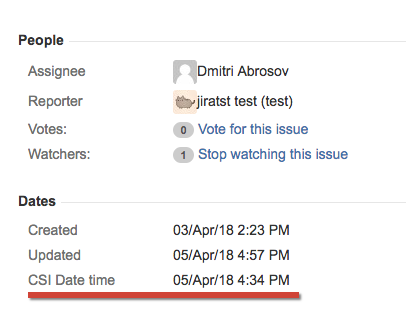
Customer Satisfaction Timestamp
To add the field with the date when customer answered the survey select Date or Date TIme custom field from the dropdown in HelpDesk administrator menu / Customer Satisfaction:
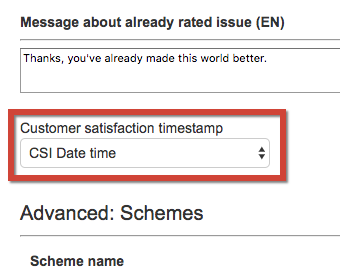
This field will be filled in automatically in the Dates section at the right when the customer leaves the feedback.
Advanced
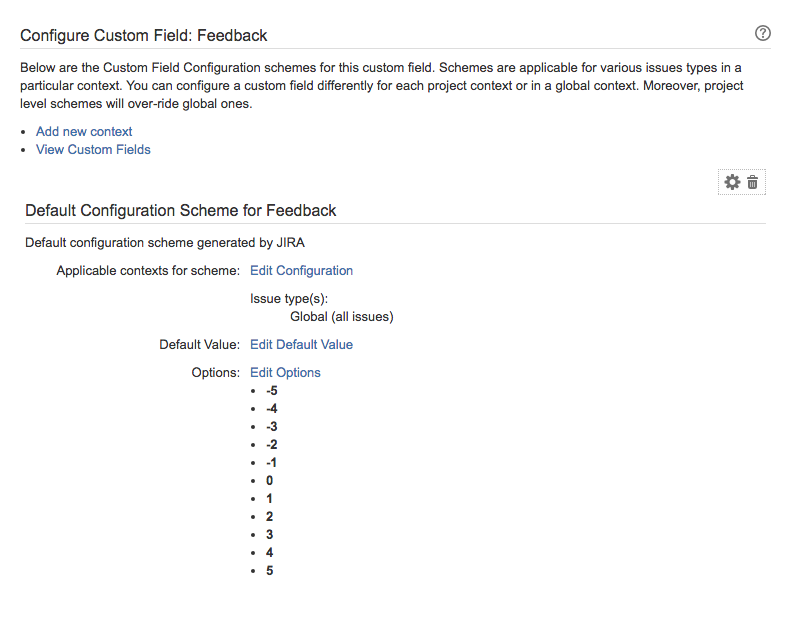
Custom Fields
Create custom fields to store the results of customer's feedback. These fields could be Select List (single choice) type for one mark rating and Text or HTML types for comments. If you have several ratings create custom fields for each of them. Add those fields to the scheme in HelpDesk administration / Customer Satisfaction, then use this scheme in Post-Function 'Sending Feedback to Reporter'.
In configuration of Select List (single choice) field create options which would be the marks (it could be numeric rating or text like 'excellent', 'good', 'bad' - whatever you want):
The reporter will receive email with feedback link when Post-Function 'Sending feedback to reporter' is set up.
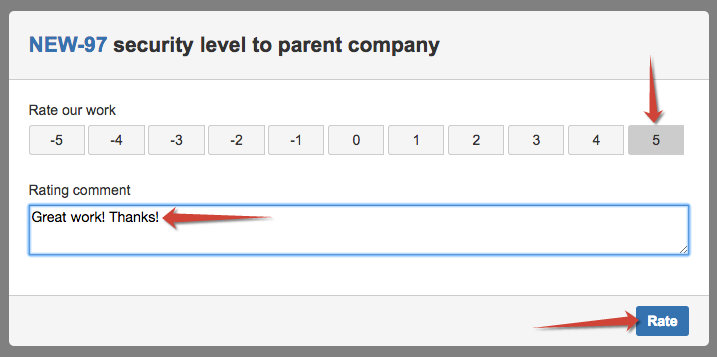
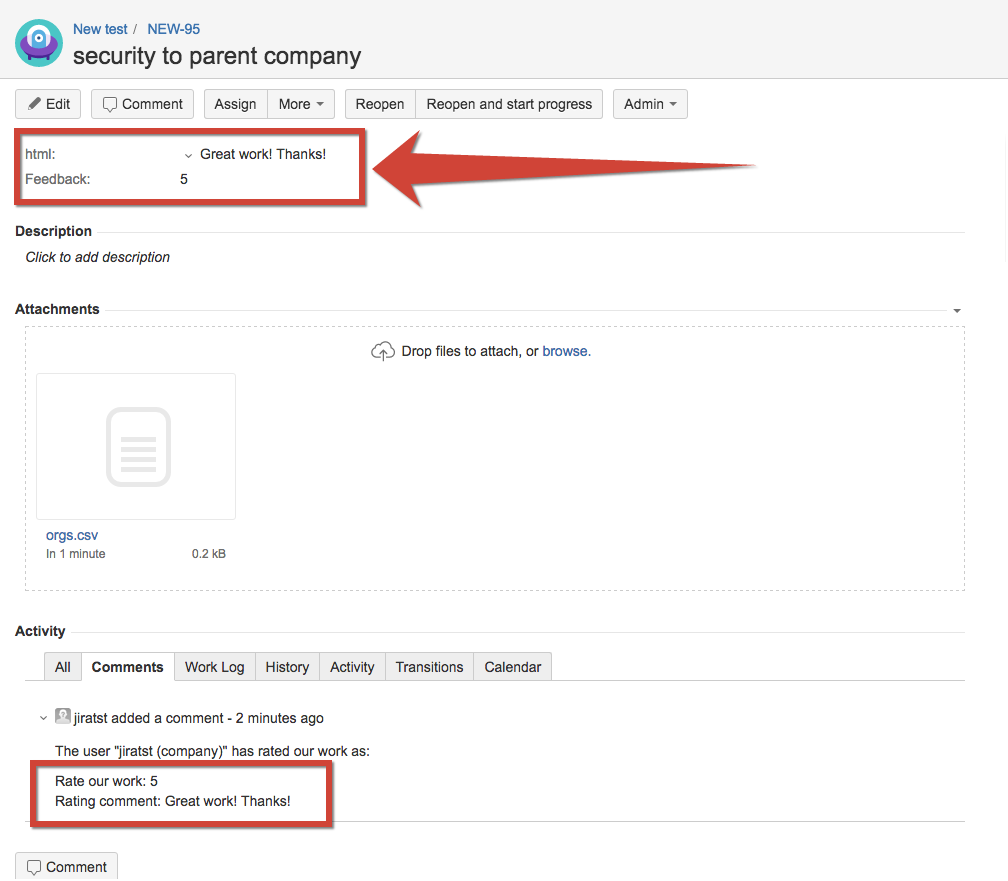
After the user (issue reporter) submits the survey the issue updates and rating with comment will be saved in selected fields above:
Schemes
You can create different schemes for customer satisfaction surveys and use them in different workflows or in different transitions.
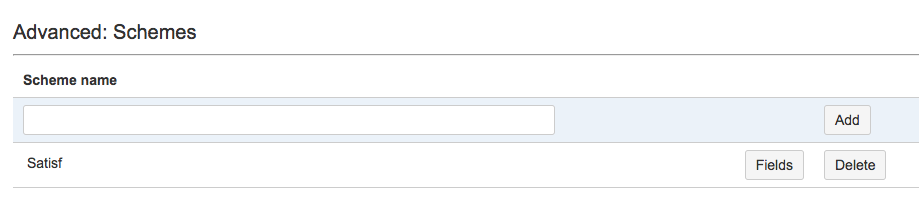
Add new scheme and click on "Fields" button to add custom fields to it.

|
Item |
Description |
|---|---|
|
Attribute name |
This name will be displayed as a field name in the survey (default system language) |
|
Attribute name (En) |
This name will be displayed as a field name in the survey (if the system language is English) |
|
Jira custom field |
Select a field created for the customer satisfaction from the dropdown list of available fields (Select Single choice, Text or HTML types) |
|
Option for which the comment will be required |
When Select (single choice) field is selected you can require a comment for one of the field's options. Don't forget to add a Comment (Text or HTML field) to the scheme in this case. |
|
Options |
Open the dialog window to customize the options (only for Select fields). See below. |
|
Delete |
Delete the attribute from the scheme |
Customize Options
You can set the colors for each option in the feedback letter and use the colors in the gadget.
Click on "Options" button to open the dialog:
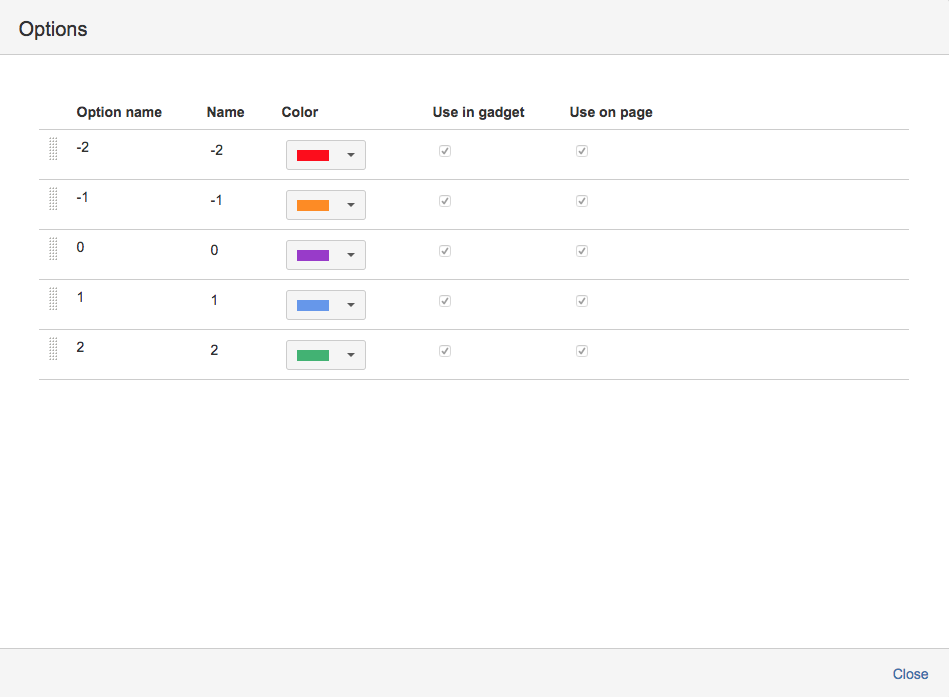
|
Item |
Description |
|---|---|
|
Option name |
Option name as it is saved in the custom field |
|
Name |
Create your own option's name to display it in the letter and gadget |
|
Color |
Select the color for the option |
|
Use in gadget |
When checked the selected color will be displayed for the option in the gadget (see below) |
|
Use on page |
When checked the selected color will be displayed for the option in the feedback lett |
Define when the survey should be taken
Go to Administrator Menu/ Issues/ Workflows and select workflow to set post-function and press Edit:
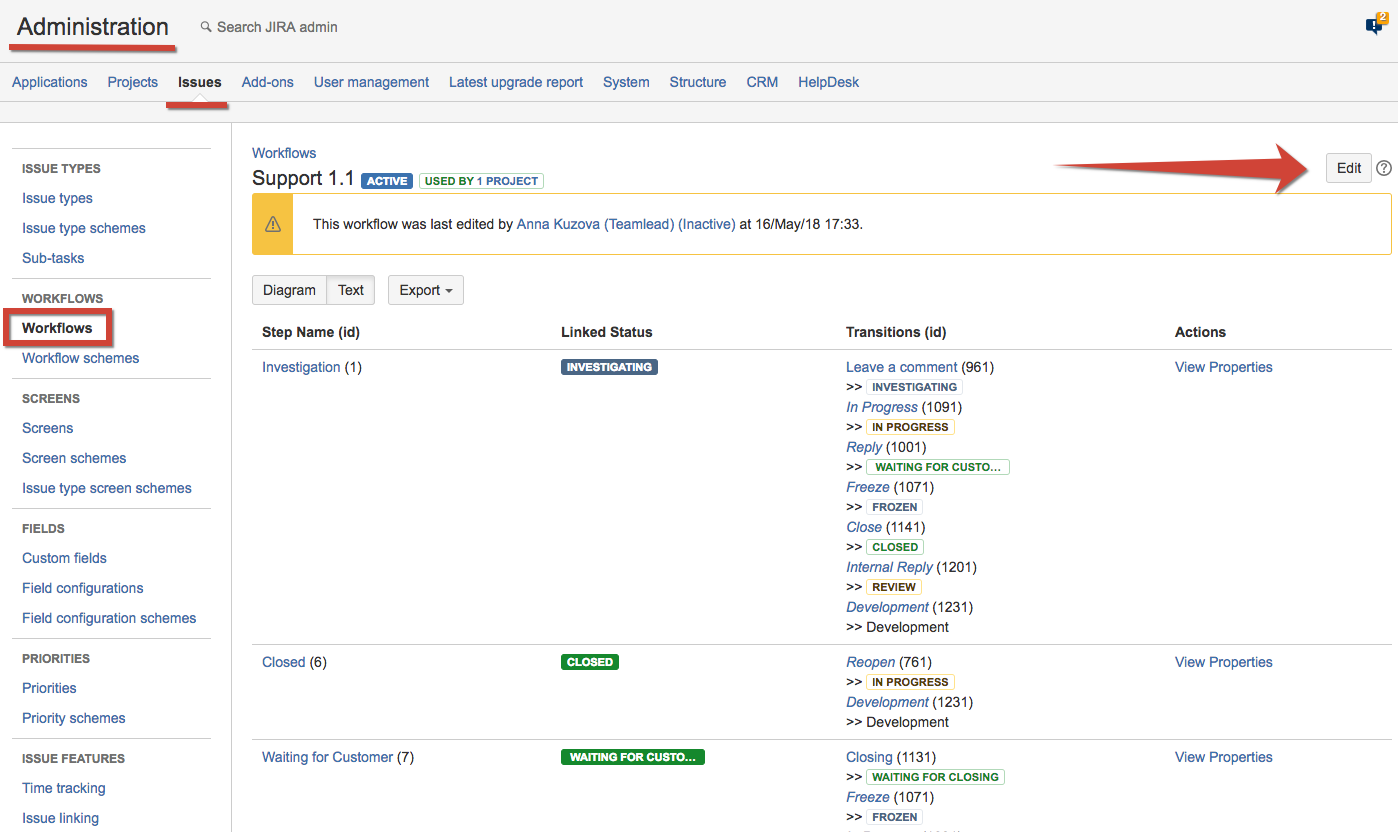
Select the transition and add post-function 'Sending feedback to reporter'.
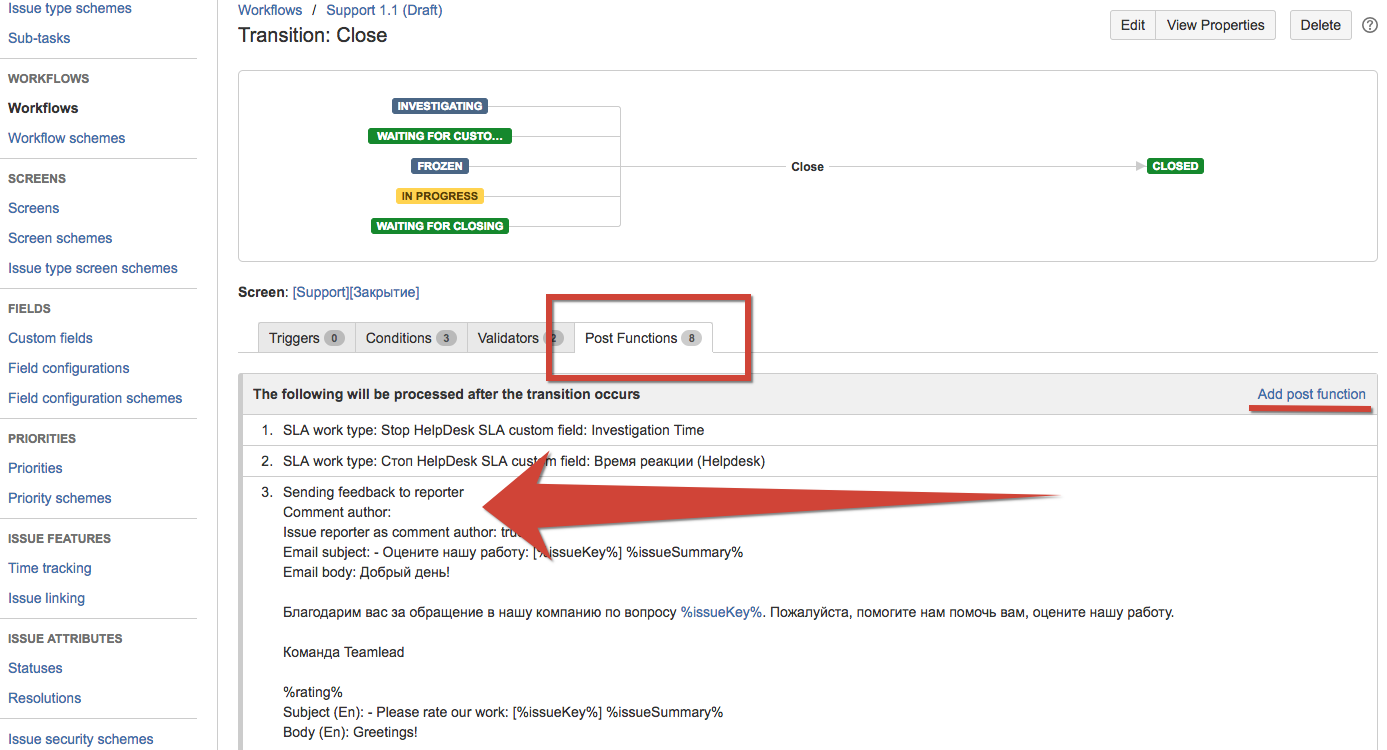
This post-function can be edited.
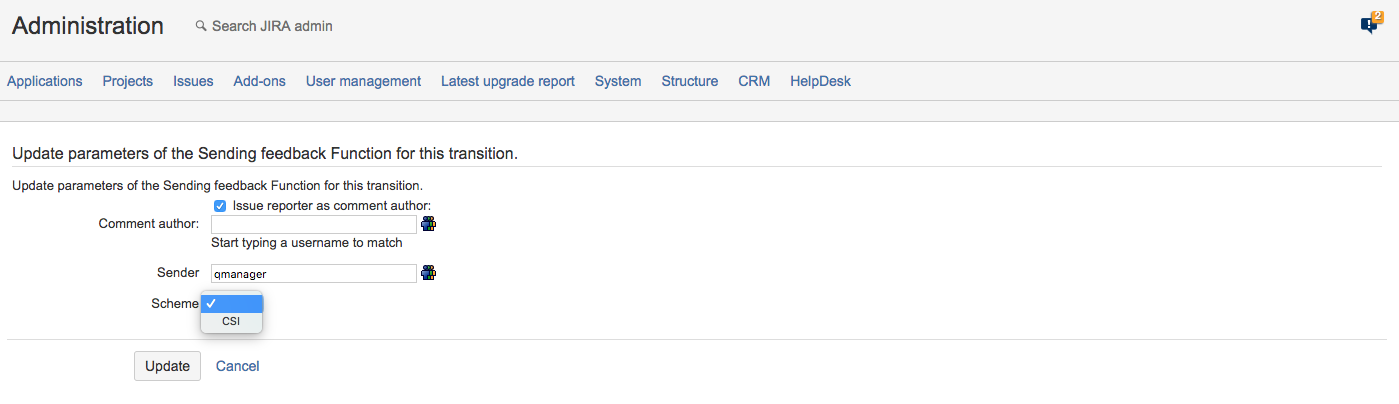
Post-function's parameters
Issue reporter as comment author checkbox enabled makes issue reporter the author of issue changes after customer satisfaction is added. The users (reporters) should have edit issue permission.
Comment author is a user picker field to select a jira-user who will be set as an author of changes made in issue after customer satisfaction is added. The user should have edit issue permission.
Sender is User picker field where you can select jira-user who's name will be displayed in Sender e-mail field (From). If no user is selected, e-mail will be sent from 'Robot Inspector'. Anyway sender's e-mail will be as set in System/ Outgoing mail.
Scheme. Select a customer's satisfaction scheme from dropdown list of schemes created in HelpDesk administration / Customer Satisfaction Survey
How to edit email's Scheme
To adjust a Scheme you just need to Go to HelpDesk Administration menu/ Customer Satisfaction and click Parameters button next to the created scheme.
In the Parameters Edit screen you can type email's Subject and Body in your default system language and in English. The email will be sent on language set on user's profile.
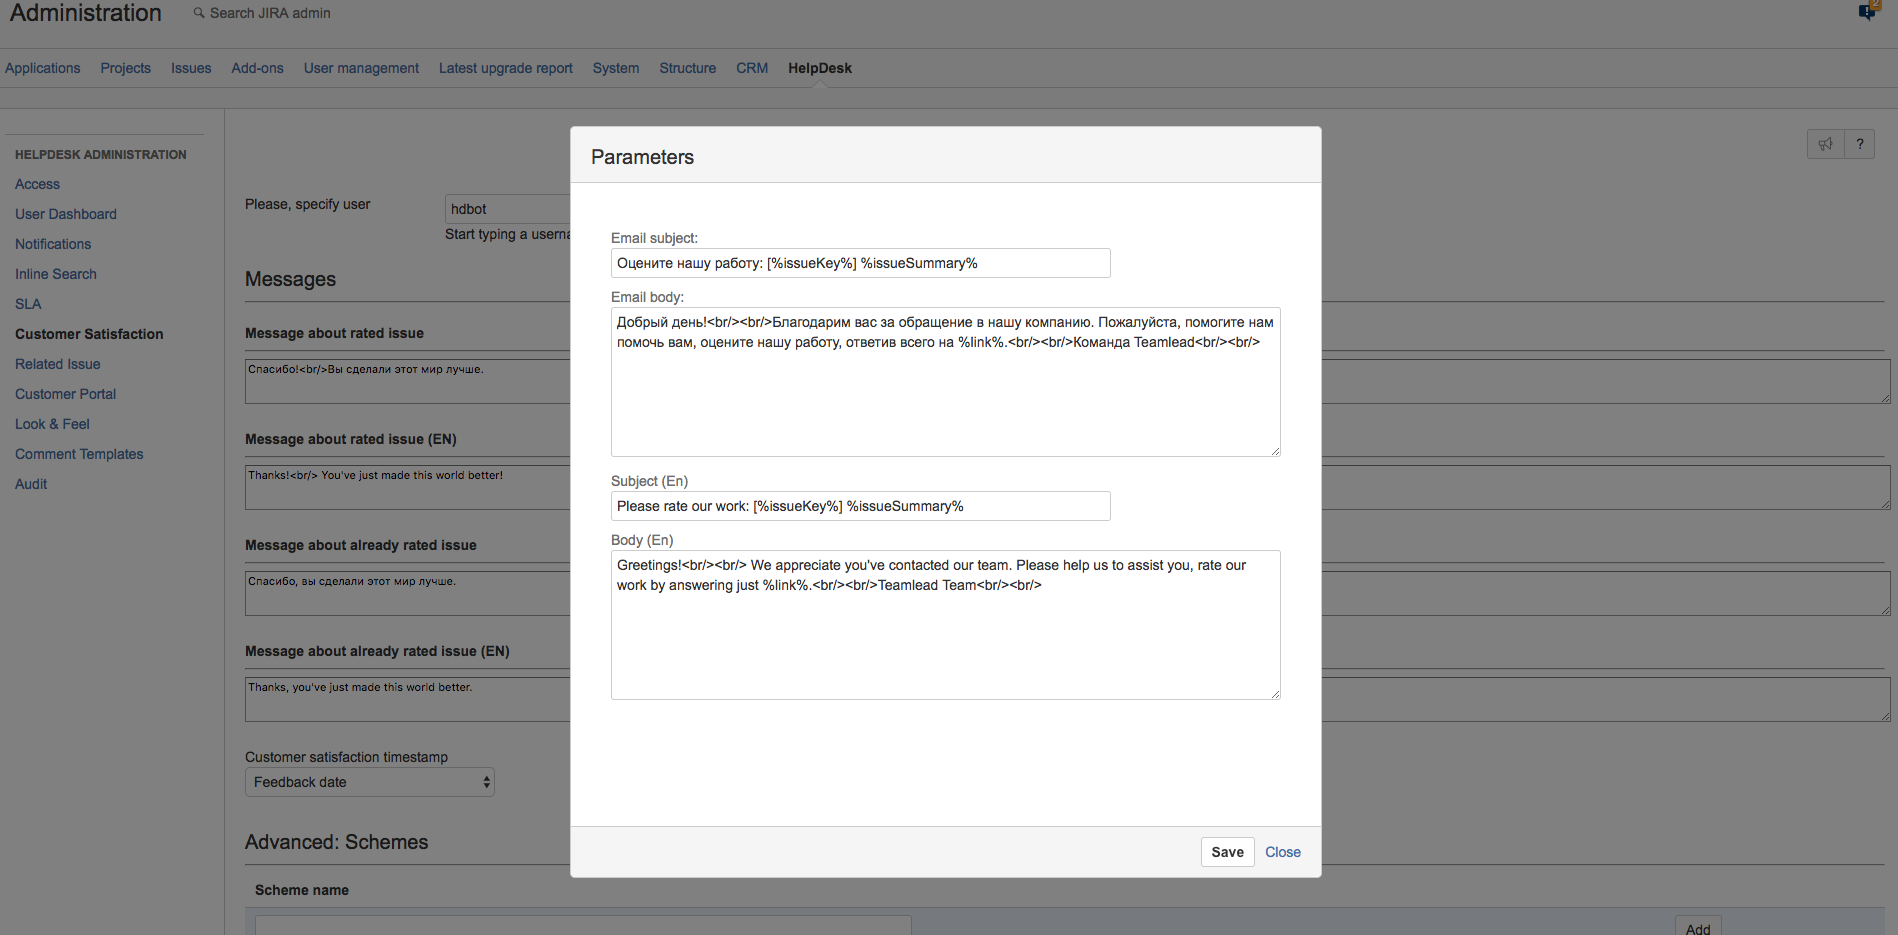
Starting from 2.1.20 app version, you can add a custom text as a link to CSI page. Instead of predefined %link% variable ("more questions" text) suggested before, use the following template to add your own text link:
<a href=”%link%”>Your Link Text</a>

→

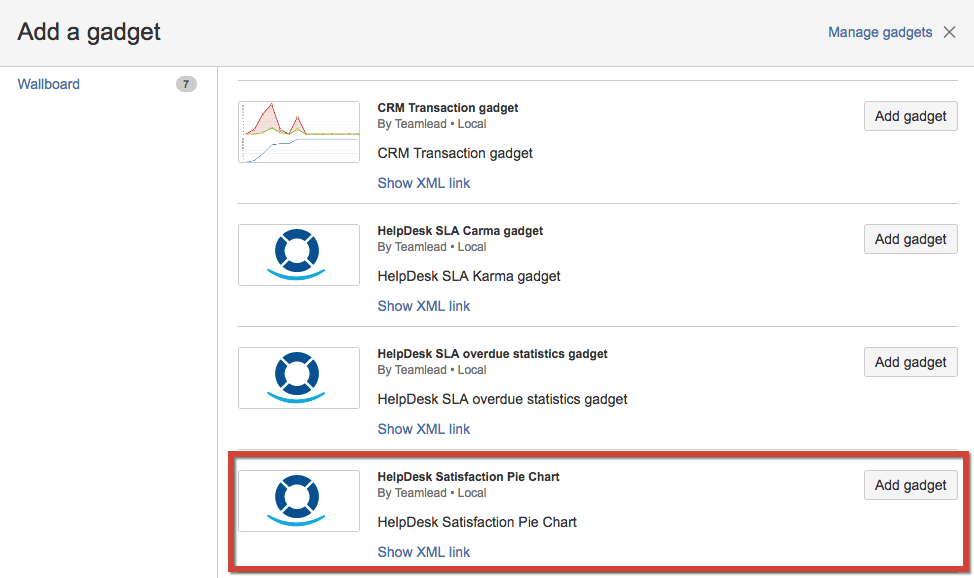
Customers Satisfaction Gadget
You can create HelpDesk Satisfaction Pie Chart Gadget based on received data from customers.
For example:
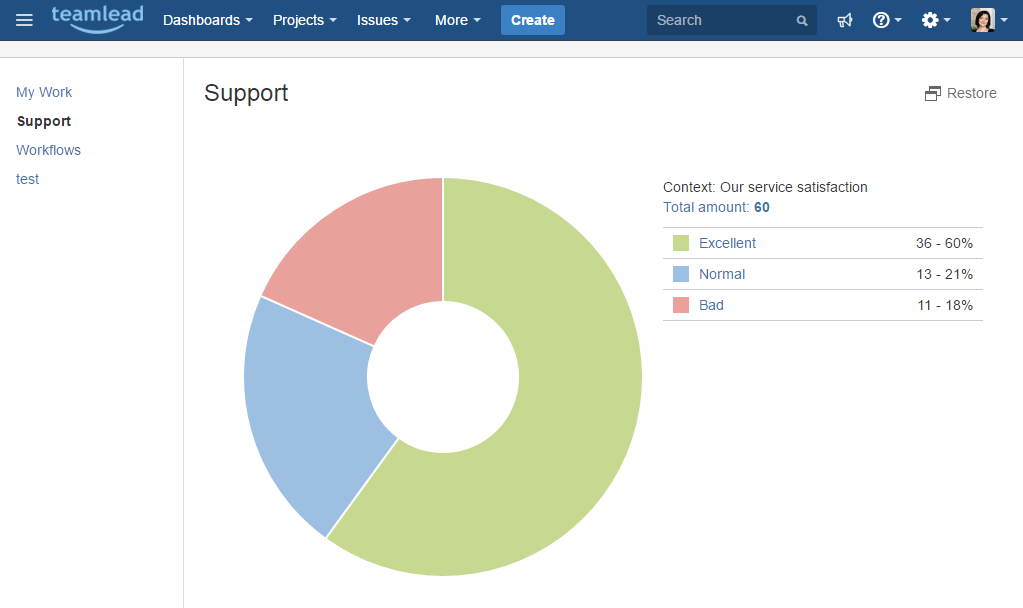
Because of rounding, totals can not add up to 100.