.png)
Use Cases
Personal Calendar
Personal Calendar
Use case description: This calendar supports individual users in managing their personal work tasks and reminders. It’s designed to help team members organize internal responsibilities, small tasks, and recurring activities that don’t require full Jira workflows. Items can be color-coded and filtered for personal productivity, and users can create private non-Jira events for added flexibility.
Primary Actor: Individual team member.
Calendar Shared With: Private or optionally shared with manager or team.
This manual guides you through setting up a Personal Calendar using our Calendar for Jira app. Its primary goal is to help you consolidate your individual tasks and reminders from across all your projects into a single, unified view. Since the calendar's purpose is to gather all of your work in one place, a prior setup is not required.
Calendar Creation
Let's create our Personal calendar.
Navigate to our Calendar for Jira app through the Jira Apps menu.
In the right-hand sidebar, find the Create button within the Calendar section.

Personal calendar - Calendar creation
If you’re planning to share this calendar with your team, it would be wise to indicate your own name in the calendar’s name to help others locate it without trouble. Otherwise, go wild, this is your personal planning page!

Personal calendar - Giving a name
When specifying what the calendar is based on, you can select the JQL option. This allows you to create a calendar that displays issues based on any Jira Query Language statement. For example, you can choose to display all issues in which you are the assignee across all projects you have access to. As you type a name after the assignee property, the field will provide you with helpful suggestions.

Personal calendar - What it is based on
To avoid crowding the calendar with events spanning their entire duration, in this use case we selected Due Date as the Date field type of our calendar. That way it will be easier to locate the tasks which require more attention to complete them on time.
In the Layout settings of your Personal calendar, choose List View for the default view of your calendar.
Since it’s a personal calendar, it makes sense to keep the weekends visibility on and select the widest grid time range possible—it will allow you to use the calendar for the past-working hours planning, if it’s required.
Personal calendar - Layout settings
The List view is designed to help you focus on the main details of your work items by providing a streamlined, uncluttered display.
Because of this, adding more fields to the Issue card fields won't affect this specific view. If you want to have quick access to more information, simply add the fields you're interested in to the Issue preview fields.
Personal calendar - Layout settings
Once you’re satisfied with the configuration of your personal calendar, click Create. You will be greeted with a view similar to this:
Personal calendar - First look
Let’s add clarity to this task list by utilizing the full functionality of our Calendar for Jira app!
Card Colors
Using color coding for the priority levels will make your calendar easier to read and help quickly identify task which require urgent attention. To add the color to the markers next to the each work item, navigate to the calendar's settings in the bottom of the right-hand sidebar, then go to the Card colors tab.
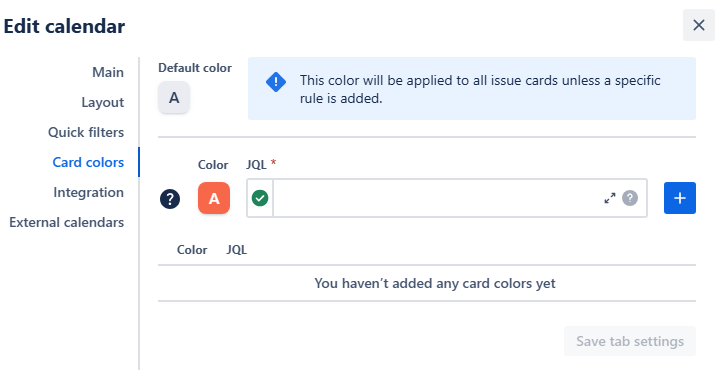
Personal calendar - Card color settings
Use JQL to associate color hues you’d prefer with the works' properties.
Example: Orange hue, JQL: priority = High
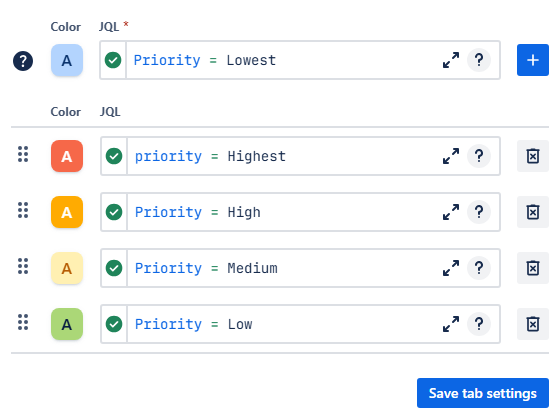
Personal calendar - Adding color rules
Click the + button to add each rule into the rule list. Once all rules are added, click Save tab settings. Upon saving, your calendar’s markers will go from grey to various hues depending on the priority level:
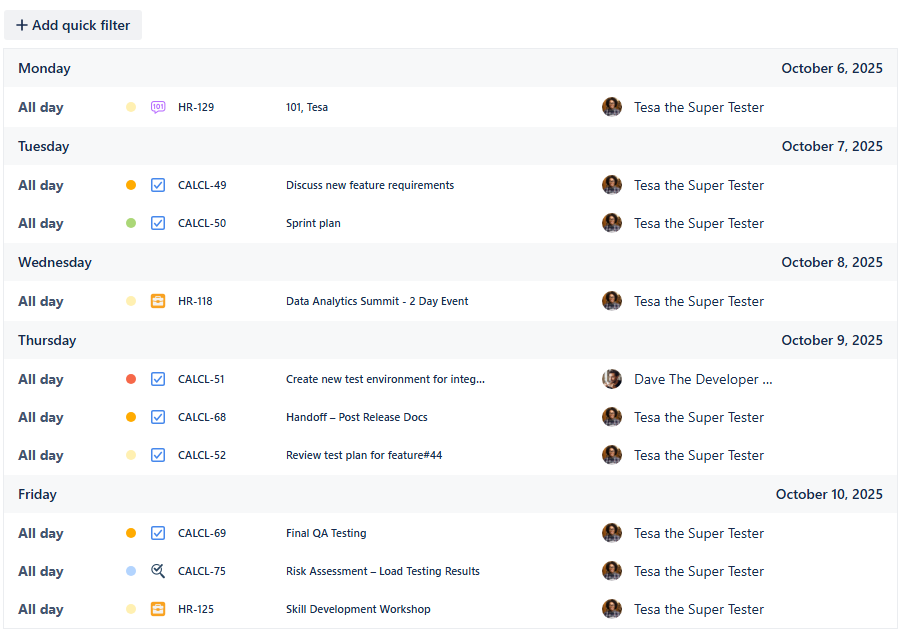
Personal calendar - Color rules applied
You can preview the color rules using the Legend button in the bottom of the sidebar:
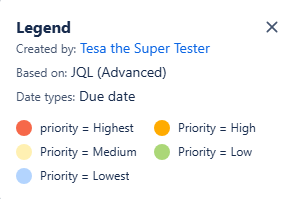
Personal calendar - Legend & Color rules
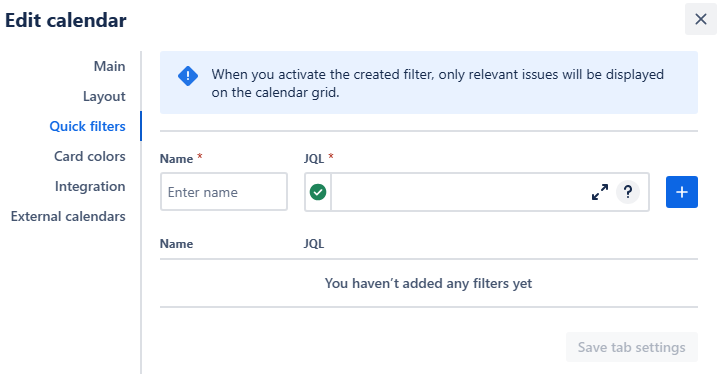
Quick Filters
Utilizing quick filters allows you to access work items' information based on any supported JQL query, enhancing personal productivity. Since your calendar aggregates work items from multiple projects, it’s crucial to create filters that help you segment that information. Another option could be tracking specific statuses related to your specialty—for example, status Reopened would be of a high interest to someone working in QA.
To set quick filters up, navigate to the calendar's settings and then to the Quick filters tab.
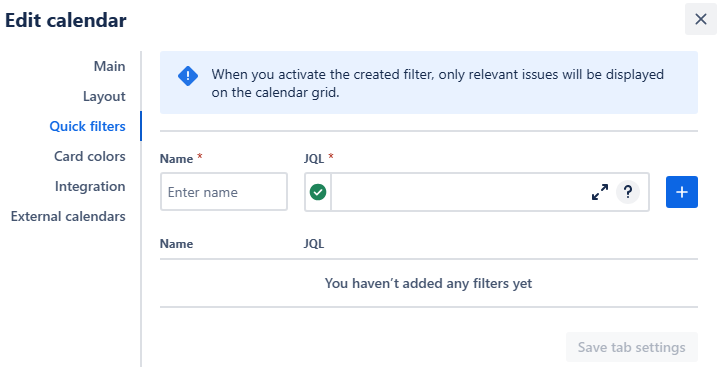
Personal calendar - Quick filters settings
Create filters for different projects your work items belong to, and add additional filters based on the status of your interest:
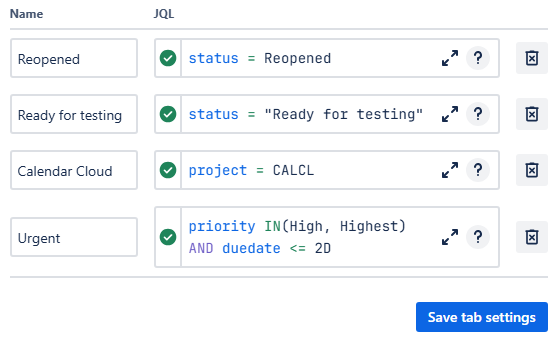
Personal calendar - Adding quick filters
Example: status = Reopened
Example: project = CALCL
Example: priority (High, Highest) AND duedate <= 2D
You might think it's unnecessary to create quick filters for Priority & Due Date combinations since this information is already visible on the calendar. However, the true value of these filters isn't just seeing the data—it's reducing clutter to focus on urgency. Creating these filters enables you to instantly narrow your view and efficiently concentrate on the tasks that need your attention right now.
Click Save tab settings after adding your filters. Here’s how they should look:
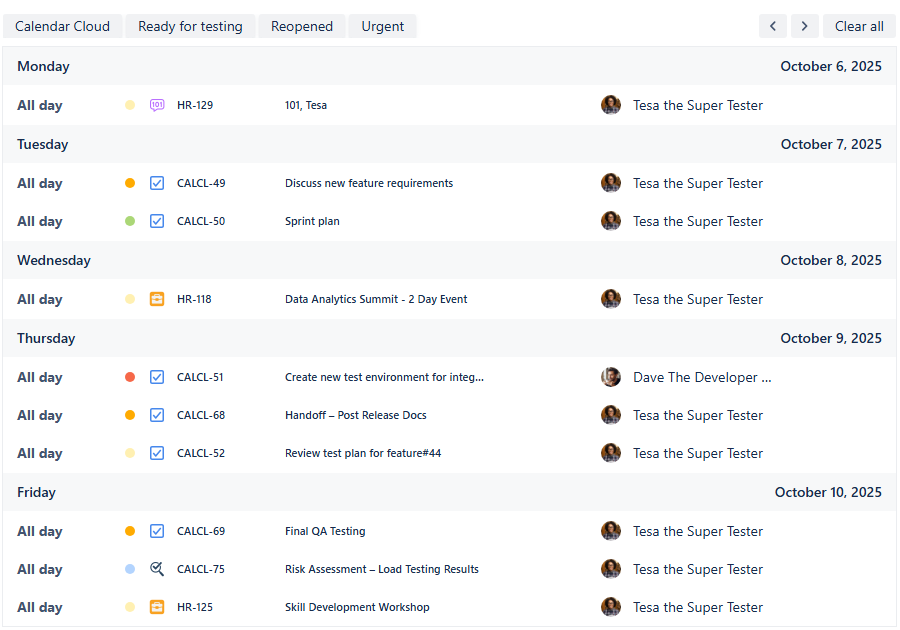
Personal calendar - Quick filters added
Click on one of the quick filter buttons to activate it. The button will go dark, indicating that the filter is active. Click it again to toggle it off. Activating multiple filters at the same time will activate an AND condition between these filters—only the items which adhere to both of the filters will be shown.
Connecting External Calendars
Integrate your Google or Outlook calendars for a complete view of your schedule. You can connect your corporate calendar or another personal calendar within our Calendar for Jira app to see how busy your day is all in one place.
First, obtain the iCal link (.ics URL) for your external calendar. You can find detailed instructions on how to obtain an ICS link here.
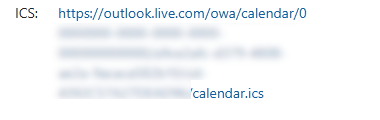
Personal calendar - Outlook calendar link

Personal calendar - Google calendar link
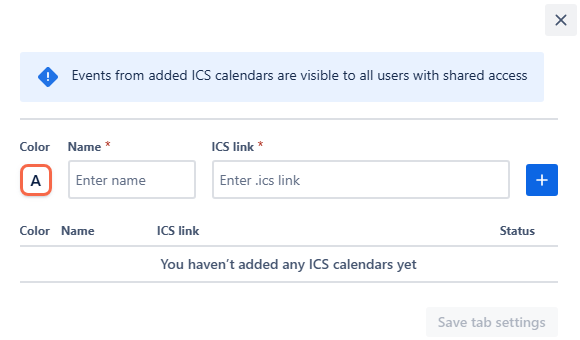
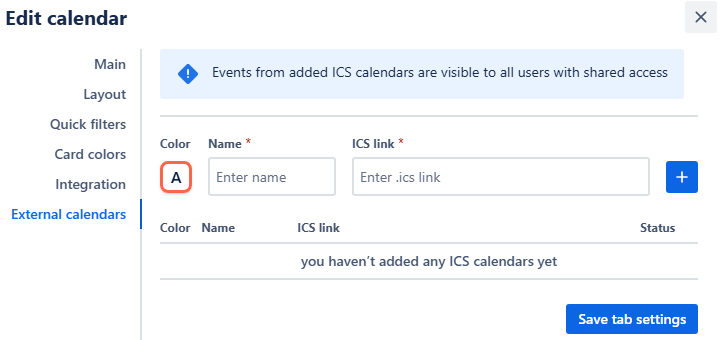
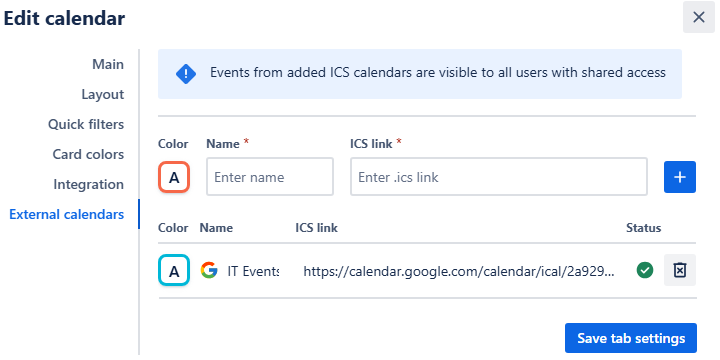
In your Calendar for Jira app, go to calendar settings and select the External calendars tab:
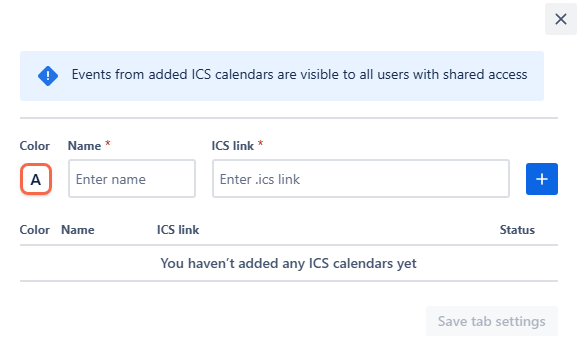
Personal calendar - Adding external calendars
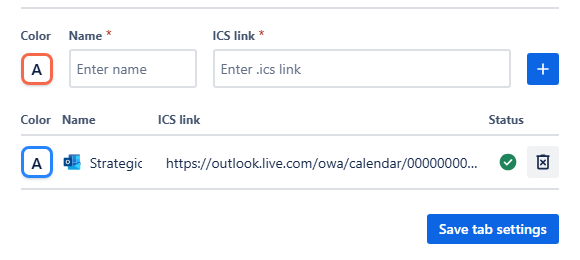
Choose a color for your external calendar, give it a name, and paste the iCal link into the ICS link field. Click the add + button.
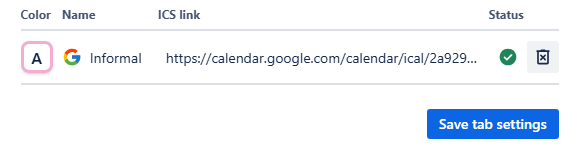
Personal calendar - External calendar added
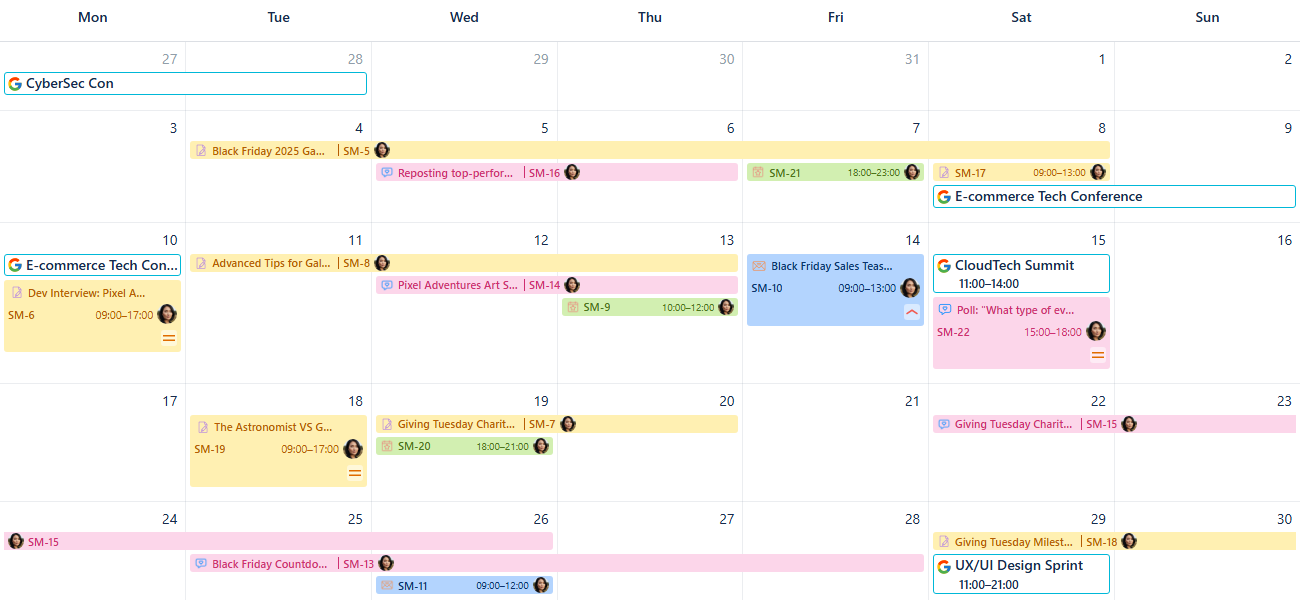
Click Save tab settings. The events from your external calendar will appear in the sidebar under External calendars:
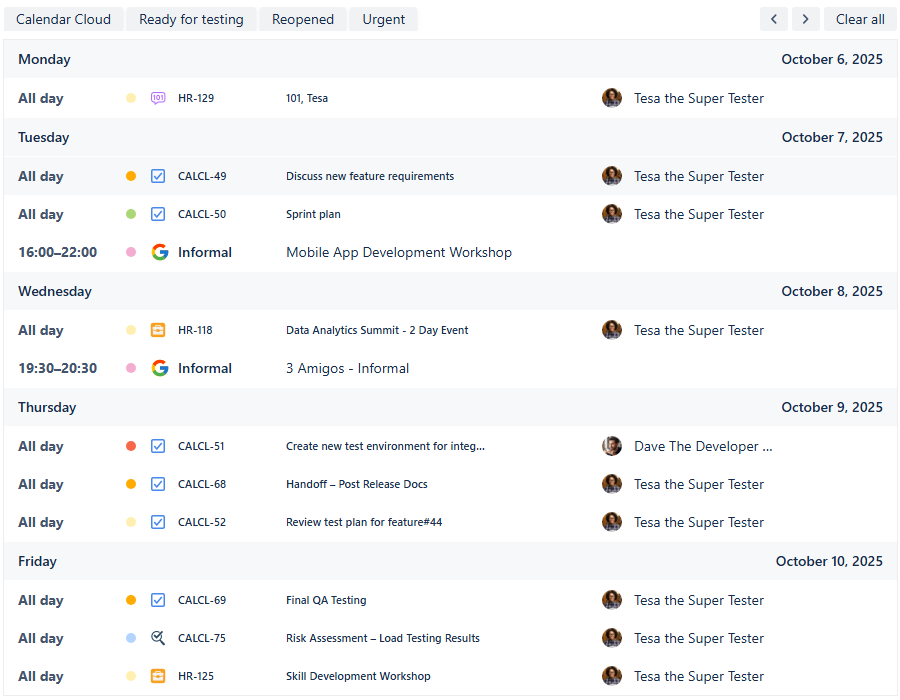
Personal calendar - External events added to the grid
Creating Non-Jira events
As the primary, and potentially sole, user of the Personal calendar, you'll find our Custom or Non-Jira Events (NJE) feature particularly useful. It allows you to plan your working hours, designate focused time for your own responsibilities, or even serve as a great personal reminder tool that doesn't require creating any work items. Plus, it can help you prioritize your wellbeing by pre-planning breaks!
To get started, head over to the Planning menu in the right-hand sidebar.
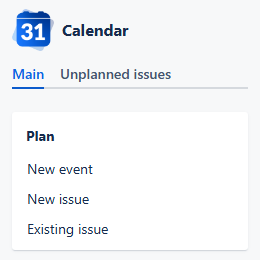
Personal calendar - Planning menu
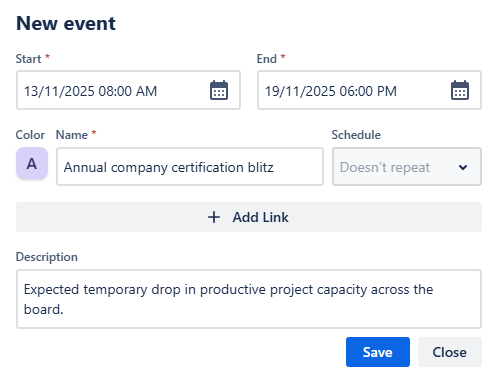
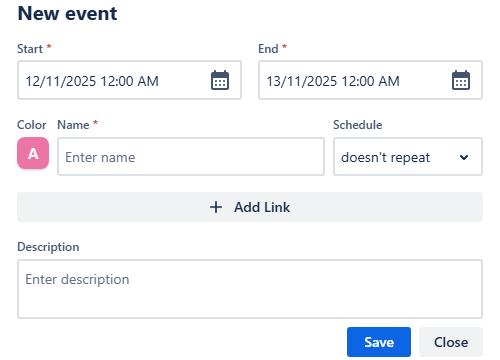
In there, click New event—it will prompt the event creation window to open:
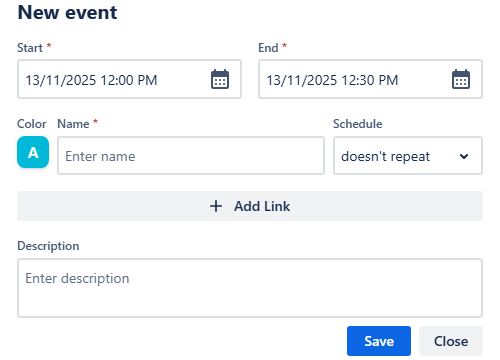
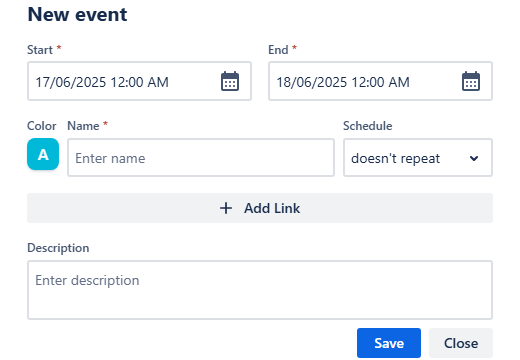
Personal calendar - New event window
Select the Start and End dates and time slots in their respective fields, pick a Color for your focus block. Enter a Name for the event, for example, Deep focus.
Choose if you want your focus block to not repeat, repeat weekly or daily. Upon using the reoccurrence option, another field will appear—Ends on. Mark when you’d like the reoccurrence to stop.
If you wish to add a URL to your focus block—it could be the link to the issue you’re going to work on—click + Add link to include it into your NJE. Provide details in the Description field:
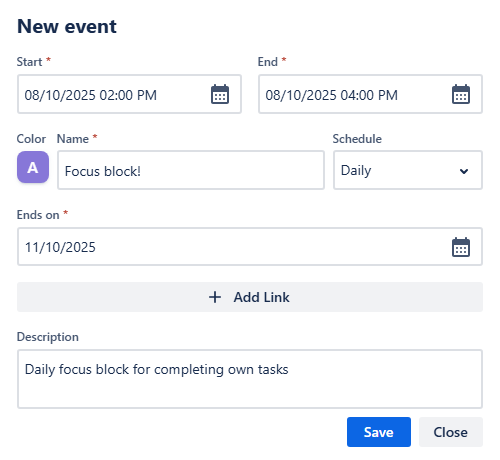
Personal calendar - Creating new event
Once you added all the info needed, click Save. Your focus block then should appear right in your calendar:
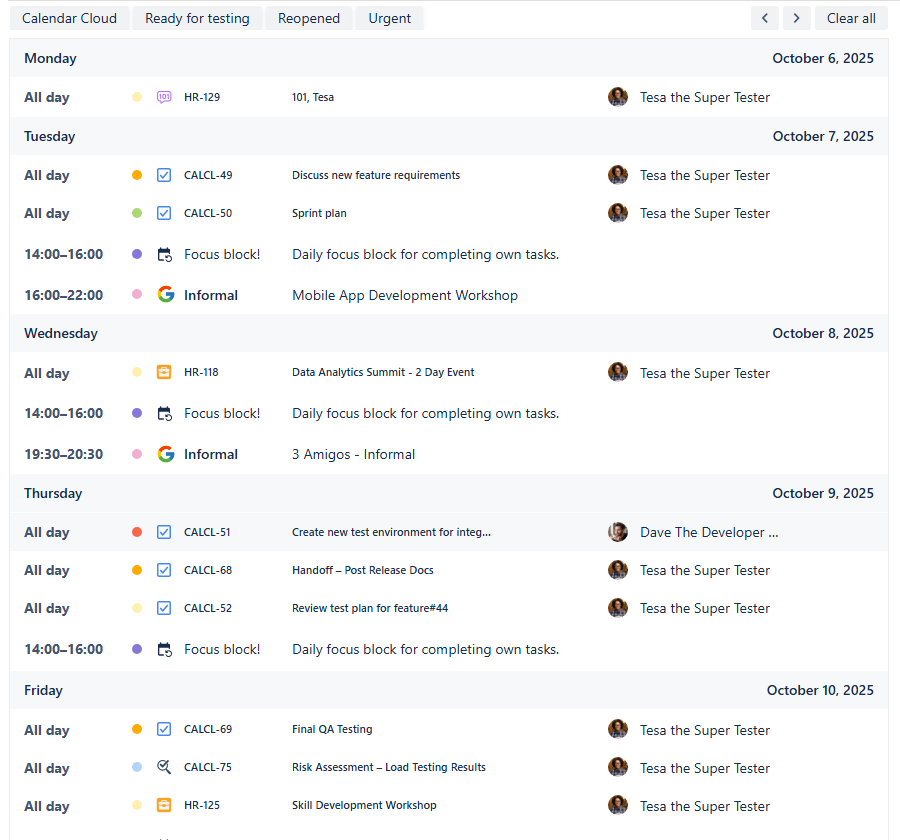
Personal calendar - Custom events added
Adding reminders
As integration feature of our Calendar for Jira app we allow the reminders from our Reminder for Jira to be displayed in your calendars. If you so happen to use two of our apps, here’s how to make them work together:
Head over to the calendar settings and then go to Integration tab:
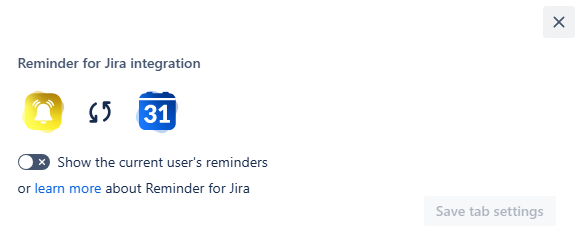
Personal calendar - Reminder integration
In there, switch the toggle on Show the current user’s reminders. Once you do that, it will change the color to green:

Personal calendar - Reminders toggled on
Click the Save tab settings. Your reminders should appear on your calendar list alongside your issues:
Personal calendars - Reminders added
Sharing your calendar
After customizing your calendar and ensuring everything works the way you’d like it to, you have an option to share it with your team to further enhance the collaboration process. To do so, follow these steps:
On the calendar interface, locate the Share button. It's positioned to the right of the Today link between the Search and Instant filters buttons.

Personal calendar - Locating the share button
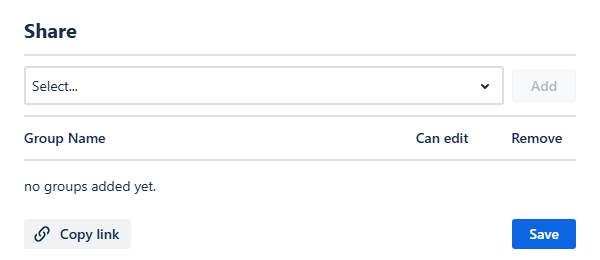
Click this button—it will prompt a share window to appear.
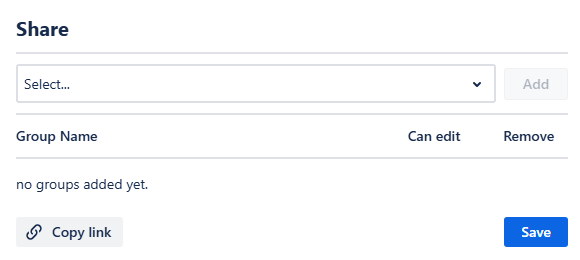
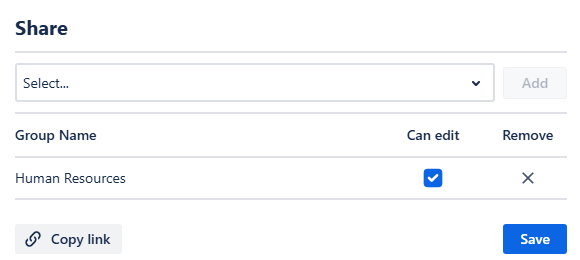
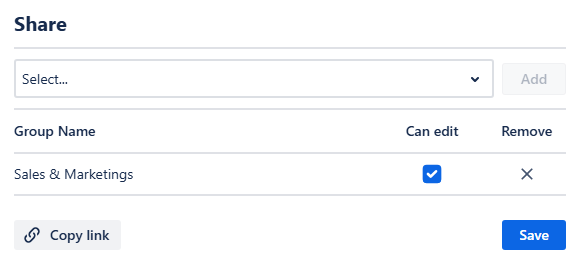
Personal calendar - Share window
In this window, you can select the user group that defines your team. Click Add, then choose if the people in your team should have the permission to make changes in your calendar by checking the box next to the user group’s name, if needed. Since this is your personal calendar, you are more than justified to leave permissions as View only.
Personal calendar - Adding your team
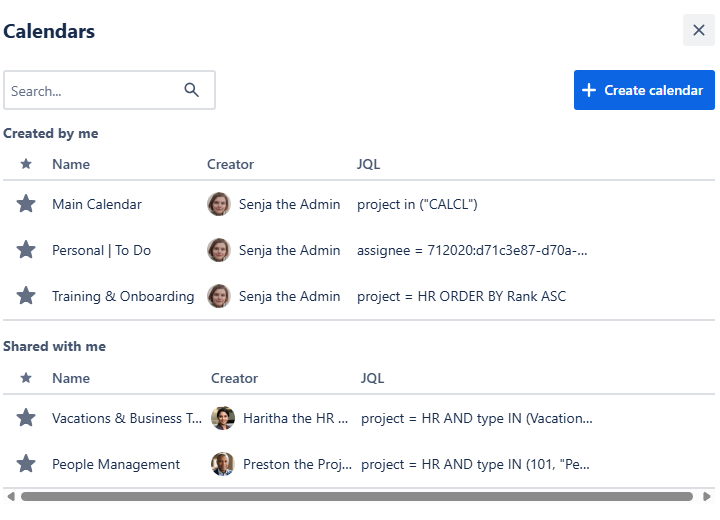
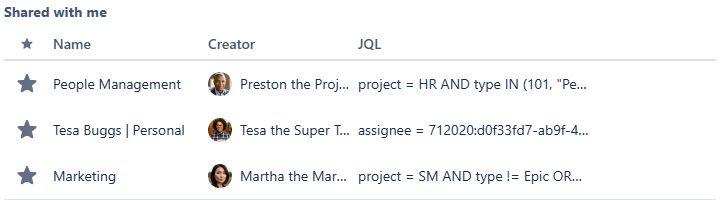
Finally, click Save. Your team will be able to find your calendar in the Shared with me section of the Calendars menu. Alternatively, you can share a link to your calendar’s page by clicking Copy link in the share window and sending it manually.
Personal calendar - Shared with me calendars
Project Management Calendar
Project Management Calendar
Use case description: The Project Calendar is used to track project tasks, including key deadlines, stakeholder meetings, and release dates. It gives project managers and leadership a comprehensive view of cross-team activities and timelines, which helps with better planning and clearer communication around project progress.
Primary Actor: Project Manager or Program Manager.
Calendar Shared With: Cross-functional teams, stakeholders, execs.
This guide provides a walkthrough for setting up a Project Management Calendar using the Calendar for Jira app. Its core function is to help you track project tasks and key deadlines. While the project setup steps aren’t mandatory, a quick review can help make the overall experience smoother.
Create relevant work types:
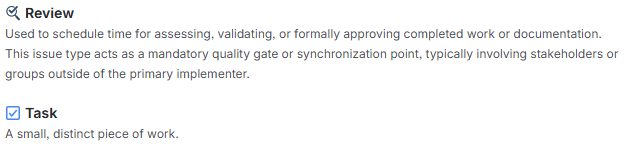
For this use case we opted to utilize two distinct work types: Task and Review. Tasks represent the discrete, actionable units of work required to produce the project's deliverables. They are the core activities that team members are assigned to complete.
Reviews represent the critical quality control and feedback cycles necessary to ensure the work (Tasks) meets the required standards, scope, and objectives before being deemed complete or moved to the next phase.
Project Management - Work types
Alternatively, you could integrate the review step directly into the Task workflow. Add an In Review status (status category In Progress) and use automation rules to reassign the task to the designated reviewer when it reaches that stage.
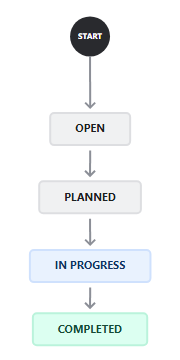
Set up workflows for issue types:
Both work types will follow a typical workflow for project tasks: Planned (status category To Do)→ In Progress (status category In progress) → Completed (status category Done). You can use a custom workflow or an existing one that follows this general progression.
Add Custom Fields (Optional)
To optimize your project calendar and improve its sorting and filtering capabilities, it's a good idea to use custom fields. A Project Manager relies on Team assignments to effectively manage workload across all groups. This visibility is key to accurately assessing team capacity and ensuring balanced effort toward achieving a single project goal. You can either utilize the built-in Team configuration provided by Jira, or create your own field:

Project Management - Team custom field
Now that the preliminary setup is complete, let’s build our project calendar!
Calendar creation
Open the Calendar for Jira app from the Jira Apps menu. In the sidebar, find the Calendars menu and click the + create button.
Project Management - Calendar creation
Provide a calendar with a concise name. Then, specify what the calendar is based on. Our goal is to track the tasks and reviews related to projects of our interest. Besides that, seeing our team members' availability would be also beneficial for accurate task assignment. Since our query is rather complex, a good choice would be setting up the calendar based on JQL:
(project = HR AND type IN(Vacation, "Business Trip")) OR (project = CALCL AND type IN(Task, Review))
This ensures the calendar displays only active project tasks and planned absences, keeping the view uncluttered by excluding completed items.
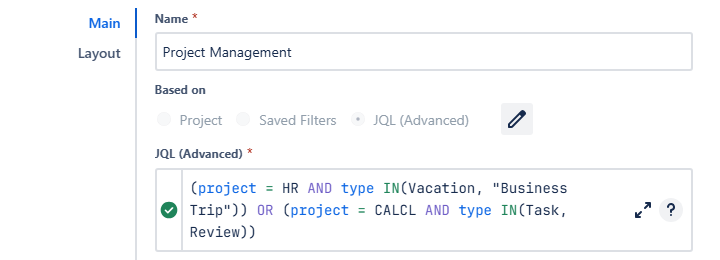
Project Management - Main settings
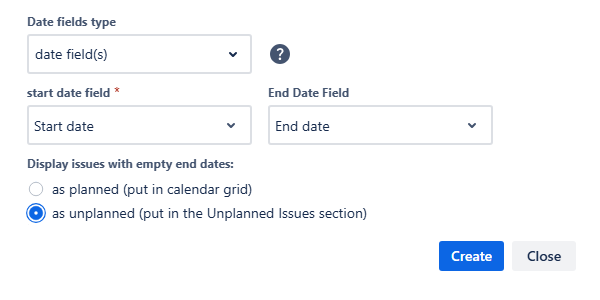
Select Date field(s) option for your Date type fields, and choose which fields will act as Start Date Field and End Date Field. Then, choose how the work items in which the End Date Field is empty will behave:
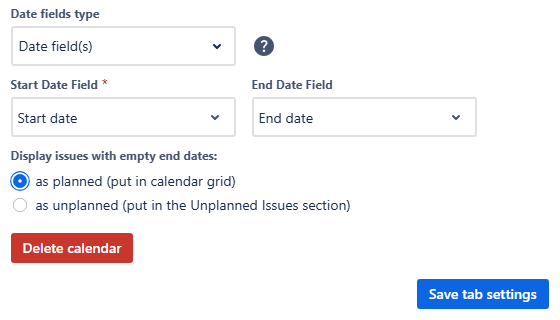
Project Management - Main settings
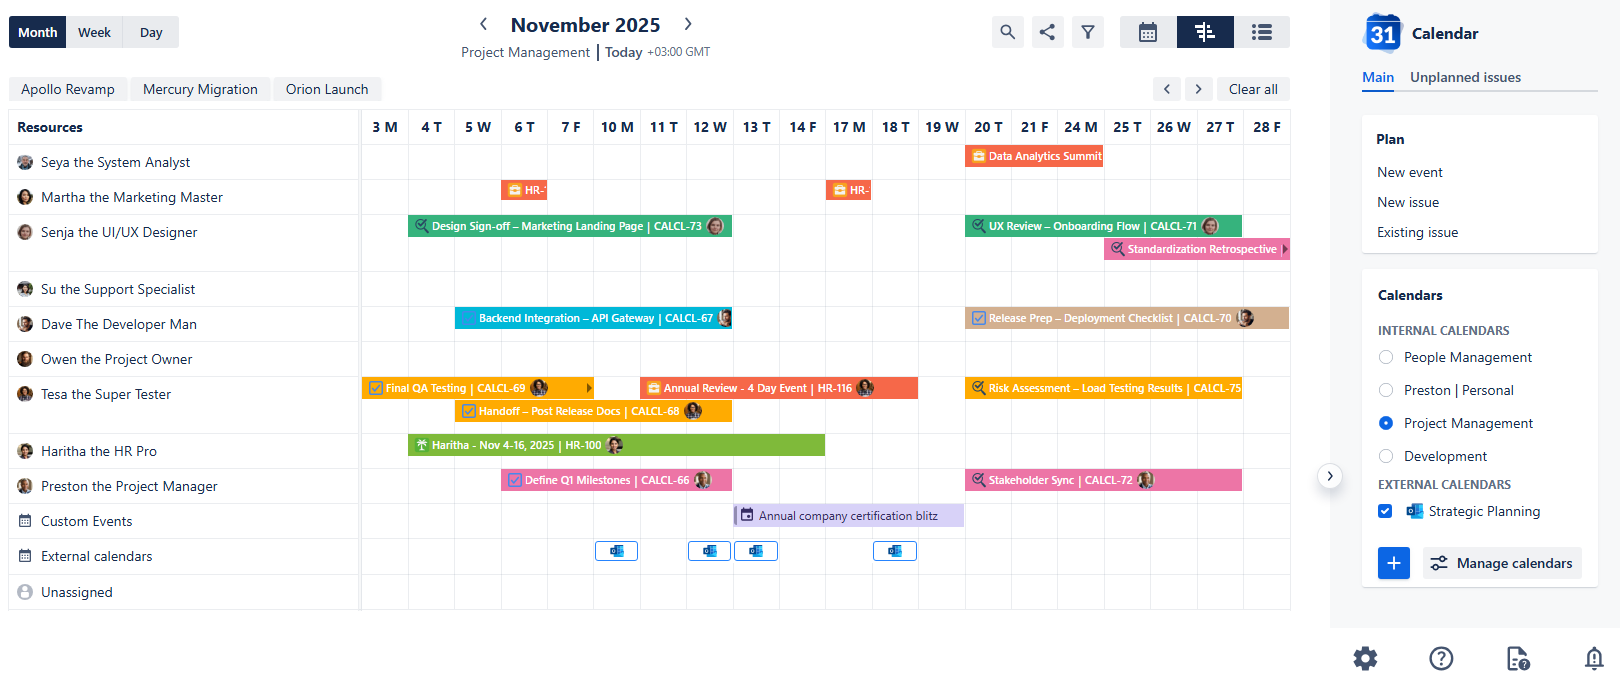
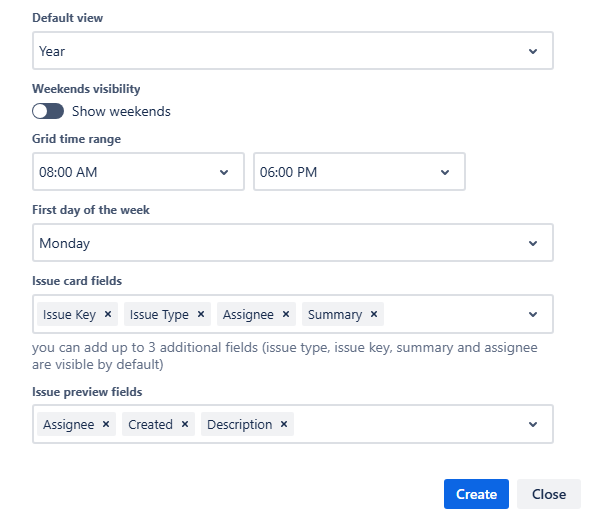
For the Layout settings, set the default view to Timeline Month View. This view is perfect for visualizing project tasks and resource allocation. Hide the weekends and set your Grid time range within the regular working hours.
Because the Timeline view prioritizes resource management, the issue cards are kept concise, showing only the default fields (issue type, key, summary, and assignee avatar). If you need more data visible on the calendar, configure the Issue preview fields to include any additional information.
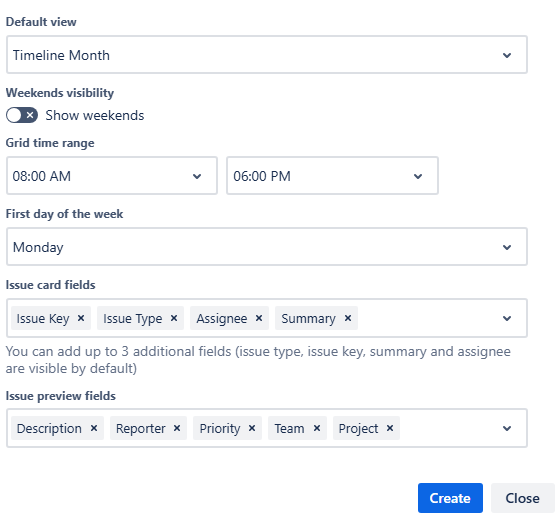
Project Management - Layout settings
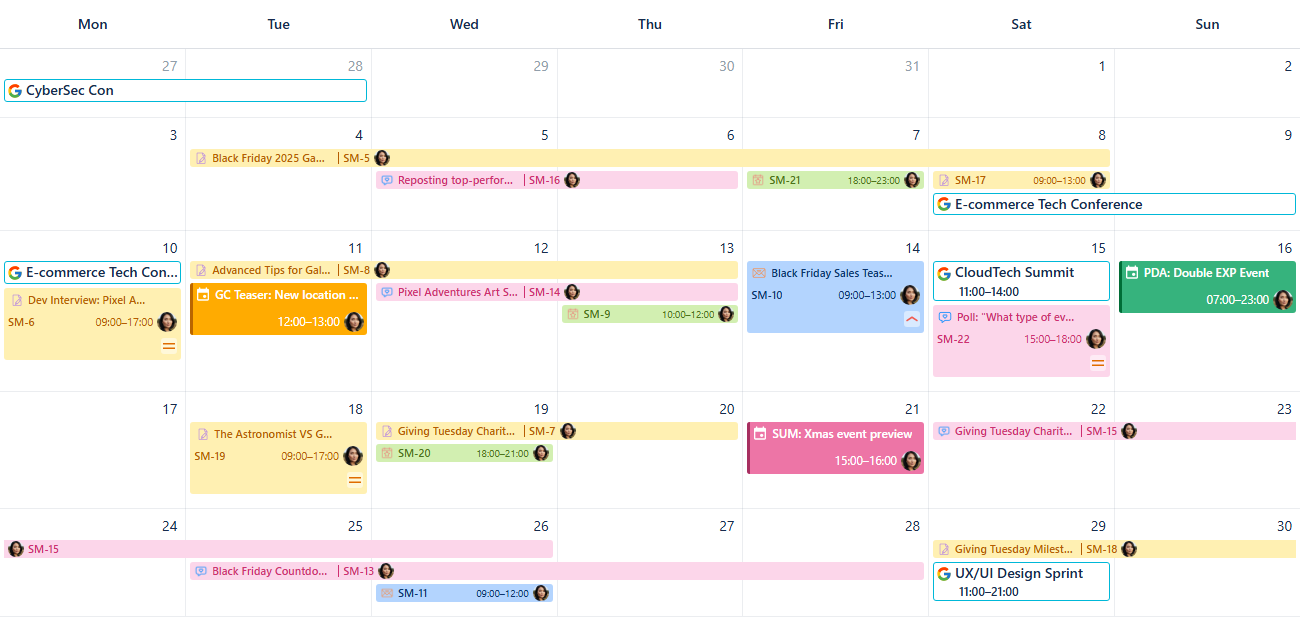
After confirming your settings, click Create. Have a look at your freshly made calendar:
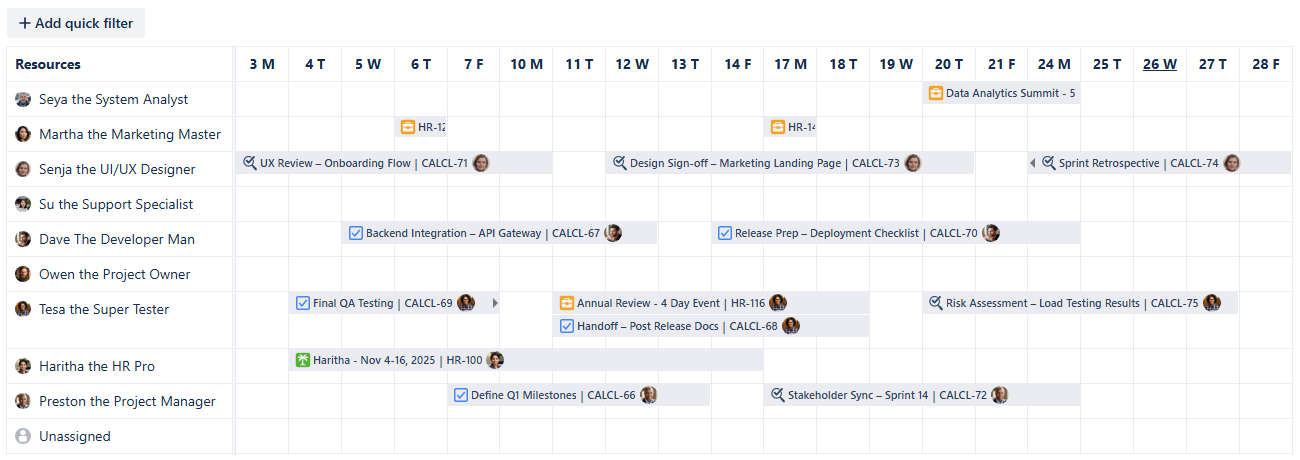
Project Management calendar - First look
Now it’s time to explore our Calendar for Jira app’s functionality to enhance your planning productivity!
Card Colors for Project Management calendar
Adding color coding is a great way to make your calendar more readable and to quickly identify tasks by team or priority. To showcase the calendar’s capabilities, let’s assign the colors to the teams.
First, open the calendar's settings at the bottom of the sidebar and select the Card colors tab:
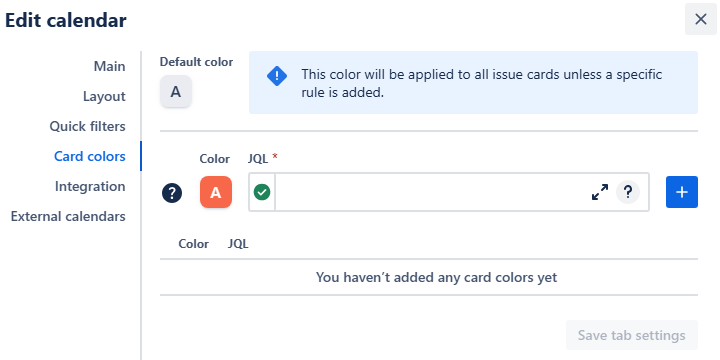
Project Management - Card color settings
Use JQL statements to apply color hues based on work properties. When using custom fields, simply begin typing the field name, select the full name hint to insert the field in JQL format, and then select the desired value from the subsequent options hint after the equals sign. Click the + button to add each rule to your list.

Project Management - Adding color rules to the calendar
Don’t forget to provide the absence-related work items with their own hues. 🙂
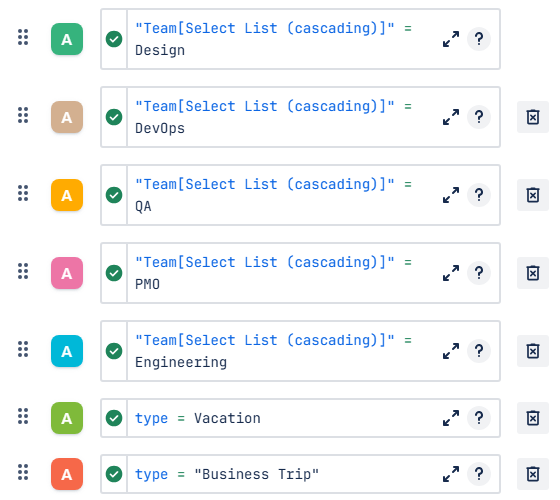
Project Management - Color rules added
Once you’ve added the rules you wished to, click Save tab settings to apply the changes. Your calendar will then change its appearance:
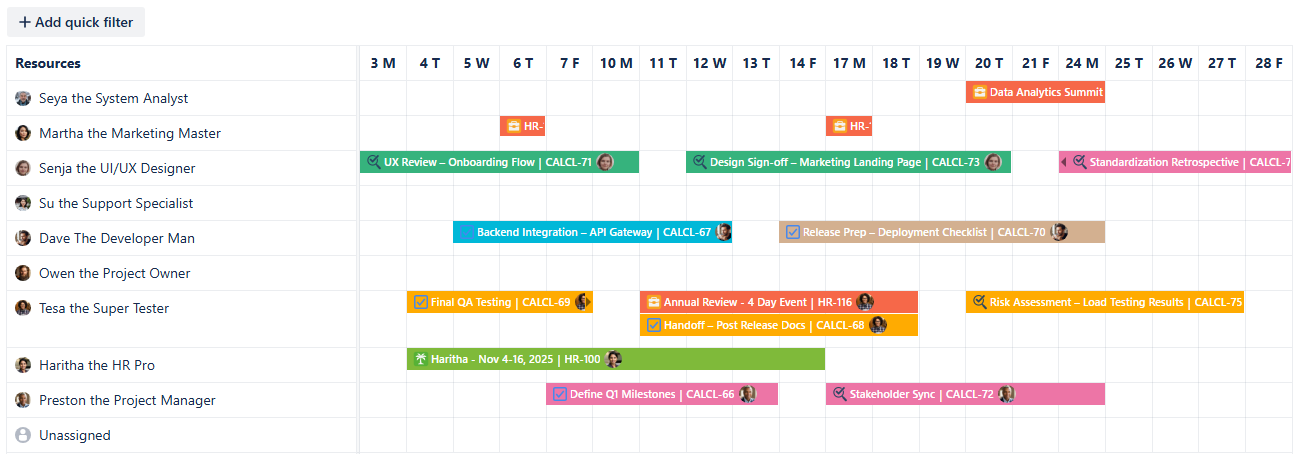
Project Management - Color rules applied
You can check the color meanings using the Legend button in the bottom of the calendar’s sidebar:
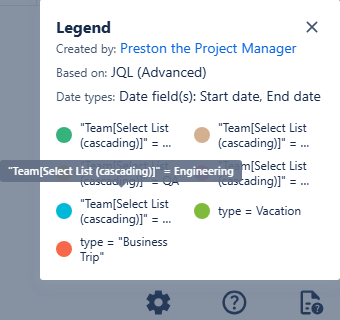
Project Management - Legend
By adding color rules based on the Team field, you can immediately identify which team's work an individual employee is executing, regardless of their primary team assignment. This instantly clarifies cross-team dependencies and workload distribution.
Quick Filters for Project Management calendar
Quick Filters are vital for effective project management. They leverage JQL queries to instantly isolate the work items a PM needs to focus on in the moment, allowing for dynamic triage without creating a separate calendar view.
To setup own quick filters, navigate to the calendar's settings, then go to the Quick filters tab:
Project Management - Quick filter settings
We will implement quick filters that segment the calendar by projects.
Note: While this use case leverages a custom field for project identification, remember that in standard practice, filters should target the native Jira Project attribute for more efficient isolation of work items.
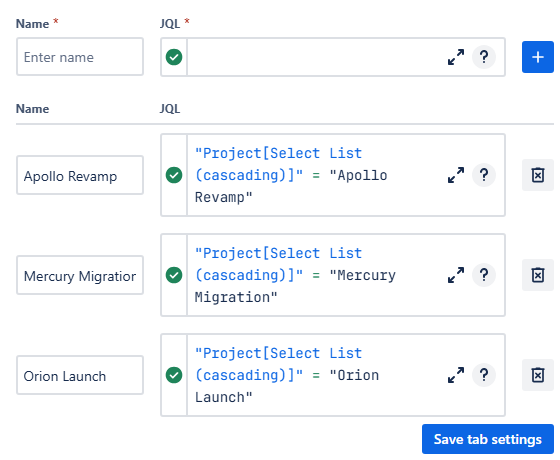
Project Management - Quick filters added
Click Save tab settings to finalize your filters. Here’s what they will look like above the calendar grid:
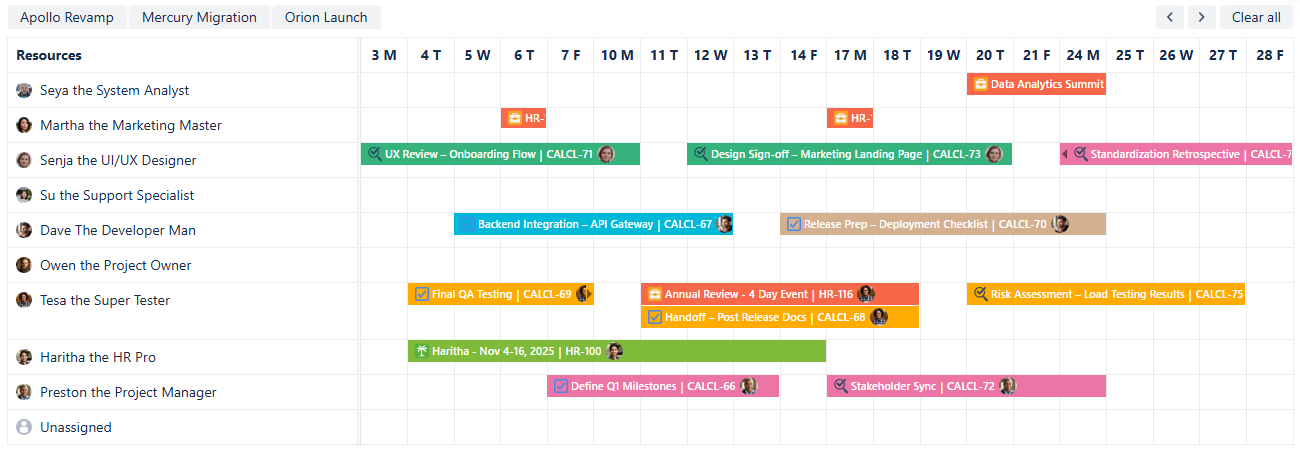
Project Management - Quick filters added
Click on one of the filters to activate it. The quick filter button will then darken, indicating it is switched on. To deactivate it, click on the filter again, and the calendar will go back to its default view. Alternatively, you can click Clear all button to the right side of the quick filter row, and all filters will be deactivated.
Project Management - Quick filters in use
Connecting External calendars to Project Management calendar
For a more complete view of your project’s schedule, you can integrate external calendars like executive calendars and strategic planning timelines.
First, get the iCal link (.ics URL) for the external calendar. Detailed instructions on how to obtain the link can be found here.

Project Management - Outlook link

Project Management - Google Calendar link
In your Calendar for Jira app, go to the calendar settings and choose the External calendars tab:
Select a color for the external calendar, give it a name, and paste the iCal link into the ICS link field. Click the add + button:
Project Management - External calendar added
Click Save tab settings. After that, the events from the external subscription will appear in their own row. To see the details of the event, simply hover your mouse over the event’s icon:

The external calendar will also be visible in the sidebar under External calendars:
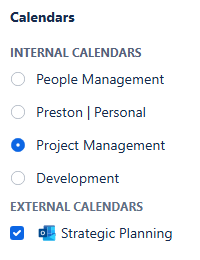
Project Management - External calendar in the calendars menu
To hide the events originating from the external calendar, simply uncheck the box next to its name. The events will reappear once you check the box again.
Creating Non-Jira Events
The Custom or Non-Jira Events feature is great for scheduling important project activities that don't need a Jira issue. You can use them for project activities that consume time but don't require backlog management—such as internal prep sessions, buffer days, or meeting blocks. You can also use this tool to visually mark a significant drop in productivity caused by external factors. This keeps your Jira issue list clean while ensuring every minute of your team's schedule is accounted for and visible on the calendar.
To get started, click on the desired date on the calendar:
Project Management - Choosing a date
In the pop-up menu, select New Event:

Project Management - Pop-up menu
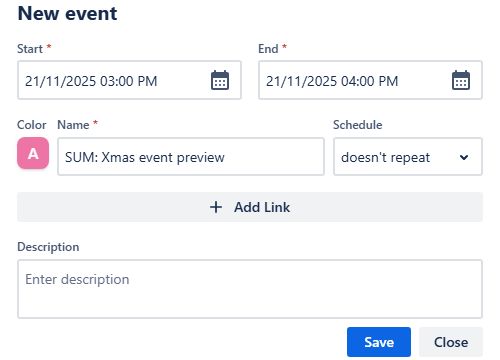
Once you click it, a new window will appear, in which you will configure your future custom event details:
Project Management - Adding a custom event
Fill in the start and end date-times, choose a color, and give the event a name. Provide a link, if it is needed, and a concise description, then click Save. Your custom event will then appear on the calendar grid:
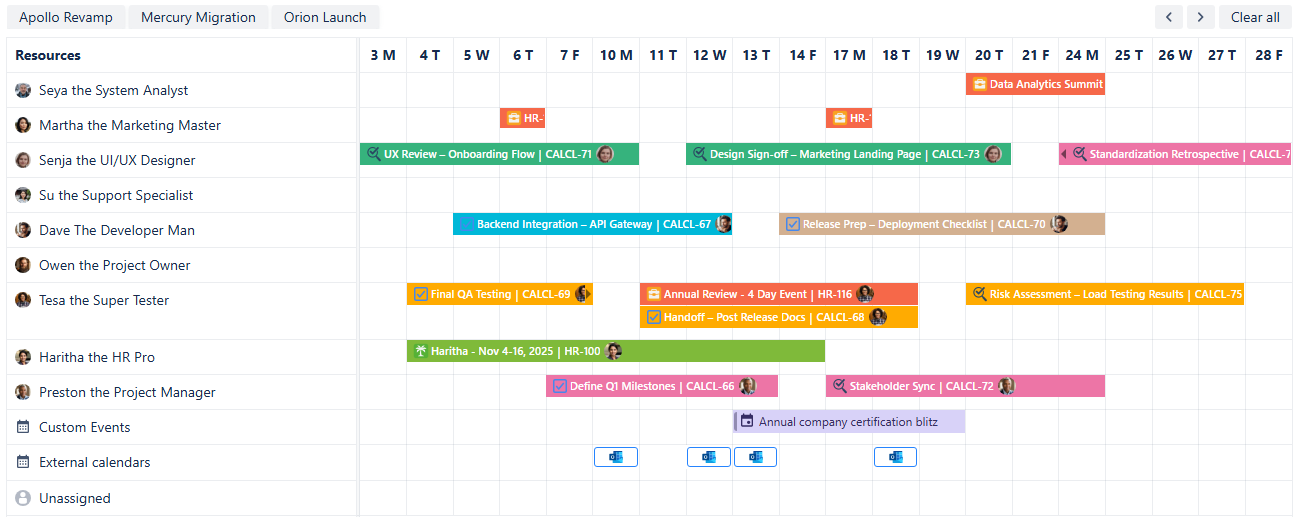
Project Management - Custom events added
Providing such detail to the project management calendar allows teams to adjust their work time proactively, helping them to mitigate delays caused by external factors and stay aligned on achieving common goals.
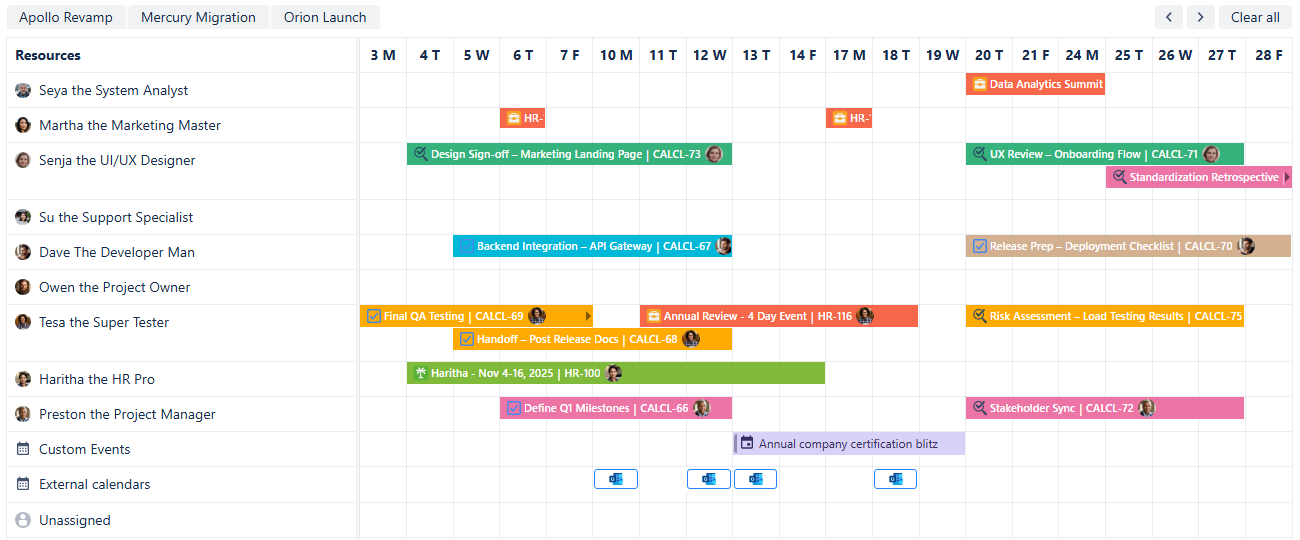
Project Management - Calendar adjusted
Sharing your Project Management calendar
After you’ve customized the calendar, you can share it with your cross-functional teams, stakeholders, and executives to improve future collaboration.
To do so, on the calendar interface, find the Share button. It's located to the right of the Today link, between the Search and Instant filters buttons. Click it, and a share window will pop up.
Project Management - Sharing a calendar
From this window, you can select the user groups with which you would like to share the calendar. Click Add, and then choose if the group members should have editing permission by checking the box next to their name.
Project Management - Sharing a calendar with department leads
Note: Editing rights grant users the ability to modify card color rules, quick filters, external calendars and integration. Only the calendar’s creator has access to Main and Layout settings.
Finally, click Save. The selected groups will be able to access the calendar from the Shared with me section of the Calendars menu:
Project Management - Shared with me calendars
People Management Calendar
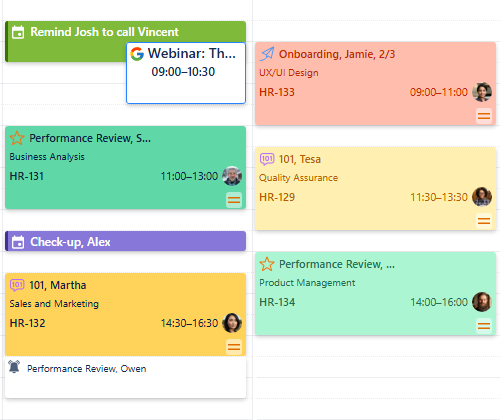
People Management Calendar
Use case description: This calendar is used by team leads and managers to schedule and track recurring team activities such as 1:1s, performance reviews, and onboarding sessions. It helps ensure consistent follow-through on people-related tasks and provides improved visibility into team management workflows across the organization.
Primary Actor: Team Lead, Department Manager.
Calendar Shared With: Team members, HR.
This guide will walk you through setting up a People Management Calendar using the Calendar for Jira app. The main purpose of this calendar is to help managers easily track and schedule recurring team activities. While you don't have to follow along with the configuration steps, we recommend you review them to get a better understanding of the features we refer to throughout this manual.
Create relevant work types:
You can create specific issue types to better track people management activities, such as 101, Performance Review and Onboarding.
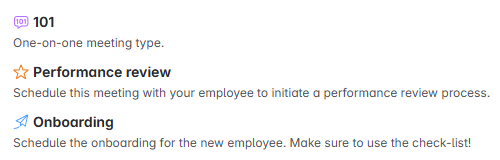
People Management - Work types
Set up workflows for issue types:
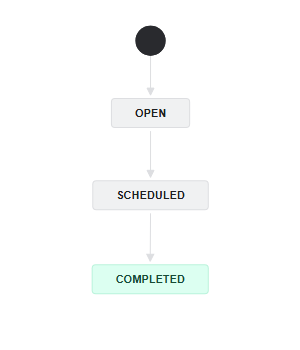
A simple but effective workflow for these activities might consist of just two steps: Scheduled (status category To Do) and Completed (status category Done).
People Management - Workflow
Add Custom Fields (Optional)
For a more efficient and well-organized People Management calendar, we recommend adding custom fields. These fields are crucial for better organizing your team's activities and making it easier to find specific information.
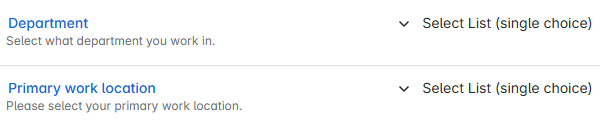
In this demo, we'll use the Department and Primary Work Location custom fields. The Department field is valuable for managers who need to quickly check the schedule of a specific team without sorting through the entire company's calendar. Meanwhile, the Primary Work Location clarifies an employee’s availability and helps determine whether a meeting should be scheduled online or in-person.
People Management - Custom fields
Create filters
When working with a wide variety of issue types and properties, it is often more convenient to create and save a filter directly within Jira. This allows you to pre-define all your desired properties and save that selection for future use.
To do this, navigate to Jira’s sidebar on the left side of your screen and click Filters, then select Search work items.
People Management - Filters
The action will redirect you to the filters page. Select a set of properties you’d like at the top of your screen.

Once you’re satisfied with your selection, click Save filter to the right of the filters' row. It will bring up the saving window.

People Management - Save filter
In here you can give your filter a name and description and choose who has the rights to view and edit it. Don’t forget to click Add to add the desired groups into viewing or editing lists.
Note: To successfully share a calendar based on a Saved filter, it is essential that the filter itself is also shared with the users who will be viewing the calendar. If a user does not have permission to access the underlying filter, they will not be able to see the issues displayed on the calendar.
Click Save once you’ve finished configuring your filters.
With these steps complete you’re now ready to create this calendar in our Calendar for Jira app!
Creating the calendar
Open the Calendar for Jira app from the Jira Apps menu. In the sidebar on the right side of your screen, find the Calendars menu and click the + create button.

People Management - Create calendar
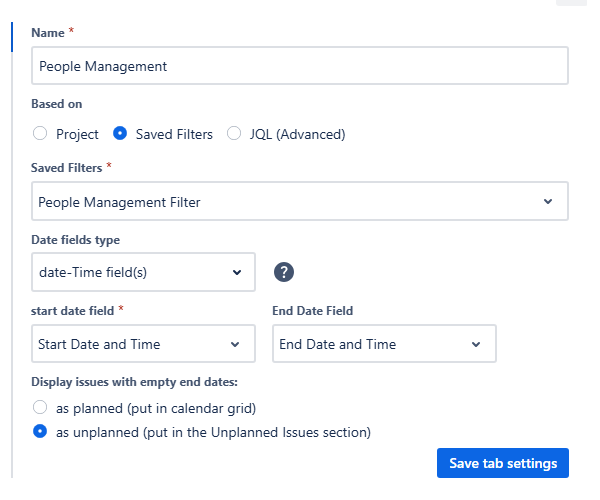
Once you provide your calendar with a name—People Management will do just fine—you'll then need to specify what the calendar is based on. Choose the Saved Filters option, as this allows you to configure your calendar to display only the work items you've pre-defined in a filter (see the setup). Later, you can use our app's filtering features to further narrow down this initial view as needed.
For the Date Fields type, choose Date-Time fields as your option. This will allow you to plan and schedule your team's activities with greater precision, down to the hour.
Note: Our Calendar for Jira app automatically creates the Start/End Date and Time custom fields upon installation. However, to use them properly within your project, you will still need to add them to your screen configuration.
People Management - Main settings
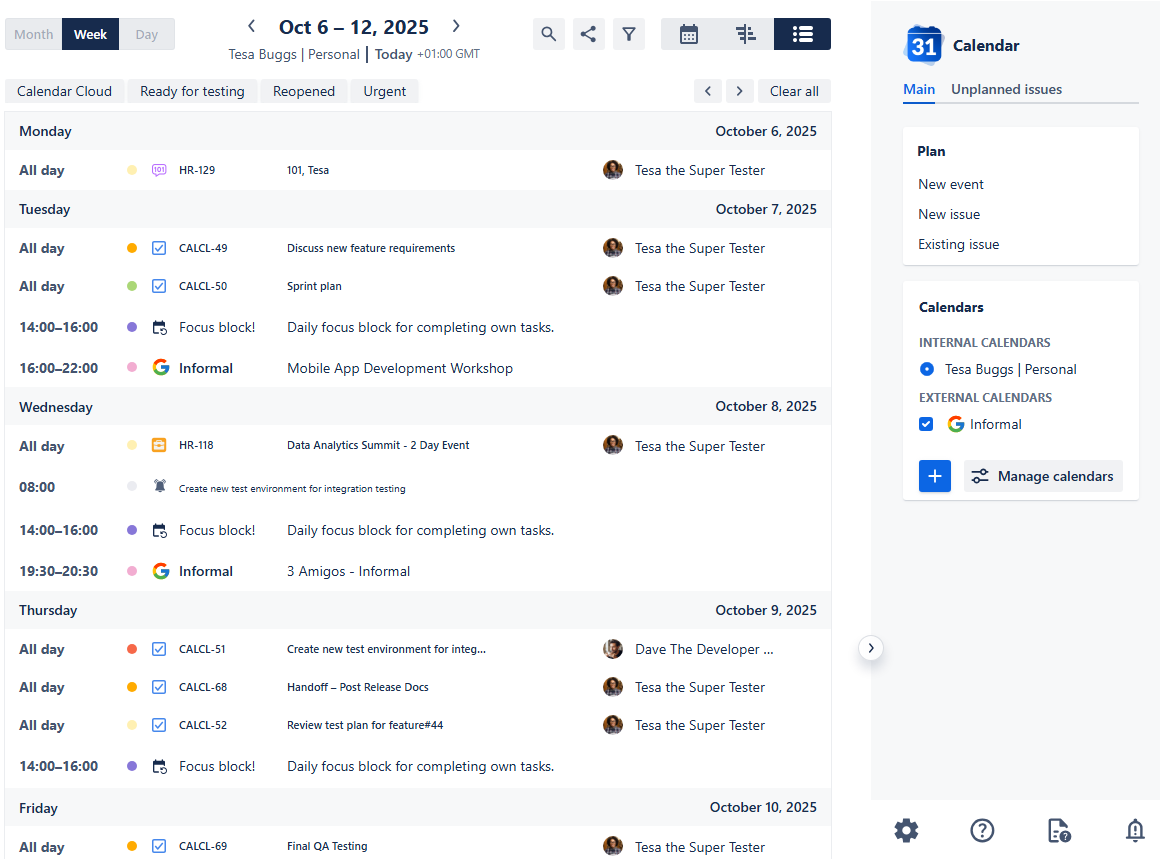
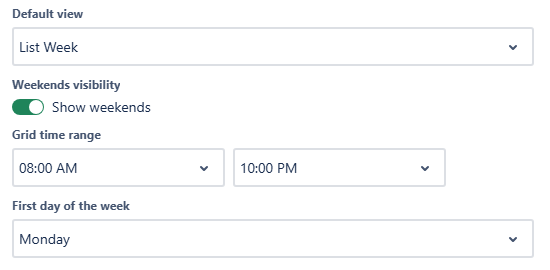
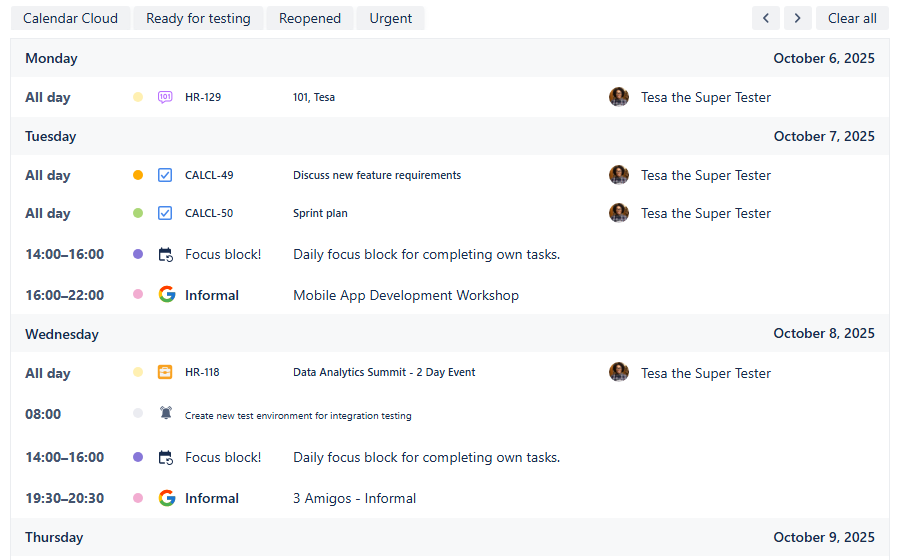
For the Layout settings, set the default view to Week View. This is perfect for visualizing people management tasks across a team or department over time.
Disable the weekend visibility for your calendar to avoid empty spaces and choose your preferable first day of the week and the calendar’s hours.
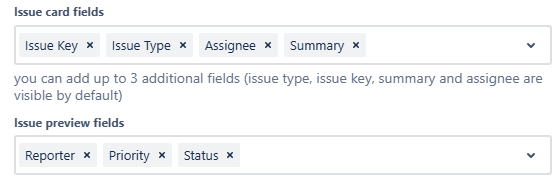
Issue card fields are the pieces of information that appear directly on your calendar grid. Since space is limited, it's best to select crucial information that helps you quickly navigate and understand a card's purpose. The main properties of the work item, such as the issue key, its type (via an icon), summary and the assignee are displayed there by default. You may choose three more fields to be shown in the issue cards. Let’s select the Department custom field to be displayed here.
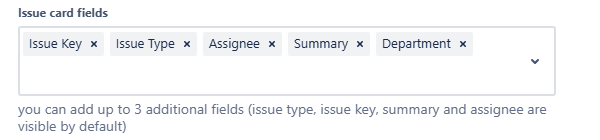
People Management - Issue card fields
Issue preview fields, on the other hand, appear in a pop-up once you click on an issue card. This provides extra space for additional details to be shown without needing to open the full issue screen. Choose what information you’d like to be easily accessible in selection.

People Management - Issue preview fields
You can still access the complete issue window to view all information by clicking the issue key link within the preview pop-up.
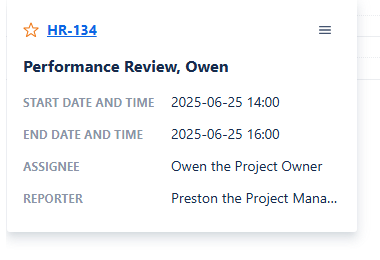
People Management - Issue preview
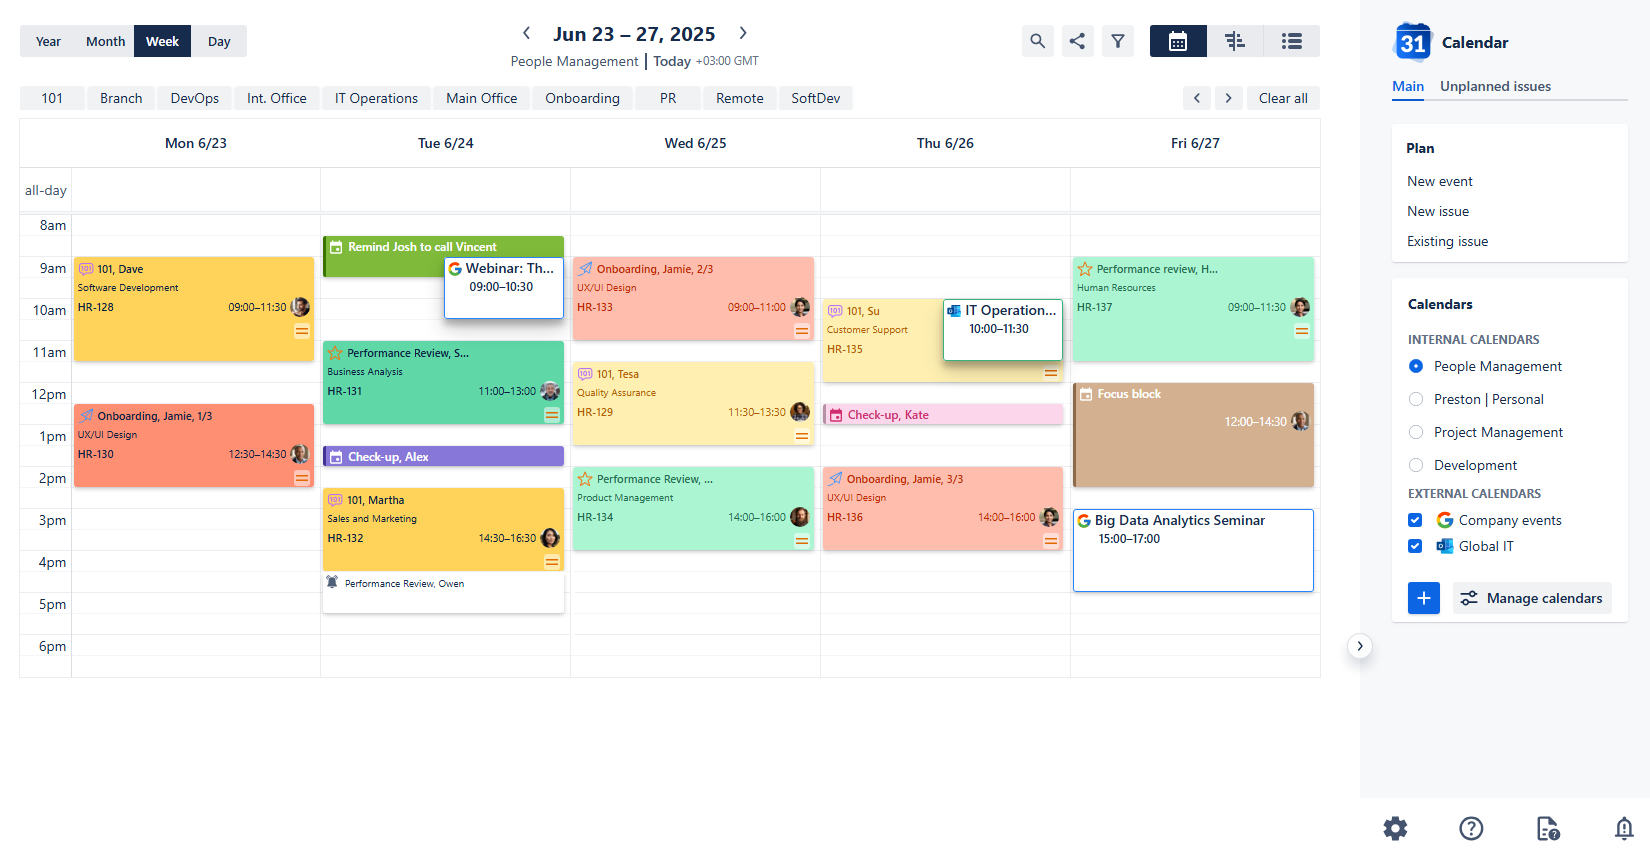
After confirming your settings, click Create. Congratulations, your calendar is now added. Upon creation it will look similar to this:
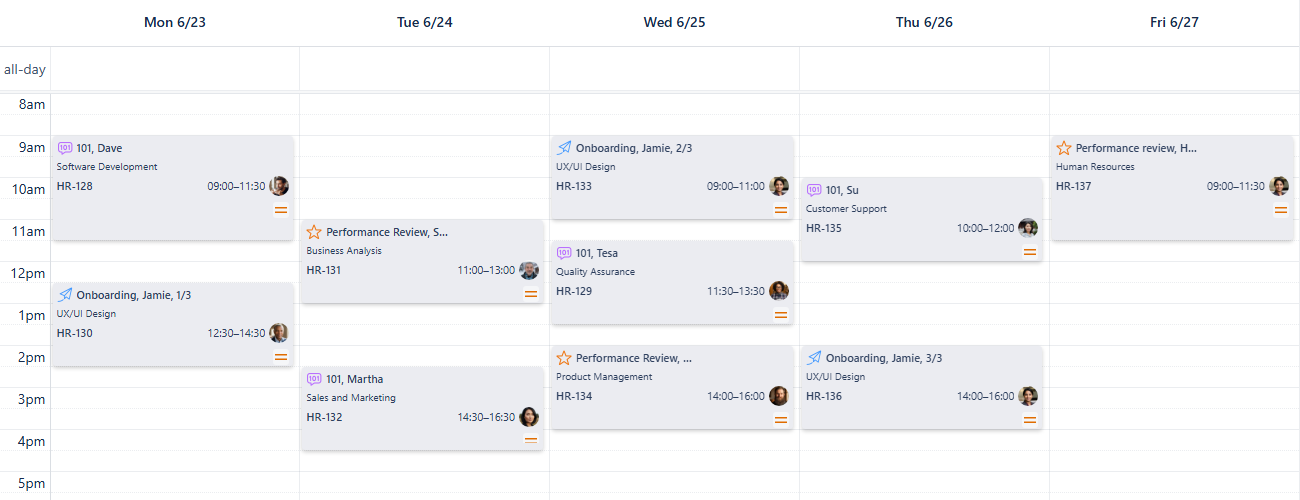
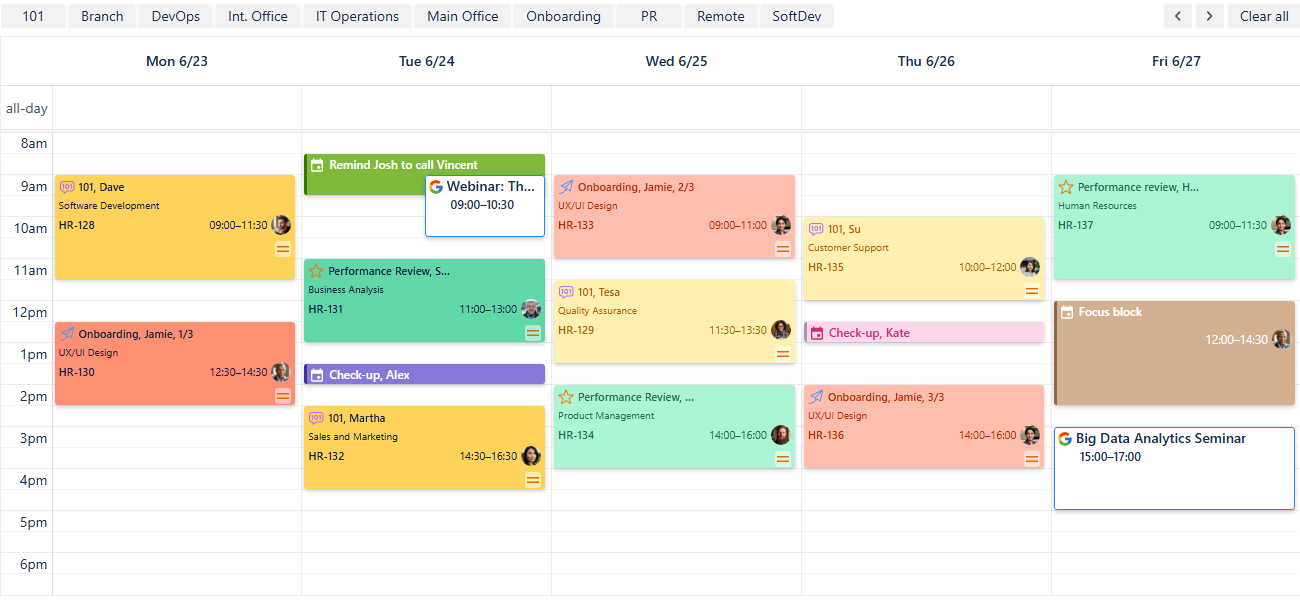
People Management - First look
Your issue cards may have a different default color based on your current settings. You can leave it as-is and start using the app immediately, but we highly recommend exploring the full functionality to customize your calendar's appearance.
Card Colors for People Management calendar
Adding color coding is a great way to make your calendar more readable and to quickly identify activities by meeting type or team.
First, open the calendar's settings at the bottom of the sidebar and select the Card colors tab.

People Management - Settings
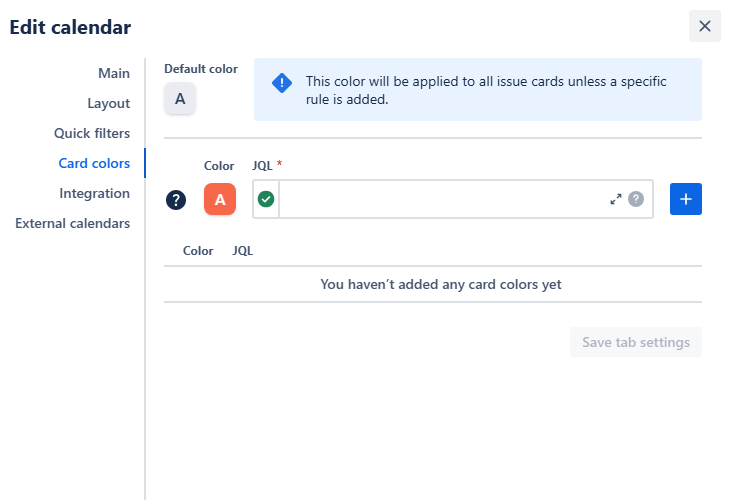
People Management - Card colors menu
In here you can use JQL statements to apply colors to your works' properties. To do so, select the color you’d like issues with certain properties to have and then describe the properties using JQL. After that, click the blue add + button to add the rule to the list.
This feature allows for a great deal of customization. For instance, you could color issue cards by status to instantly visualize your team's progress. You might choose to use paler shades to represent scheduled or ongoing work and more saturated colors for completed tasks. Alternatively, you could take the opposite approach and use the most saturated colors for ongoing work, while reserving paler shades for items that are already done.
You could also color the cards by department or projects to distinguish between employees' tasks based on where or what on they work. Varying saturation levels could help visually indicate an issue's priority or risk level.
For simplicity, let’s assign the rules based on issue types and statuses:
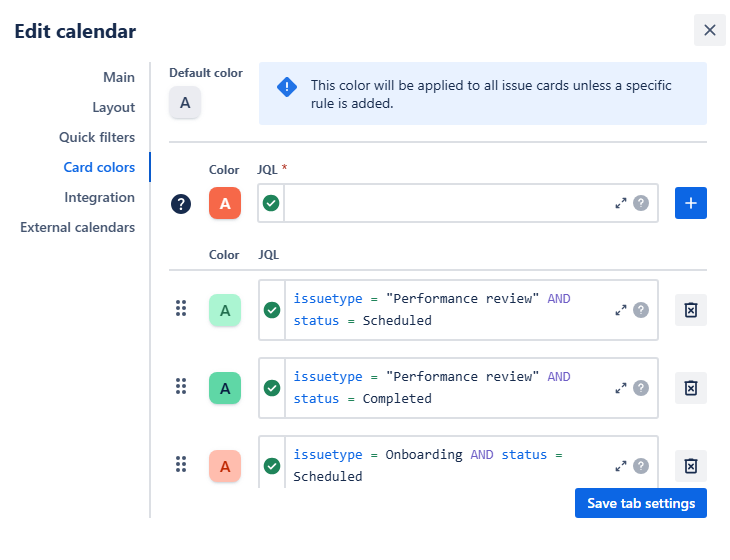
People Management - Card color rules
Tip: Not feeling confident in using JQL? Here’s our small hint on how to get a proper query without mistakes!
Once you’ve added all rules, click Save tab settings. After that, your calendar will change its appearance:
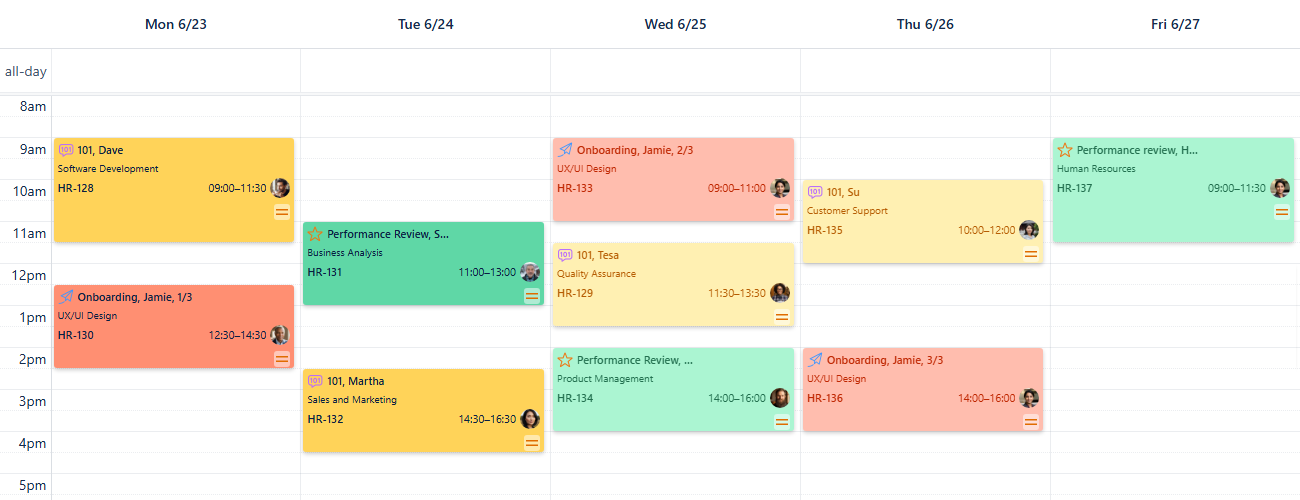
People Management - Color rules applied
As you can see, using color-coded cards provides aid for easier navigation. At a glance, you can get an instant idea of your entire week's activities, allowing you to quickly prepare for the different types of meetings and tasks ahead.
To quickly preview what the different card colors on your calendar mean, head to the bottom of the sidebar on the right side and click the Legend button. You can see the entire JQL associated with the specific color by hovering your mouse cursor over that color. This is especially useful when viewing a calendar created by another person, as it gives you an instant key to all their color-coding rules.
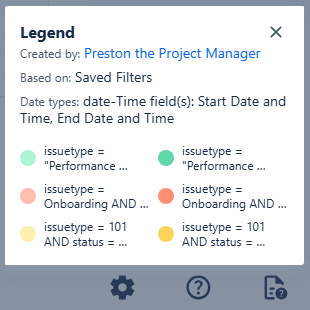
People Management - Legend
Quick Filters for People Management calendar
Quick filters allow your team to easily access information based on any JQL query, including ones with custom fields, which is vital for effective management.
Navigate to the calendar's settings, then go to the Quick filters tab.
People Management - Settings
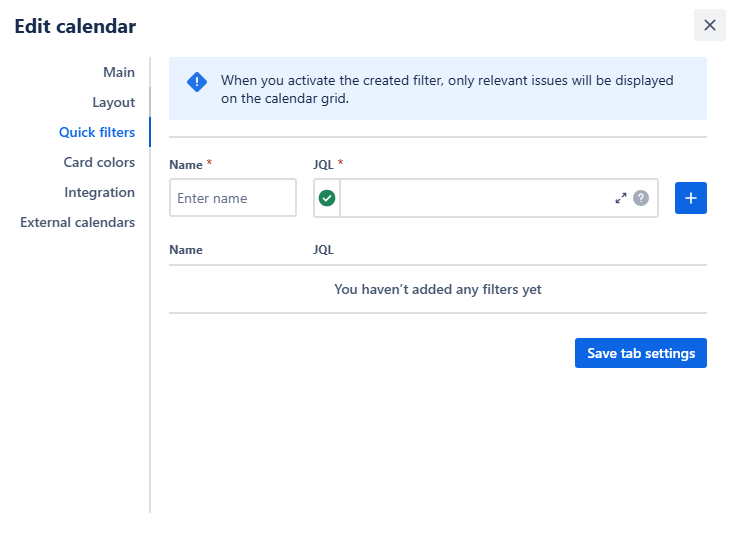
People Management - Quick filters menu
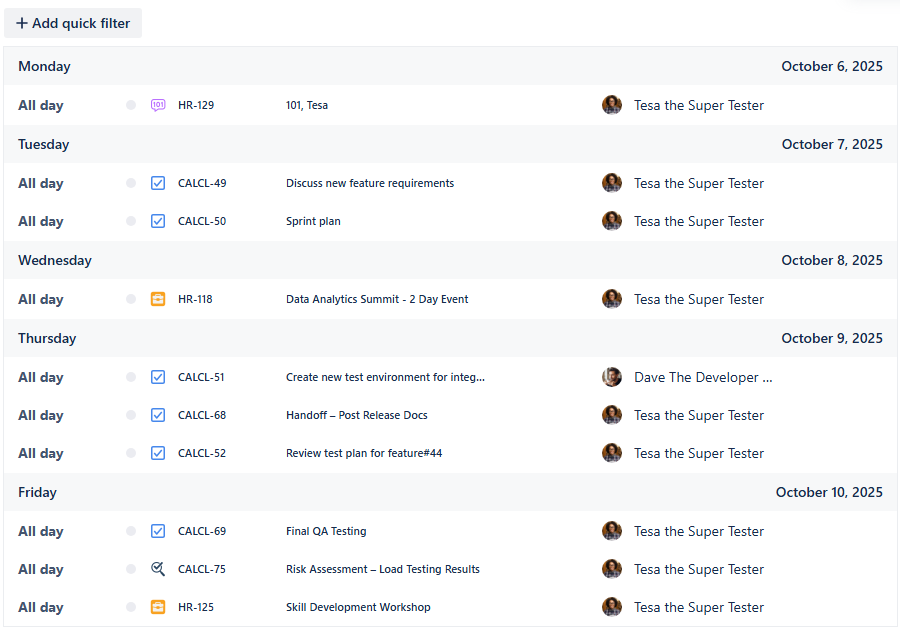
You can also access the same settings page by clicking + Add quick filter right below the zoom select of your calendar:
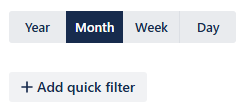
People Management - Add quick filter
Even with color differentiation based on issue type, it can still be useful to remove all distractions and focus on a specific kind of work. For a more streamlined view, let's add quick filters based on issue type to your calendar. We should also utilize our custom fields by creating Department and Primary work location quick filters.
Give each filter a short name, enter the JQL query describing the property you’re wishing to include in that filter, then click the blue add + button to add the filter to the list.
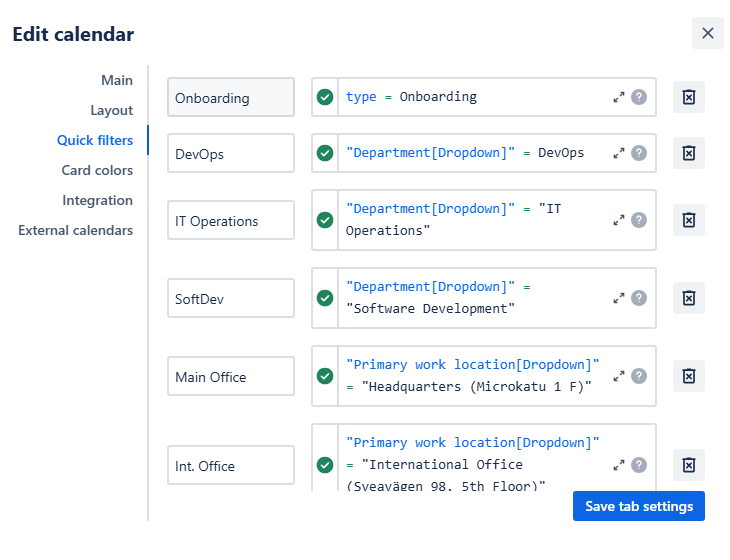
People Management - Quick filters added
Click Save tab settings to finalize your filters. The buttons to use them will then appear above your calendar grid.

People Management - Quick filters added
Click a button to enable a quick filter, and it will darken to show it's active. Your calendar will then display only the issues that match that filter's rule. If you click a second button, your calendar will show issues that adhere to both rules.
To turn off a filter, simply click the button again, and it will lighten. If you want to disable all active quick filters at once, click Clear all at the right end of the quick filter row.
Note: When you choose more than one quick filter, an AND operator is applied to them. This means that for an issue to be displayed, it has to meet the conditions of all selected filters.
Example: Choose DevOps and Int. Office quick filters. The calendar then will show vacations and planned business trips only for people who are in the DevOps department and are located in the International Office.
Example: Choose DevOps and QA quick filters. You've selected two different departments, and in our setup, an issue cannot belong to both at once. Therefore, no issues will be displayed.
Example: Choose 101 and Onboarding quick filters. Both filters describe different work types, and because a work item cannot be of two types, no issue will be displayed.
Keep in mind that with custom fields, how well quick filters combine depends on your specific setup. You won't be able to combine issues based on properties from the same field that can't logically co-exist on a single work item.
Connecting External Calendars
For a more complete view of your team’s schedule, you can integrate external calendars for company-wide events or the official HR calendar.
First, get the iCal link (.ics URL) for the external calendar. Detailed instructions can be found here.
People Management - iCal link from Google Calendar
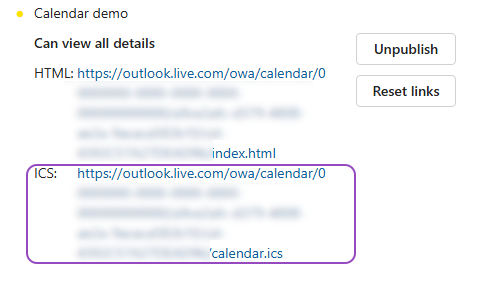
People Management - iCal link from Outlook
Once you’ve acquired the link, in your Calendar for Jira app, go to the calendar settings and choose the External calendars tab.
People Management - External calendars menu
Select a color for the external calendar, give it a name, and paste the iCal link into the ICS link field. Click the blue add + button to add this calendar to the ICS calendars list below.

People Management - Adding external calendar
Click Save tab settings.
The events from your external ICS-subscription will now also be displayed on your calendar.

People Management - External calendar added
The external calendar will then be visible in the sidebar under External calendars. An icon next to its name will indicate whether the calendar comes from Google Calendar or Outlook.

People management - Calendars menu
To hide them at any time, simply uncheck the box next to the external calendar's name in the sidebar.
Creating Non-Jira Events
The Custom or Non-Jira Events (NJE) feature is great for scheduling important team management activities that don't need a Jira issue. This could include scheduling prep time before reviews, check-ups or informal coaching sessions.
To schedule a custom event, pick a date on your calendar. Bring your mouse over that date and simply click it—a pop-up window will appear.
People Management - Picking a date
In the pop-up menu, select New Event. Alternatively, you can click the same button from the Planning menu of your sidebar on the right side of your screen.

People Management - Planning pop-up menu
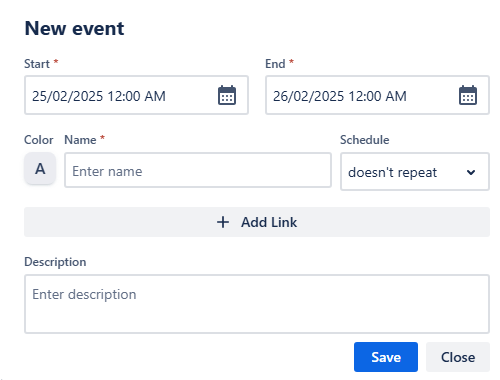
People Management - New event window
Fill in the start and end dates and times, choose a color and give the event a name like Check-up, Kate. Correct the time if needed, attach a link to external webpages and provide description.
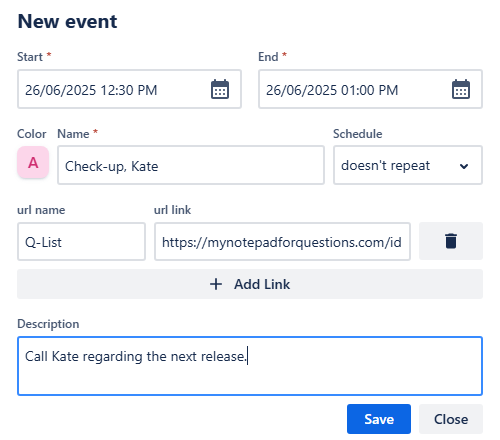
People Management - New event
Once you provide all necessary information click Save. Your new custom event will immediately appear on your calendar grid:
People Management - New events added
You can use this feature to plan a large amount of custom events within your calendar or use this tool to create personal reminders. However, if you use our Reminder for Jira app, there is a way to display those within your calendar as well!
Adding Reminders
Displaying reminders attached to Jira work items in your calendar is an effective way to keep everyone on top of feedback cycles, 1:1 schedules, or onboarding steps.
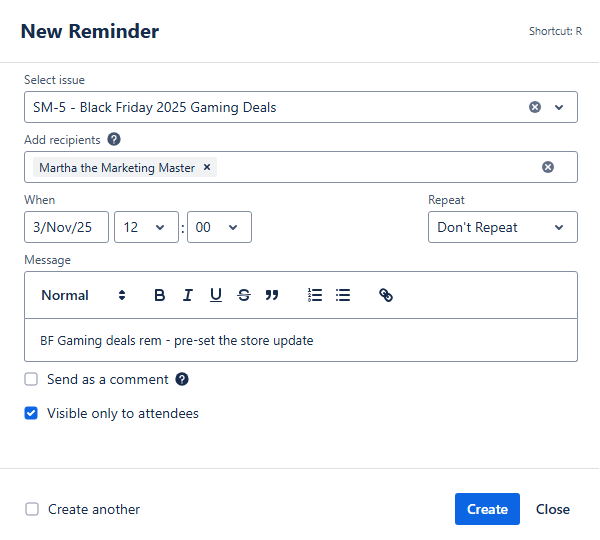
To create a reminder, simply press the R-key to summon the reminder creation window over your calendar. Alternatively, head over to our Reminder for Jira page (by Teamlead). On its main page, find + Add reminder button to the right side of your screen:

People Management - Add reminder
In the window that appears, first select the issue for which you'd like to set a reminder. Then, provide the rest of the necessary information, including recipients, day and time when the reminder should occur, and whether you want the reminder to repeat. Any additional information could be added in the comment box as a short message (255 symbols max).
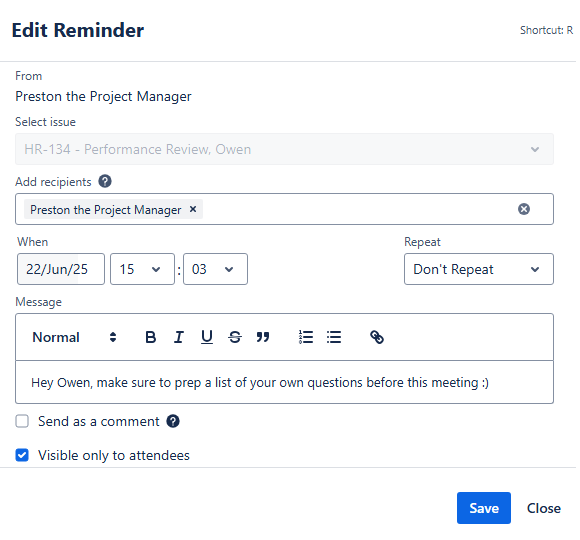
People Management - Creating a reminder
Click Create. Your reminder should then appear in your reminder list.
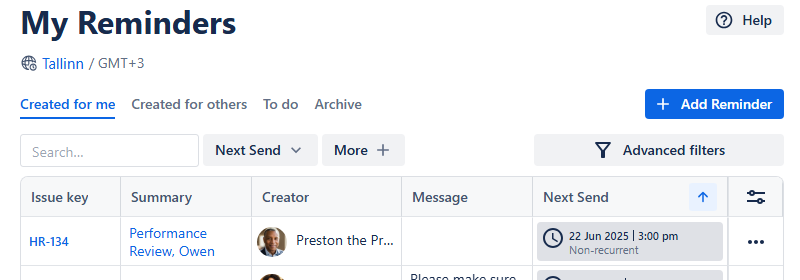
People Management - Reminder added
For the complete manual for our Reminder for Jira app, please refer to our documentation here.
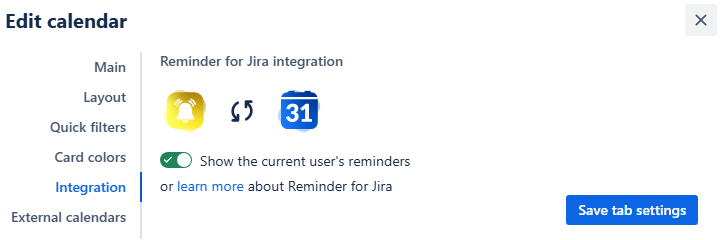
Now, to display those reminders on your calendar, head back to our Calendar for Jira app and to the calendar settings. In the settings, locate the Integration tab.
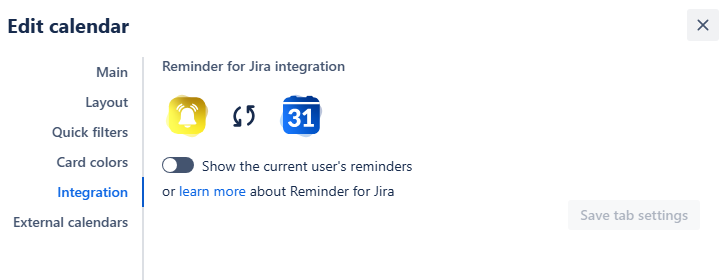
People Management - Integration settings
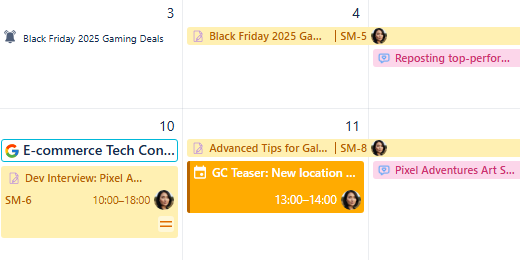
Switch the Show the current user’s reminders toggle to on, turning it green. After that, click the Save tab settings. Your reminders will then appear on the calendar grid alongside your issues:
People Management - Reminders on the calendar grid
Sharing your calendar
After you’ve customized the calendar, you can share it with your team and HR to improve collaboration.
On the calendar interface, find the Share button. It's located to the right of the Today link, between Search and Instant filters buttons.

People Management - Share button
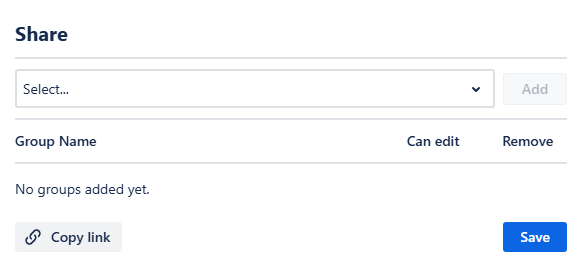
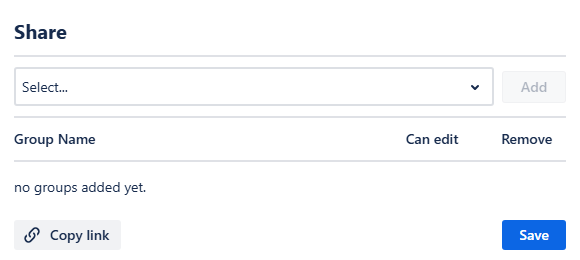
Click this button, and a share window will pop up.
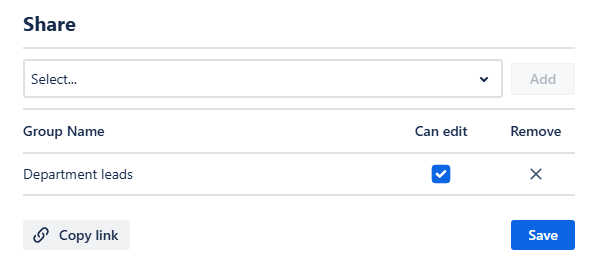
People Management - Share window
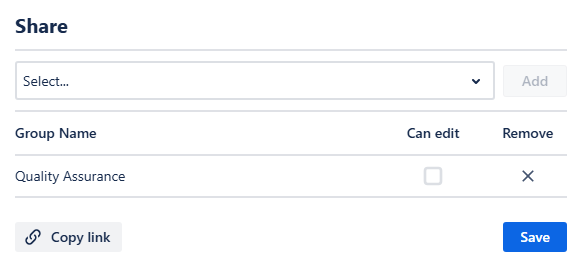
From the drop-down selection menu you can choose the user group you’d like to share your calendar with. Click Add, and then confirm if the group members should have editing rights by checking the box next to their name.
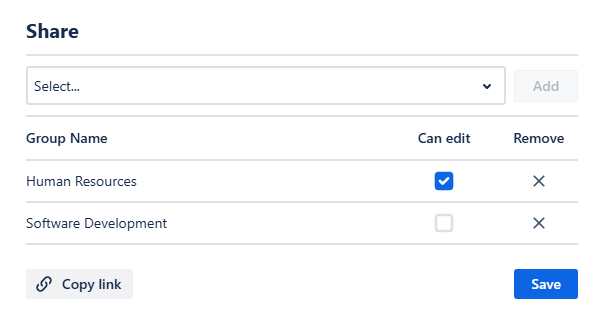
People Management - Sharing the calendar
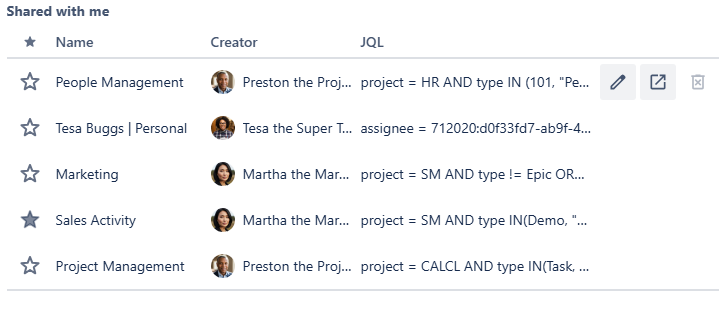
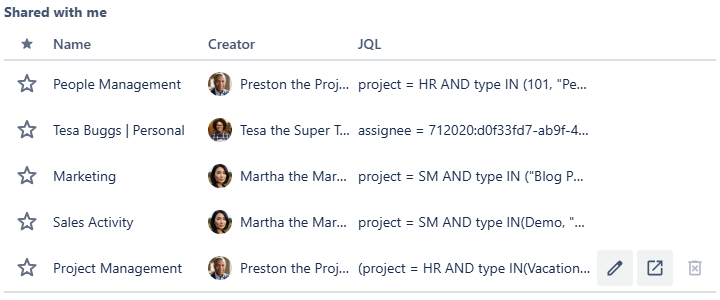
Finally, click Save. Your team members will be able to access the calendar from the Shared with me section of the Calendars menu. You can also get a direct link to the calendar by clicking Copy link in the share window, and then send it to your colleagues.
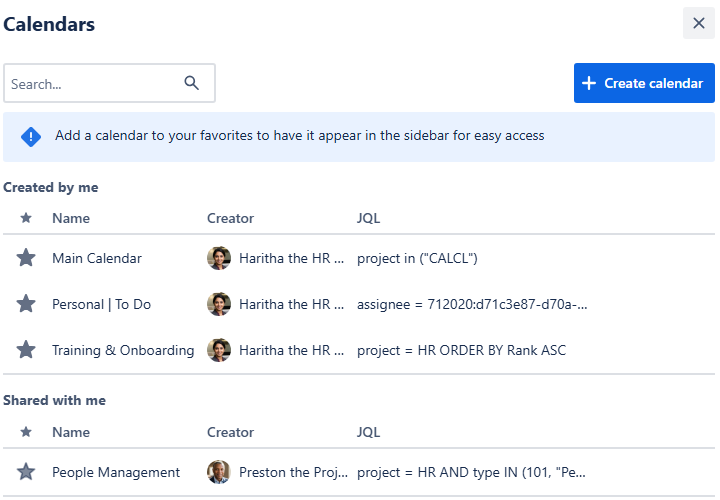
People Management - Shared with me calendars
When you add a shared calendar to your favorites by clicking the Star icon, the calendar will appear in the Internal calendars section of your sidebar. A distinct icon next to its name will indicate that the calendar belongs to another user.
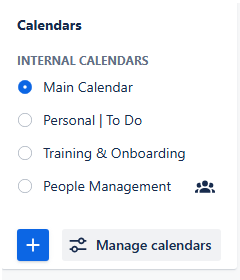
People Management - Shared with me calendars
Vacations & Business Trips Calendar
Vacations & Business Trips Calendar
Use case description: This calendar is designed to provide a clear overview of employee availability across the organization. HR can track scheduled vacations and business trips using dedicated issue types, while team leads and managers can check availability before scheduling important meetings or deliverables. It improves transparency and streamlines the time-off request and approval process.
Primary Actor: HR Manager or HR Assistant.
Calendar Shared With: Team leads, project managers, department heads, all staff.
To prepare the demonstration of this use case of our Calendar for Jira app, we created two separate issue types called Vacation and Business Trip and added workflows for both of them. We will share the setup steps and configuration. Feel free to use it, if you’d like!
Create the respective issue (work) types.

Work types - Vacation & Business Trip
Create the workflows for the issue types.
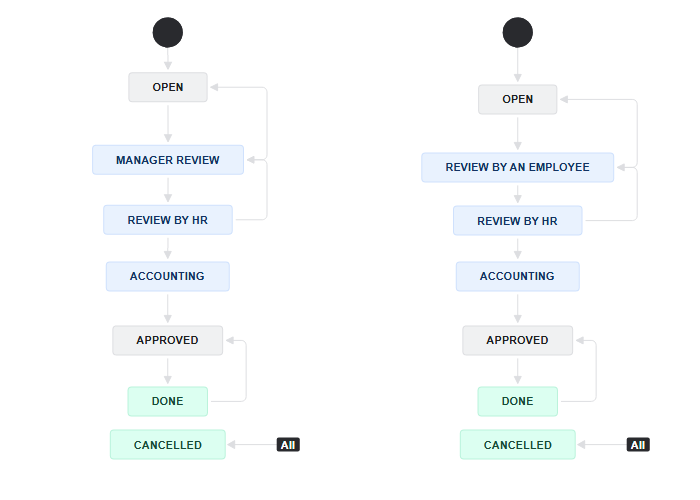
Workflows - Vacation & Business Trip
The process for vacation requests is quite straightforward. An employee initiates the request by creating an issue (status Open, category To Do). This issue then moves through an approval chain, typically starting with their manager and then proceeding to HR (status Manager Review to status Review by HR, category In Progress). In cases of paid vacation where an advance payment is required, an accountant might also be involved in the approval process (status Accounting, category In Progress).
Business trip requests operate similarly, but with a slight twist. Instead of the employee initiating the request, it's the manager who proposes the business trip to the employee (status Open, category To Do). The employee must then agree to the trip before the issue is forwarded to HR for their approval (status Review by an employee to status Review by HR, category In Progress). Like in the Vacation’s workflow, an accountant could be invited into the approval process, if necessary.
Once a vacation or a business trip request gets all the necessary approvals, the works can then be marked as approved (status Approved, category To Do—because it is yet to happen). After the planned vacation or the business trip is finished, the work is marked as complete (status Done, category Done).
A key feature of both the vacation and business trip workflows is their flexibility. Users can send an issue back at nearly any step in the process, and cancel it altogether at any moment. This allows for easy change requests or corrections if any details need to be adjusted or if the request is no longer valid.
Add custom fields.

Department - Custom field

Primary work location - Custom field
To optimize your Vacations & Business Trip calendar, we recommend utilizing custom fields. These fields are invaluable for sorting and filtering the issues by the organizational details. For this case, we opted to use department and primary work location fields.
The department field allows for quick identification of requests by department, making departmental-level planning and resource allocation easier. Primary work location field aids in preventing scheduling conflicts—it helps you identify the timetable overlaps between the employees who are not supposed to be absent at the same time. This way critical operations remain uninterrupted.
With this step our issue (work) setup is officially done.
Now, let’s learn how to use our Calendar app!
Calendar creation
Let’s begin by creating our Vacations & Business Trips calendar. Follow the link to our application through the Jira Apps menu.
From there, navigate to the Calendars menu in the sidebar and click Create button.

Vacations & Business Trips - Creating a calendar
We will name this calendar Vacations & Business Trips and use JQL to specify what it is based on.
Tip: if you aren’t very confident with JQL, we have a quick shortcut for generating JQL without having to write it manually.
You can then copy-paste into the calendar settings:
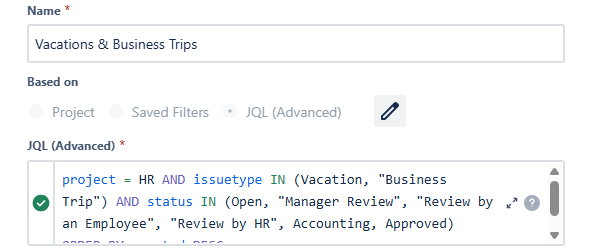
Vacations & Business Trips - Creating calendar
When configuring your calendar, you'll want to display only the most relevant work items for Vacations and Business Trips. There's no need to clutter your view with requests that are Cancelled or already Done. To achieve that, you can either list all the statuses you’re interested in, or exclude the Cancelled and Done works with the NOT IN operator:

Vacations & Business Trips - Creating calendar: alternative JQL
To accurately place work items on your calendar grid, you'll need to specify which date fields the calendar should use. In this case, since we operate in days rather than hours, date field(s) is the most intuitive option. Simply choose Start date and End date as the fields defining the calendar.
Note: Only the Start date field is strictly required.
Calendar creation - Main
For the layout settings we decided to go with the year default view for more transparency regarding the employees' leaves. The rest of the choices are shown down below:
Calendar creation - Layout
Once you’re satisfied with your selection, hit Create button in the bottom right corner of your calendar creation window.
Upon creation our calendar will look like this:
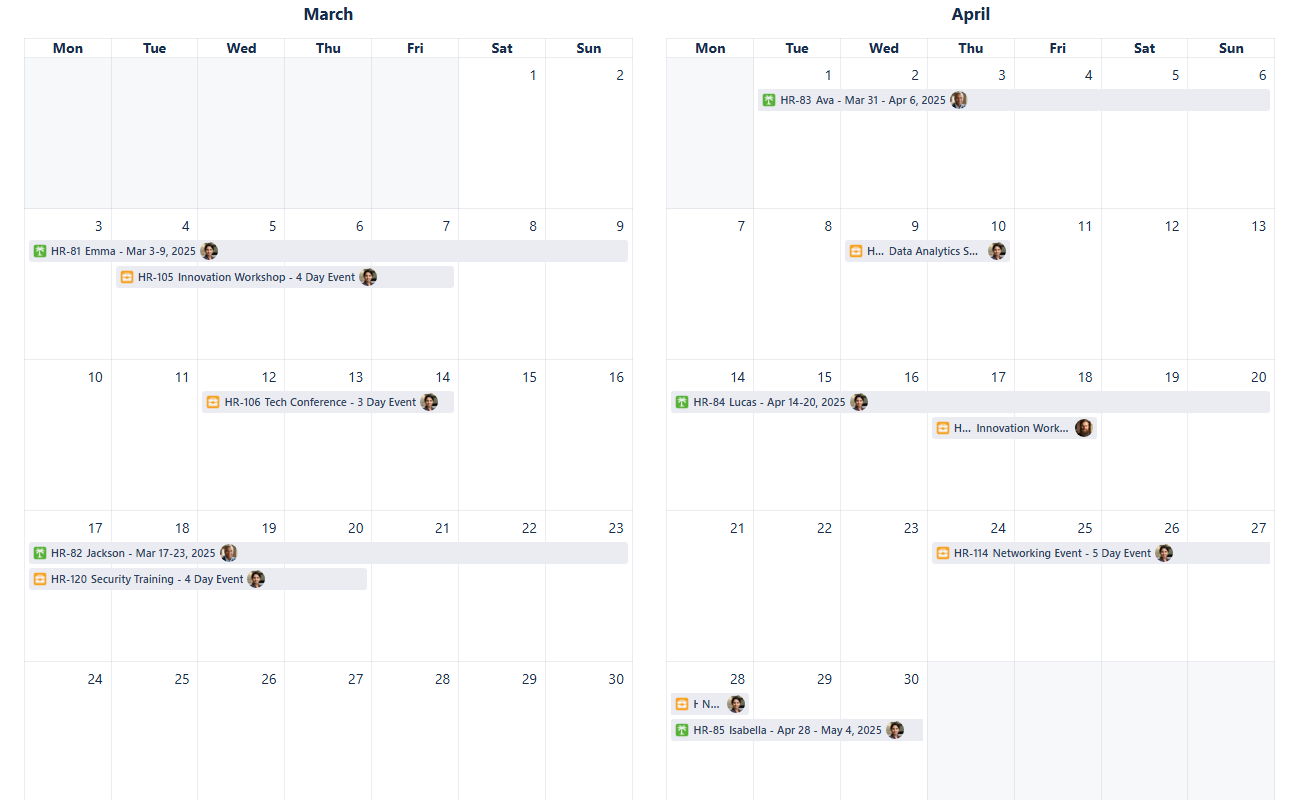
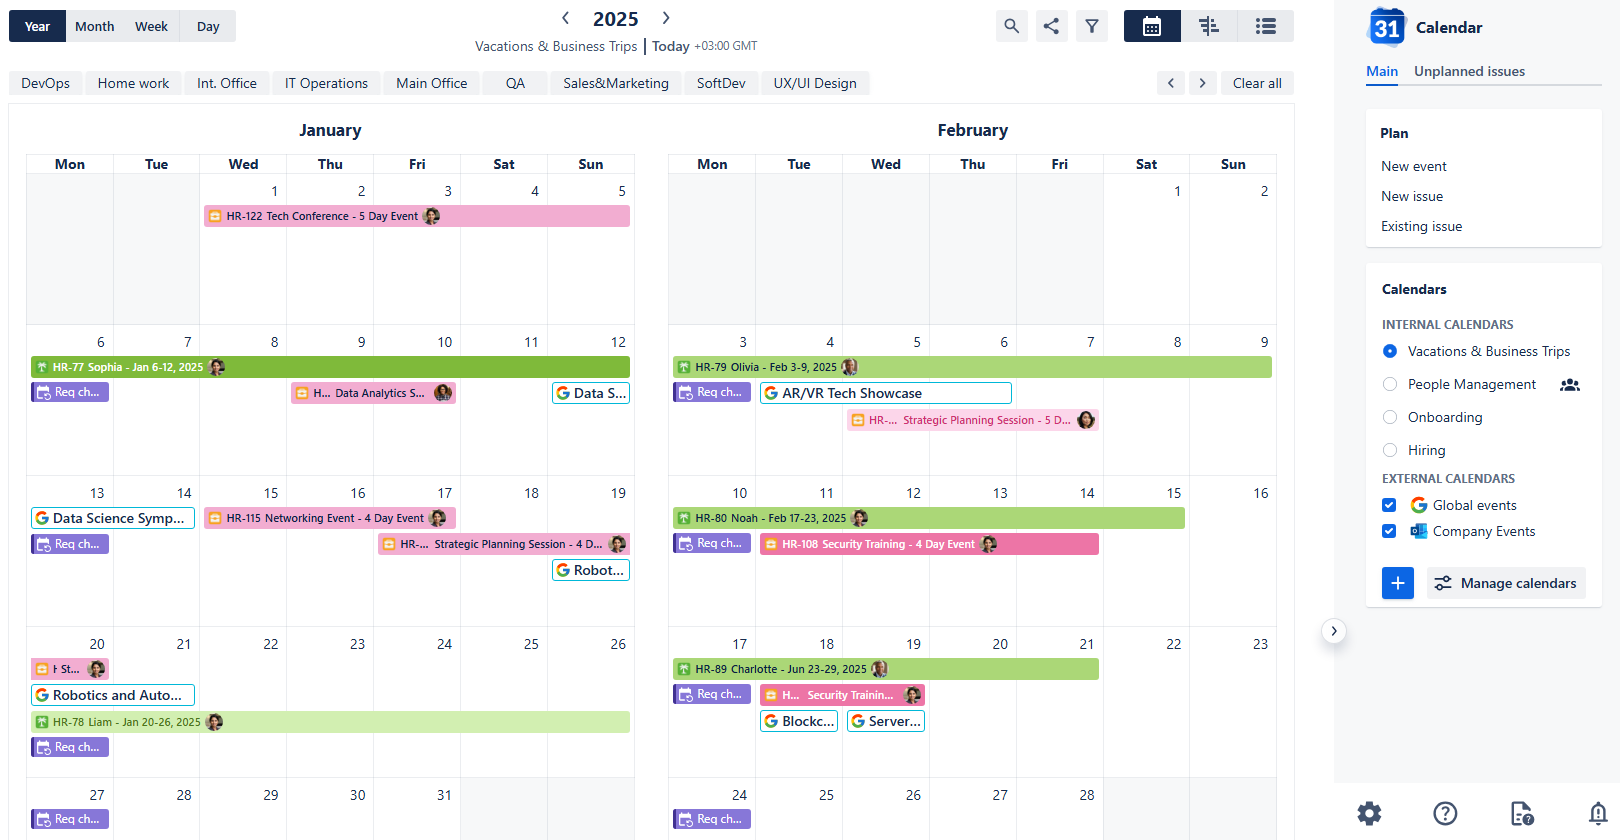
Vacations & Business Trips Calendar - First look
As you can see, without any distinction between the works it’s not so easy to read the calendar, even with our amazing issue icons. Thankfully, our Calendar for Jira app provides more than enough functionality to make the calendar navigation easier.
Let’s start off with adding some color!
Card colors for Vacations & Business Trips calendar
Navigate to the settings of our current calendar in the bottom of the sidebar:
In the settings, move to the Card colors tab.
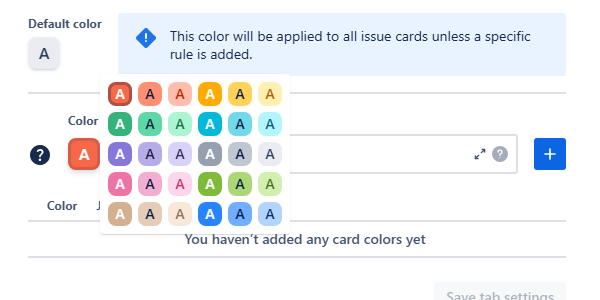
Calendar editing - Card colors
Here you can use JQL to associate specific colors with the works' properties you wish to highlight. Out app provides a generous amount of color schemes—for example, for the vacations let’s choose the green color scheme.
We can use the different shades of green to differentiate between the works' statuses:
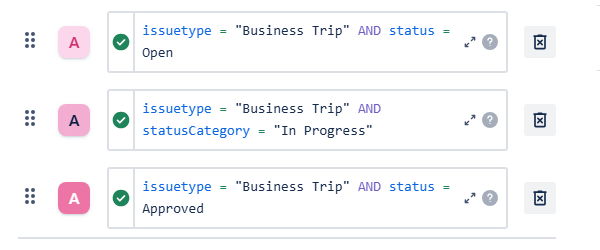
For the just made vacation requests with the status Open let’s choose the palest shade of green:

JQL: issuetype = Vacation AND status = Open
Similarly, for the vacation requests which are being reviewed we can choose the middle option—the more saturated one. Since our workflow identifies all of the review statuses as In progress, we can use a status category instead:

JQL: issuetype = Vacation AND statusCategory = “In Progress”
Lastly, for the vacations that had been Approved we can use the brightest shade of green in our palette:

JQL: issuetype = Vacation AND status = Approved
For the Business Trip works we can choose pink shades:
Calendar settings - Card colors: Business Trip works in pink ✨
After applying the settings our calendar will change its appearance:
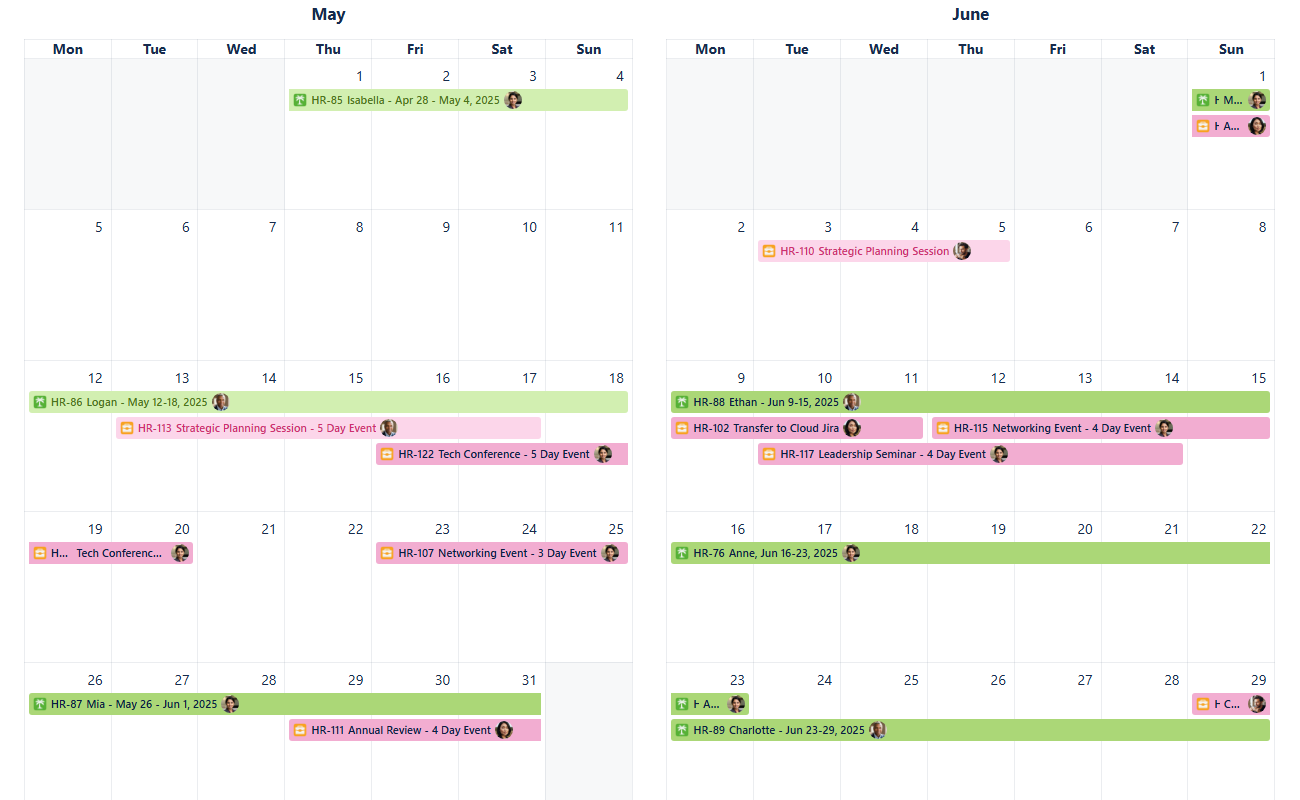
Vacations & Business Trips - Card color rules applied
To quickly preview the Card color settings (for example, if you are checking the calendar created by another person and wish to know what different colors mean) head over to the bottom of the sidebar and click the Legend button:
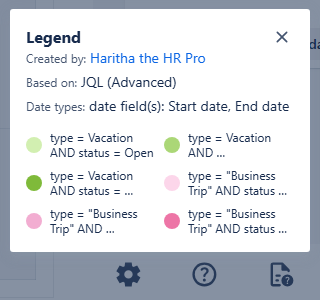
Vacations & Business Trips - Legend and card color rules preview
You can see the entire JQL associated with the specific color by hovering your mouse cursor over that color.
Now that our calendar is much easier to read, we can also utilize our Quick filters for accessing the information based on the custom fields we’ve created earlier.
Quick filters for Vacations & Business Trips calendar
Again, navigate to the calendar’s settings and then move to the Quick filters tab.
Let’s create quick filters for our departments and primary work locations.

Vacation & Business Trip - Quick filters added
JQL supports the use of earlier created custom fields and gives hints in their usage. It also brings up the possible options if your custom field is of a select type.
After adding a variety of quick filters and clicking Save tab settings, our Quick filters row located above the calendar grid will look like this:

Vacations & Business Trips - Quick filters
Clicking on one of the options will prompt the calendar to display the issues that satisfy the selected criteria.
Note: When you choose more than one quick filter, an AND operator is applied to them. This means that for an issue to be displayed, it has to meet the conditions of all selected filters.
This works well if you pick filters that define different aspects of your issues. For example, if you choose filters for both location and department, the displayed issues will satisfy both conditions. It will also work if your setup has non-mutually exclusive parameters, where, instead of a single select choice you have multiple choice or checkboxes used.
Example: Choose DevOps and Int. Office quick filters. The calendar then will show vacations and planned business trips only for people who are in the DevOps department and are located in the International Office.
However, if you pick filters that define the same parameter in a way that creates a conflict, no issues will be displayed. This often happens because an issue cannot fulfill mutually exclusive conditions at the same time.
Example: Choose DevOps and QA quick filters. You've selected two different departments, and in our setup, an issue cannot belong to both at once. Therefore, no issues will be displayed.
Example: Similarly, create quick filters based on JQL—issuetype = Vacation AND issuetype = "Business Trip"—no issues will be shown, as an issue cannot be both types simultaneously.
Keep in mind that with custom fields, how well quick filters combine depends on your specific setup. You won't be able to combine issues based on properties from the same field that can't logically co-exist on a single work item.
Connecting external calendars
Effective planning often requires looking beyond your internal Jira data. Our Calendar for Jira app allows you to seamlessly integrate external calendars, providing a holistic view for future planning. By connecting an external calendar displaying upcoming industry events, you can cross-reference it with your Vacations & Business Trips calendar to later decide who’s going to attend said events.
To integrate a calendar from services like Outlook or Google Calendar, you'll need its link in the iCal format (the URL typically ends with .ics).
In this demonstration, we'll walk through adding a calendar from Google Calendar:
Open Google Calendar and navigate to the Settings menu (usually found in the top-right corner of your screen).
Vacations & Business Trips - Adding external calendar
In the left-hand sidebar of the screen navigate to the settings of the calendar you wish to export in the Settings for my calendars section.
Google calendar - Settings
Google calendar settings - Settings for my calendars
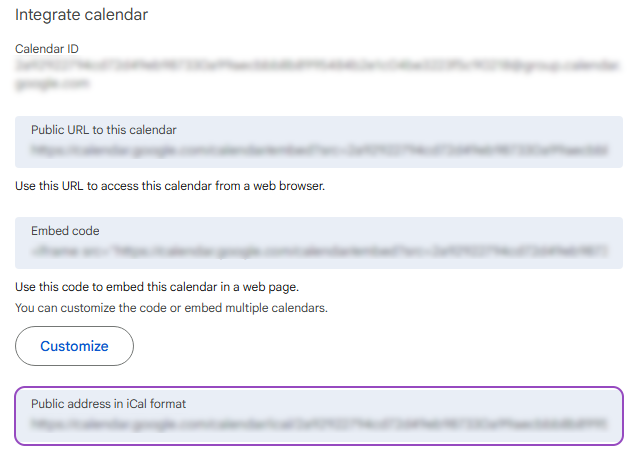
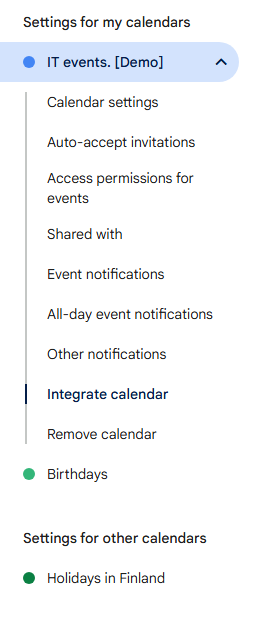
From there, head to Integrate calendar section.
Google calendar settings - Settings for my calendars - Integration settings
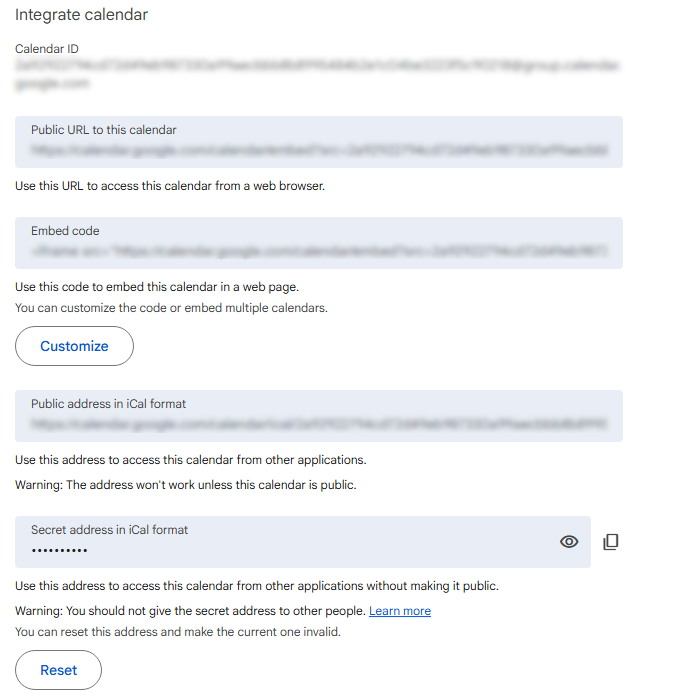
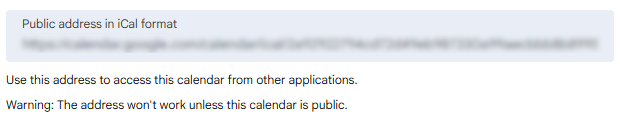
In here you will find Public address in iCal format—the link you need to copy.
Note: The calendar must be public for this address to work in our Calendar for Jira App (and anywhere else). To make it public, head to Access permissions for events section of the calendar’s settings and allow public access.
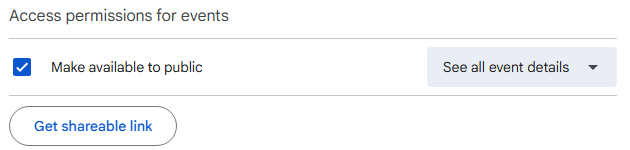
Google calendar settings - Access permissions for events
Once you have your link, head back to our Calendar App for Jira.
Navigate to your calendar settings in our app and then head over to External calendars tab.
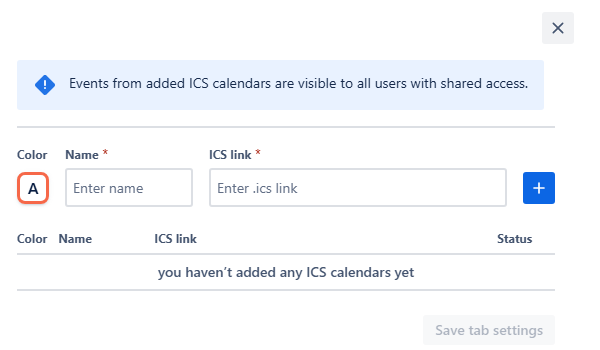
Vacation & Business Trip - External calendars
Similarly to Card colors and Quick filters, fill in the required fields. Choose the color for displaying this external calendar, then give your external calendar a name and paste the link you copied from the Google Calendar into the ICS link field. Click the add + button. Don’t forget to Save tab settings.
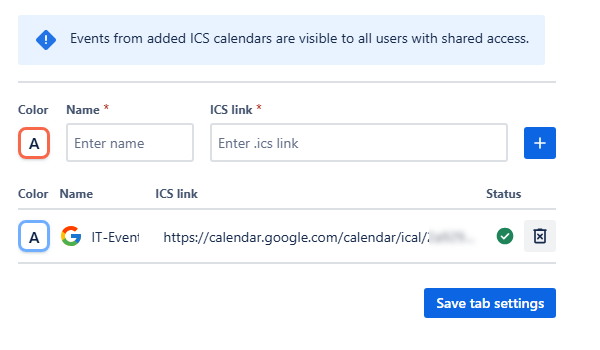
Vacations & Business Trips - Added external calendar
Your external calendar should appear in your sidebar in the Calendars section, below the External calendars sub-list.
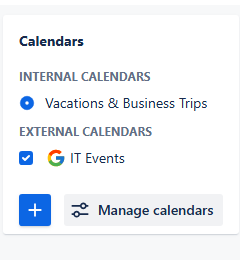
Vacations & Business Trips - External calendars menu
Note: This external calendar is attached to the calendar Vacations & Business Trips. Switching to another Internal calendar will hide the external calendars added to this one.
Creating Non-Jira events for Vacations & Business trips calendar
The Non-Jira Event (NJE) feature is an invaluable tool for quick, visual communication, which could act like sticky notes on the calendar. While the Vacations & Business Calendar is primarily focused on employee time off and travel, NJEs allow the HR team to inject vital, non-vacation context directly onto the schedule. This includes key administrative tasks, like marking the deadline for finding a temporary replacement for a departing employee or noting the final date for approving all outstanding leave requests. By utilizing the NJE's bright, distinguishing colors, these essential HR workflow items instantly stand out from the standard time-off entries, ensuring crucial deadlines are never missed.
To get started, click on any date where you would like to place the event.
Vacations & Business Trips - Picking a date
In the pop-up menu, select New Event.
Once you click New event, an Event creation window will appear:
Vacations & Business Trips - Custom event creation window
Select the Start and End dates and time slots in their respective fields, pick a bright color for easy identification. Provide a Name for the event—it will be displayed on the event’s card on the calendar grid.
Choose the recurrence of the event—whether it happens once, weekly or even daily. Upon using the reoccurrence option, another field will appear—Ends on. Choose when the recurring event will happen for the last time.
Click + Add link to include any relevant URLs. Write a Description for further context in the description field.

Vacations & Business Trips - Custom events details provided
Once you are happy with the details provided and all the required fields are populated, click Save. The event will then appear on your calendar grid:
Vacations & Business Trips - Custom event added
The Non-Jira Event (NJE) feature is especially valuable for calendars viewed in Year Mode, as the integrated Reminder for Jira displays are not supported in this high-level view. This makes NJEs the only way to introduce high-priority, color-coded visual alerts directly onto the comprehensive year-at-a-glance schedule.
Sharing your calendar
Finally, once the configurations are complete, it is time to provide access to your calendar to your team.
To do so, locate the Share button at the top, between the Search and Instant Filters buttons:

Vacations & Business Trips - Sharing a calendar
Click it, and the sharing window will appear:
Vacations & Business Trips - Share window
In this window, you can select the user groups you’d like to share your calendar with. Choose the group from the drop-down menu (or begin typing the group’s name if the option isn’t there, and it will appear), then, once it’s selected, click Add. The group will be then added to the list below, indicating they will gain viewing access upon saving. Checking a box next to the group’s name will give the users editing permissions - they will be able to customize all settings except for Main and Layout tabs of your calendar.
Vacation & Business Trip - Selected groups to share with
Once you are happy with sharing configuration, click Save. The sharing settings will then be immediately applied. The users of the selected group will be able to find your calendar in the Shared with me section of their calendar manager:
Vacations & Business Trips - Shared with me calendars
Marketing Calendar
Marketing calendar
Use case description: The Marketing Calendar serves as a central hub for planning content and campaigns across multiple projects. It allows teams to track various marketing activities like blog posts, social media content, newsletters and offline events in a unified, time-based format. By enabling filtering based on content type, team members, and campaign tags, the calendar helps ensure timely execution and team alignment.
Primary Actor: Marketing Lead or Campaign Manager.
Calendar Shared With: Marketing team, content creators, product managers.
This guide will walk you through setting up a Marketing Calendar using our Calendar for Jira app. We've pre-configured various work types and custom fields within our demo instance to fully showcase the app's features. If you'd like to see the exact parameters and settings used, you can find a detailed breakdown below.
Create the respective work types.
For this case, we opted to use four different work types to describe typical marketing activities: Blog Post, Newsletter, Social Content, Event.
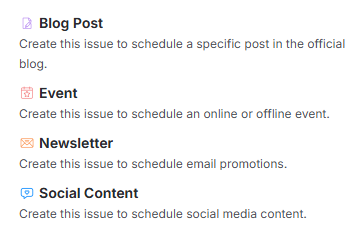
Marketing calendar - Work types
Following Jira logic, we'll use Epics to unify different work items into separate marketing Campaigns.
Create workflows.
We decided to use one shared workflow which describes the usual stages of marketing activities. Once a work item is created, it is then moved to a draft stage (status Draft, category In Progress), where the initial idea is described. It is followed by the review (status Review, category In Progress) to receive the suggestions on how to achieve the goal of said activity. The changes are then applied in the preparation phase (status Preparation, category In Progress), which is followed by the final review (status Final Approval, category In Progress). After the details are confirmed, the activity is scheduled and the work item will remain in that status until the chosen date (status Scheduled, category To Do). It will transfer to Published status once the work is finished (status Published, category Done).
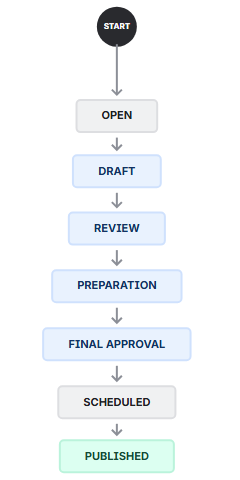
Marketing calendar - Marketing workflow
We suggest using automation to ensure proper work item allocation to the assignees. To do so, head over to the automation rules in your Jira settings and create the rules where you choose who will become the assignee each time the status of the work item is changed.
Add custom fields.
Now that our work types are implemented into the project, we could further diversify them into different sub-categories by creating custom fields. We opted to add two at most custom field per work type to demonstrate the functionality of our Calendar for Jira app, but, of course, there could be more.
Let’s imagine that this demo project belongs to a video game development company.
To associate all works with the different products created by this company we added Game Title custom field. This way, we could visually assess how much effort is put into each product by viewing the calendar grid.
For Campaigns (Jira Epics), we included a Campaign Goal field to clearly define the intended result of each marketing initiative. This helps to unify all related activities toward a single, measurable objective.
For Blog Post, we decided to add Content Type custom field to quickly make it transparent if there are any gaps in the engagement with the audience in the company’s official blog. It will be especially visible with the proper settings for our Calendar for Jira app.
Social Content received Social Media Platform custom field to ensure that the company’s presence across the internet is thorough. Content Type custom field was also associated with the Social Content work type.
For Newsletter, we opted to specify the Audience, with the multiple choices possible.
Finally, for the Event, we simply listed the options for the Type of Event the company organizes, whether it be something hosted entirely online or even merch sales.
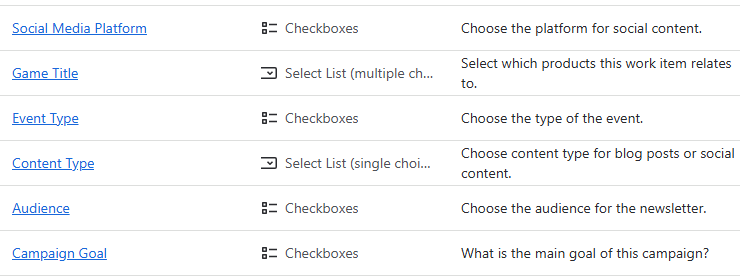
Marketing calendar - Custom fields
Because these custom fields are associated with different work types, it is necessary to properly configure the screens and screen schemes so these options are available to choose from while creating an issue or editing it.
With such detailed setup, we are now ready to put it into use by creating our Marketing calendar!
Calendar Creation
Open the Calendar for Jira app from the Jira Apps menu.
In the sidebar, find the Calendars menu and click the + create button.

Marketing calendar - Creating the calendar
Give your calendar a name: simple Marketing will be more than enough.
Specify what the calendar is based on. For this case we can use pre-defined Saved Filters which include all marketing activities we’ve added to our demo instance, excluding the epics.
Because marketing is quite often planned by the hour, it is reasonable to use date-time field(s) as the date field type of your Marketing calendar.
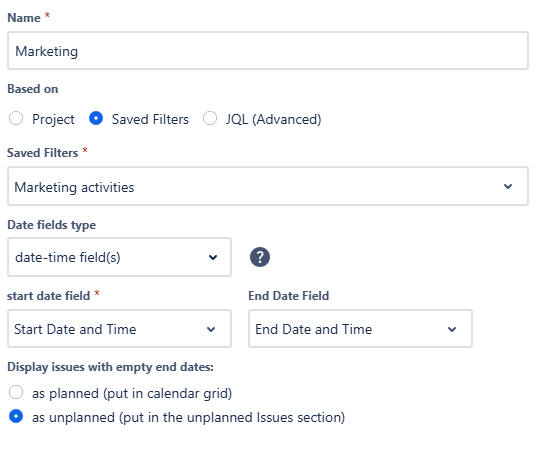
Marketing calendar - Main settings
For the Layout settings, set the default view to Month View. This provides an excellent, high-level overview of all upcoming campaigns and content.
For the gaming industry, planning marketing activities on weekends is especially valuable, as a large part of the player base is most active on those days. To take advantage of this, make sure weekends are visible in your calendar.
For your issue card fields, we suggest displaying the Campaign this item belongs to by choosing the Parent option. This instantly links each task to its overarching campaign. We also recommend showing the item's Priority level for quick visual context.
The issue preview window is perfect for displaying additional details from your custom fields without cluttering the calendar view. We suggest selecting the most relevant custom fields you've created. The information in the preview will be displayed based on the specific work type you're viewing.
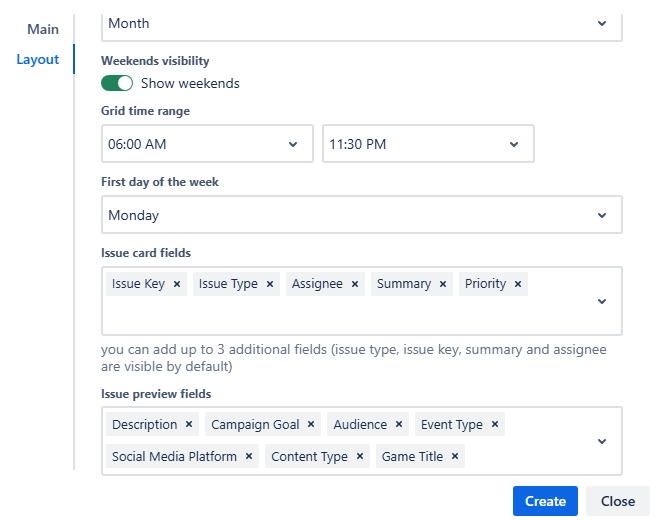
Marketing calendar - Layout view
After confirming your settings, click Create. You will then see the initial look of your Marketing calendar:
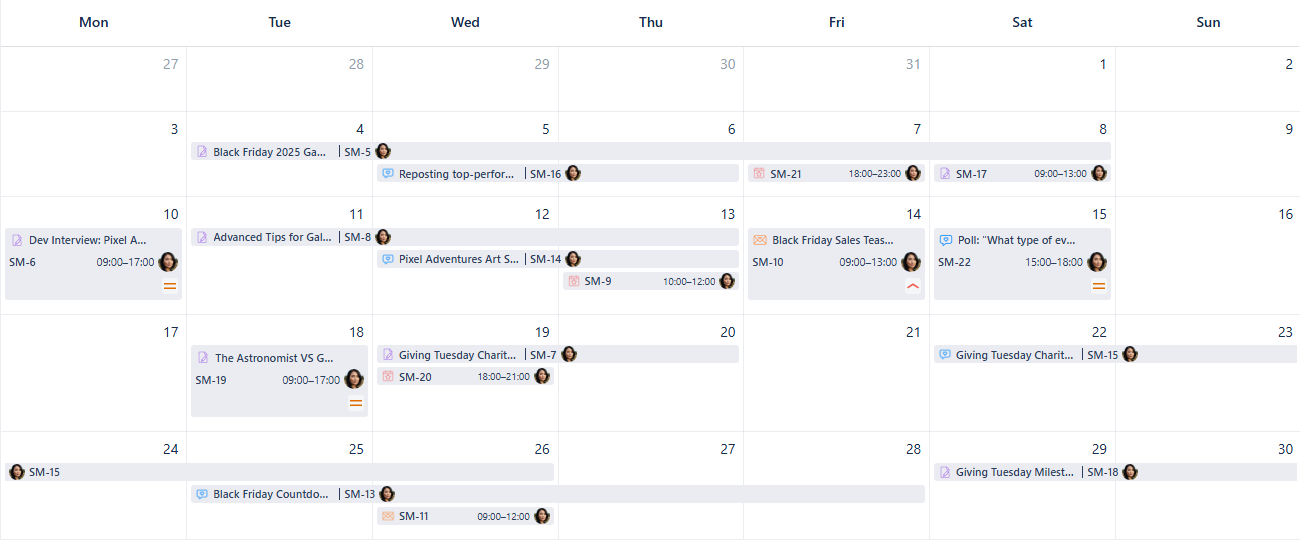
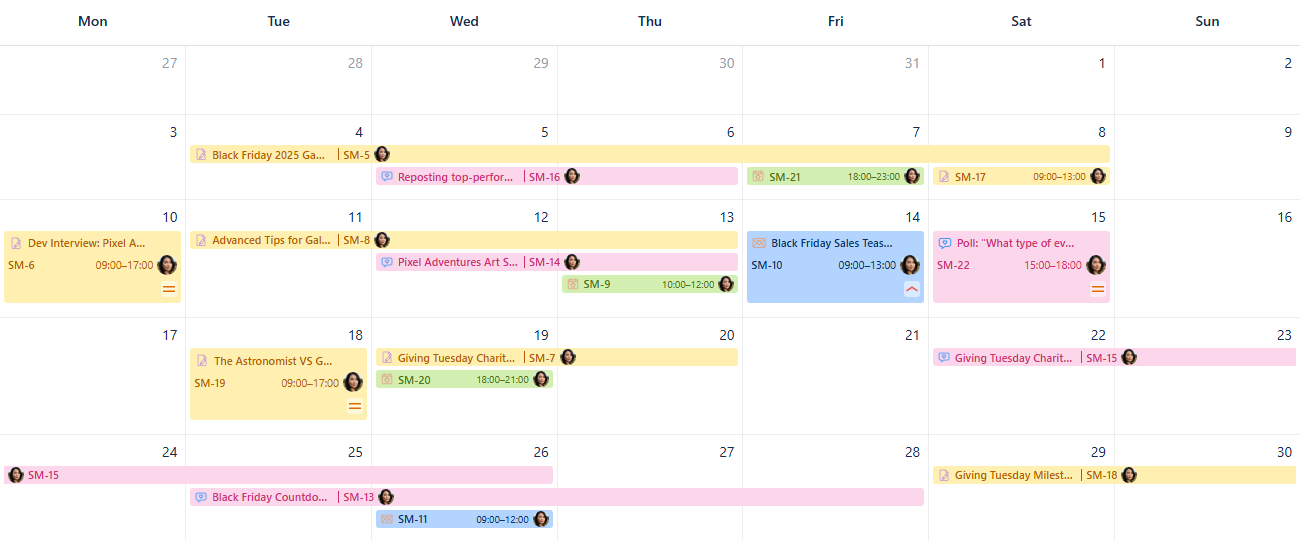
Marketing Calendar - First look
To bring more clarity to your calendar, let's explore the app's powerful display and filtering features.
Card colors for Marketing calendar
Applying colors to the various marketing activities is a great way to bring clarity to the calendar and make navigating it easier.
First, open the calendar's settings at the bottom of the sidebar and select the Card colors tab.
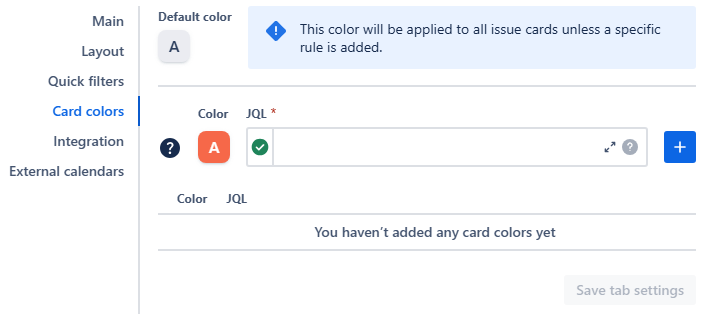
Marketing calendar - Card color settings
Using JQL statements to apply color rules is a great way to visually manage your calendar. For instance, you can highlight different work types to instantly see if your marketing efforts are balanced. This visual insight allows you to quickly adjust your strategy and ensure a balanced marketing mix.
Example: Yellow hue, the lightest shade: type = "Blog Post"
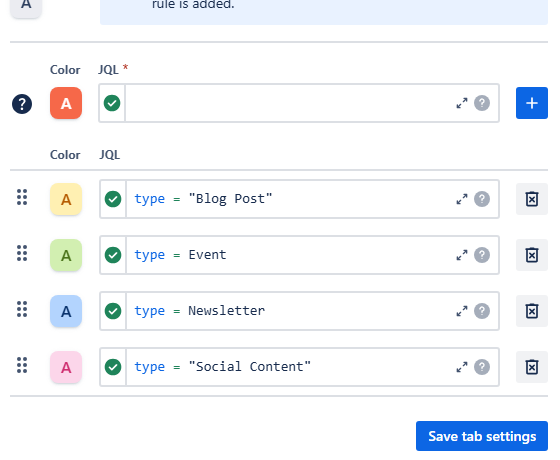
Marketing calendar - Card color rules added to the settings
Once you’re happy with all color rules added, click Save tab settings.
Other users are able to check the color rules by clicking the Legend button in the bottom of the sidebar:
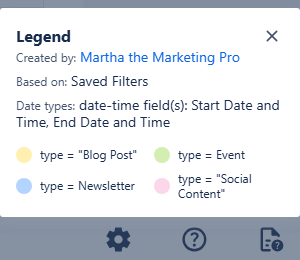
Here’s how the card color feature will change the appearance of your Marketing calendar:
Marketing calendar - Card color rules applied
Make sure to check the coloring your cards page if you have any questions about this feature.
While color-coding is great for a high-level overview, Quick filters give you the power to instantly focus on specific information by hiding everything else. Let’s set those up as well!
Quick filters for Marketing calendar
Navigate to the calendar's settings, then head over to the Quick filters tab.
There, you can use JQL to associate short, precise names describing what you’d like to isolate with the queries. Thanks to the variety of custom fields setup in this demo, we can display the work items based on the game title, highlight the issues which require immediate attention, and also isolate the activity on different social medias—all in one feature.
As you use JQL with custom fields, the hint feature will assist you by suggesting available custom field names and their possible values as you type.
Here’s how a quick filter setup could look like:
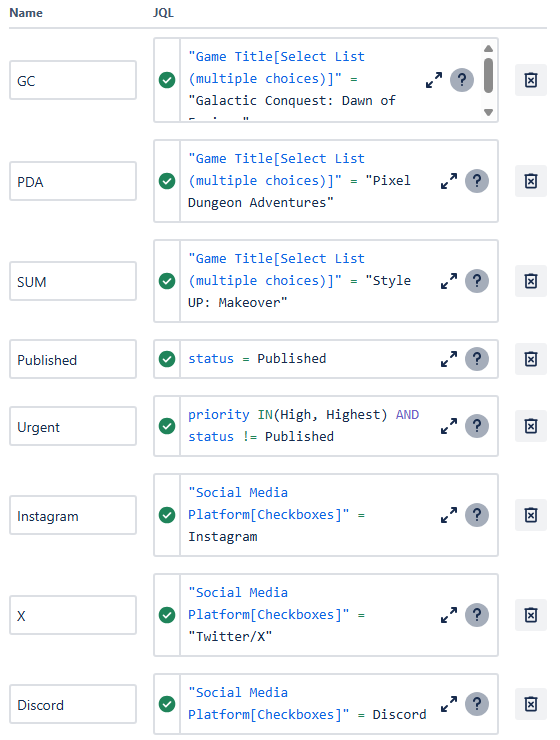
Marketing calendar - Quick filter rules added
After clicking Save tab settings, you will find your quick filter buttons right above your calendar grid, in the quick filter row:

Marketing calendar - Quick filters in place
Click one of the buttons to activate the filter. The calendar will then display the issues which adhere to the rules inlaid into that particular quick filter. Clicking the button again will deactivate the filter. By activating multiple quick filters at the same time, you apply an AND condition between them: the calendar will only display the work items that satisfy all sets of quick filter rules currently activated.
More info about how the filtering works within our Calendar for Jira app can be found here.
Connecting External Calendars
You can integrate external calendars like product launch schedules, industry events, or partner-related timelines into your Marketing calendar to provide valuable information to your team, product managers or content creators.
First, get the iCal link (.ics URL) for the external calendar. Find the detailed instructions on how to locate the ICS link here.

Marketing Calendar - Outlook .ics link
Marketing Calendar - Google .ics link
In your Calendar for Jira app, go to the calendar settings and choose the External calendars tab.
Choose a color hue and provide a name to your external calendar, then paste the iCal link into the ICS link field. Click the add + button.
Marketing calendar - External calendar added
Click Save tab settings. The external events will then also appear on your calendar grid:
Marketing calendar - External events added onto the grid
The external calendar will then be visible in the sidebar under External calendars.
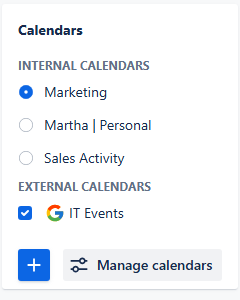
Marketing calendar - External calendar in the sidebar
Check the box next to its name—the external events will then also appear in your calendar grid. Uncheck it to hide the events of the iCal subscription.
To delete the external calendar, simply click the delete button to the right of the calendar’s name in the External calendars settings.
Creating Non-Jira Events
The Custom or Non-Jira Events (NJE) feature is great for scheduling important marketing activities that don't require a Jira issue. This could include team brainstorms, informal deadlines, or prep sessions for a major event.
To get started, click on the desired date on the calendar:
Marketing calendar - Picking a date
In the pop-up menu, select New Event. An event creation window will appear:
Marketing calendar - Non-Jira event
Fill in the dates and times, choose a color, and give the event a name. In gaming industry, this could convey a simple operation of turning a certain setting on or off on the servers (for example, pre-configured in-game events).
Marketing calendar - Adding the event
Add a description and click Save. The event will immediately appear on your calendar grid:
Marketing calendar - Custom events added
Adding Reminders
If your team uses our Reminder for Jira app by Teamlead, you can display these reminders directly on your calendar. This is an effective way to keep everyone on top of publishing deadlines or review stages.
To create a reminder directly from our Calendar, simply press the R-key to prompt the reminder creation window to appear:
Marketing calendar - Adding a reminder
Alternatively, you can create the reminder from the main page of our Reminder for Jira app by Teamlead by clicking the + Add Reminder blue button:
Marketing calendar - Creating a reminder from the Reminder page
Provide the necessary information and associate the reminder with a work item. After that, click Create, and the reminder will be added to your reminders list.
Once you have a reminder you’d like to display on your calendar grid, go to the calendar settings, and then to the Integration tab. In there, switch the Show the current user’s reminders toggle to on, turning it green.
Marketing calendar - Turning the reminders on
Click the Save tab settings. Your reminders will then appear on the calendar grid alongside your issues:
Marketing calendar - Reminders on the calendar grid
Sharing your calendar
After you’ve customized the calendar, you can share it with your team to improve collaboration.
On the calendar interface, find the Share button. It's located to the right of the Today link.

Marketing calendar - Sharing a calendar
Click this button, and a share window will pop up.
Marketing calendar - Share window
From this window, you can select the user group that represents your marketing team. After you do, click Add, and then choose if the group members should have editing rights by checking the box next to their name. This is useful if a campaign manager needs to make changes.
Marketing calendar - Sharing the calendar with a user group
You can also get a direct link to the calendar by clicking Copy link in the share window.
Finally, click Save. Your team members will be able to access the calendar from the Shared with me section of the Calendars menu.
Marketing calendar - Displayed in Shared with me
Sales Activity Calendar
Sales Activity calendar
Use case description: This calendar is designed to help sales teams manage and visualize their upcoming activities, such as client calls, product demos, and follow-ups. It provides a weekly overview for planning and coordination, and it enables managers to monitor team bandwidth.
Primary Actor: Account Executive or Sales Ops.
Calendar Shared With: Sales team, leadership.
This guide outlines the steps to set up a Sales Activity calendar within the Calendar for Jira app. Its purpose is to assist sales teams in managing their activities and ensuring all essential tasks are tracked. Make sure to check out the setup steps down below to make the explanation given in the manual more clear; following them isn’t required.
Create relevant work types:
You can create specific issue types to better track your sales activities, such as Client Call, Follow-up, Demo and Contract Review:
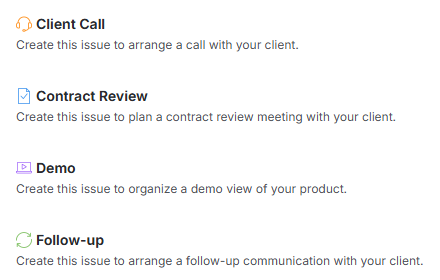
Sales Activity calendar - Work types
Set up workflows for issue types:
A simple, effective workflow for sales activities might go as Open → Planned → Completed. Generally speaking, default Jira workflows should be more than sufficient to configure these work types, however, a more complex approach is also possible if it is required by your workplace.
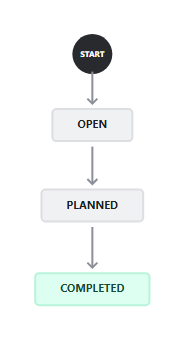
Sales Activity calendar - Workflow
Add Custom Fields (Optional)
In a sales calendar, you're not just tracking generic tasks; you're tracking a complex sales process. Custom fields allow you to tag each work item with specific, sales-oriented data like account size, the deal stage, the client or the region they’re from to make sure your sales activity efforts are directed exactly where you want.
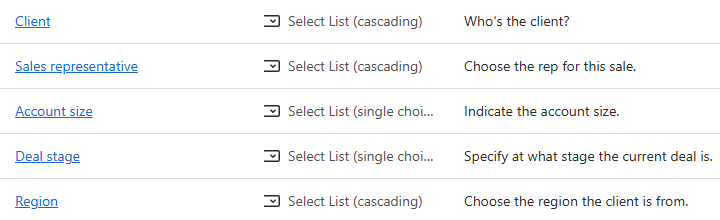
Sales Activity calendar - Custom fields
For this demo, we've also created a custom Sales Rep field instead of using the default Assignee field. While a real-world setting would likely map the sales representative to the Assignee, creating a separate custom field gave us greater flexibility within the calendar use case.
With our project now fully configured, we are ready to dive into the demo!
Creating the Calendar
Now that the preliminary setup is complete, let’s build our sales calendar.
Open the Calendar for Jira app from the Jira Apps menu. In the sidebar on the right side of the screen, find the Calendars menu and click the + create button.

Sales Activity calendar - Creating a calendar
In the calendar creation window, give your calendar a clear and descriptive name. If you plan to share the calendar with others—as is often the case in a sales environment—including key details in the name will make it much easier for colleagues to find and understand its purpose in the future.
Select what the calendar is based on. For many organizations, treating the sales process for a specific product, service, or activity as its own project is a common practice. This approach allows your calendar to display and manage all the relevant issues and activities tied to that specific project, giving you a focused view of your sales pipeline. To specify both the project and the work types, the best option is to use JQL.
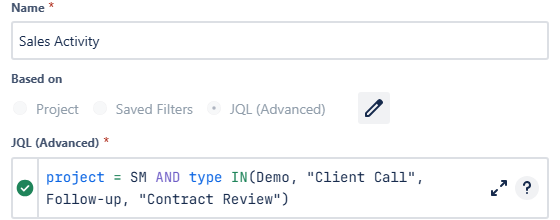
Sales Activity calendar - Name & Based on settings
Your calendar's data can be based on a single sales project or multiple projects. While choosing a single project provides a focused view, selecting multiple projects allows you to pull from a wider range of data and then use our app's filtering features to narrow your view as needed.
Since sales activities primarily consist of scheduled client calls and meetings, you'll need the flexibility to set precise times. In the Date field type settings, be sure to select the date-time fields option for both your Start and End date fields.
To make scheduling quicker, choose the "as planned" option for Display issues with empty end dates. This allows you to schedule a meeting using only the Start date and time—the issue will still be visible on the calendar even if you don't yet know the exact end time.
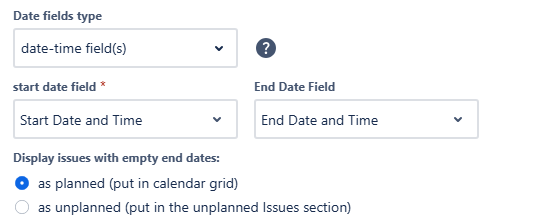
Sales Activity calendar - Date fields
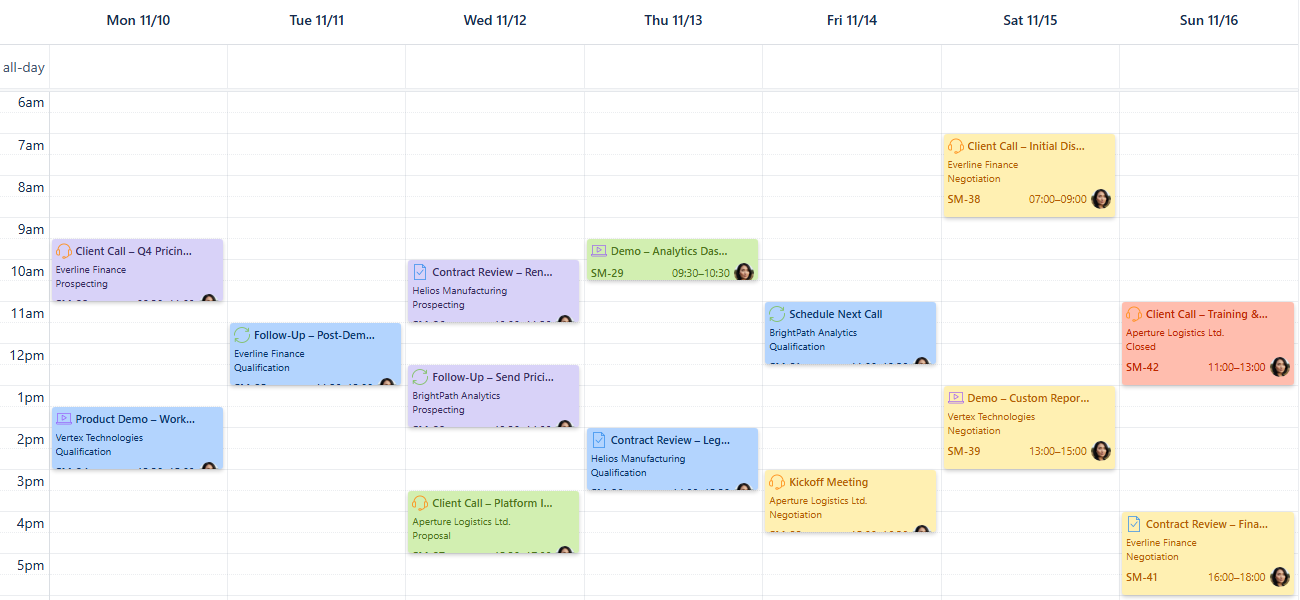
For the Layout settings, set the default view to Week View. This is perfect for sales teams who need a clear, actionable overview of their daily and weekly schedules.
Since sales availability often requires accommodating different time zones, ensure you enable Weekends and set a broad Grid time range to visualize all potential client call hours.
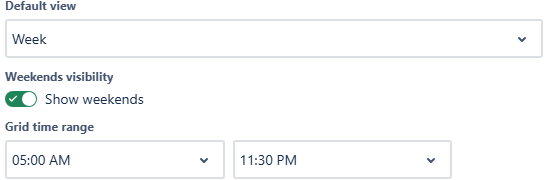
Sales Activity calendar - View, Weekend and Grid time range
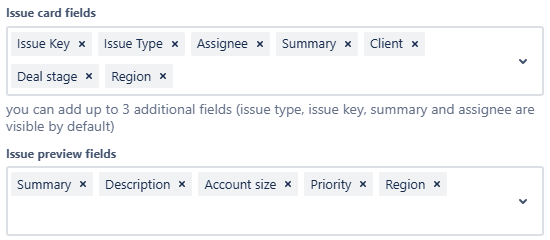
For Issue card fields, display the most essential data—Client, Deal stage and Region—directly on the scheduled event block. Use Issue preview fields area—what you see when you click on the card—to include relevant secondary information, such as Description, Account Size or Priority. It will give you quick access to the full sales context without opening the work item.
Don't hesitate to display the same fields in both the card and the preview if that fits your workflow best. The goal is to set up the calendar in the way that provides you with the fastest access to the information you need most often.
Sales Activity calendar - Issue cards & Issue preview fields
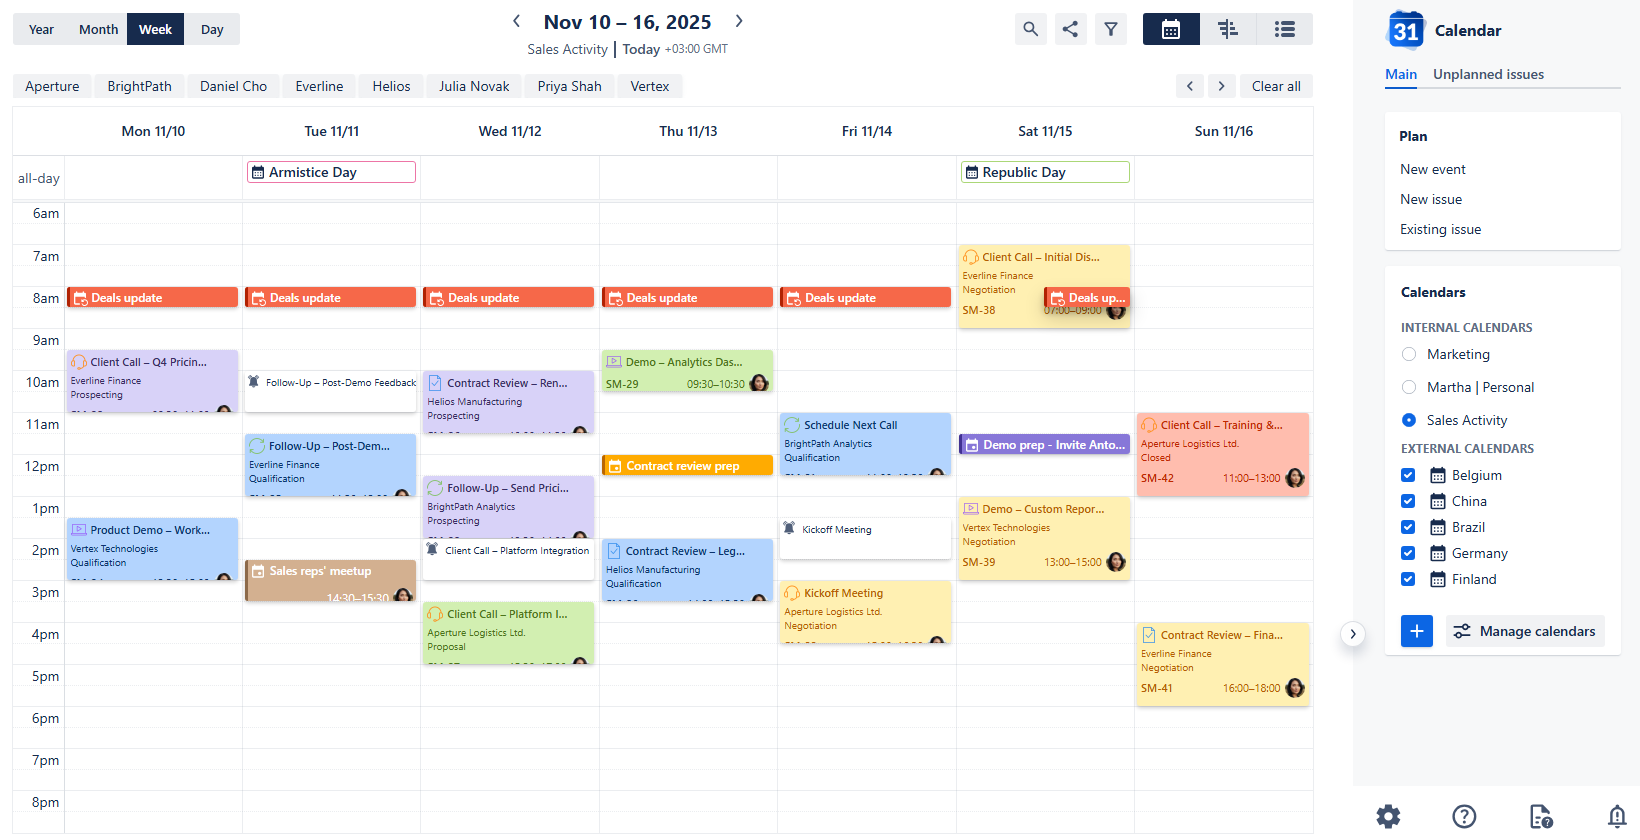
After confirming your settings, click Create. Have a look at the initial appearance of your calendar:
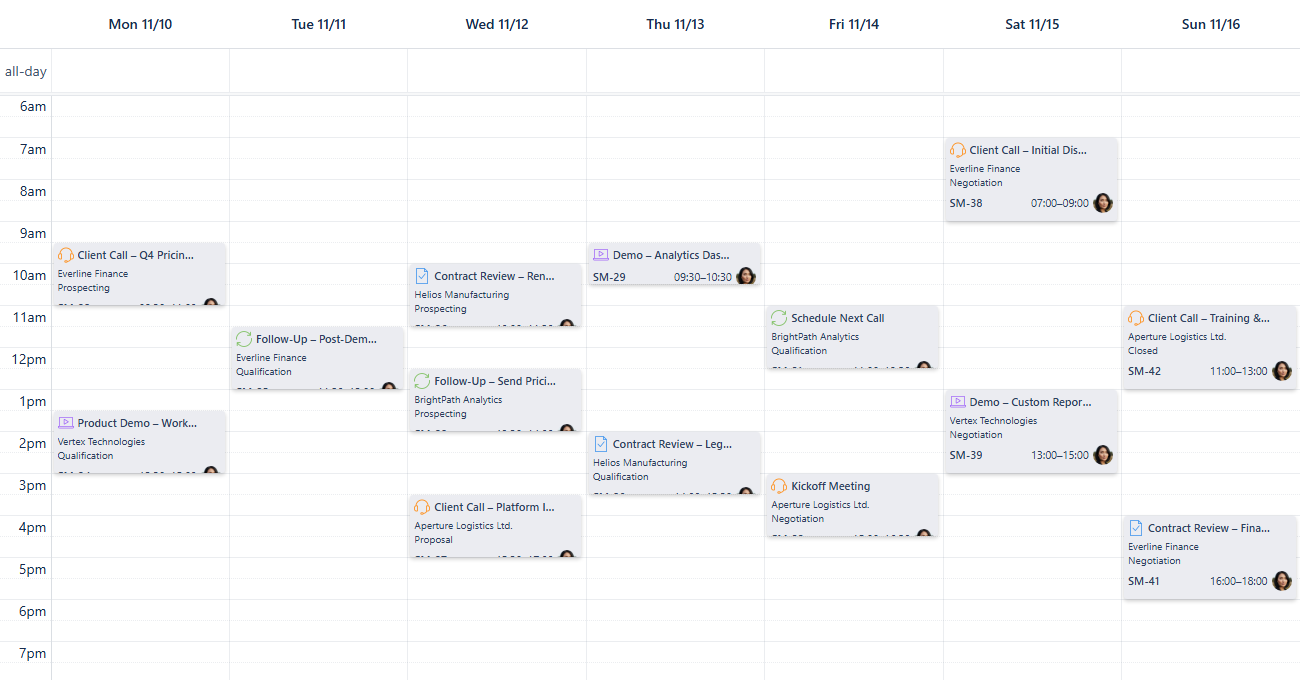
Sales Activity calendar - First look
Card Colors
Using color coding is a powerful way to enhance your calendar's readability and quickly interpret the data displayed on the grid. It allows you to integrate a smart visual hierarchy that reduces information clutter on the issue cards. By assigning colors based on a critical field—such as Deal Stage—you can instantly identify the status and urgency of every sales activity.
Let's establish the color rules for each Deal Stage now.
First, open the calendar's settings at the bottom of the sidebar and select the Card colors tab.

Sales Activity calendar - Card color settings
Select the color for the initial deal stage and provide a text input into the JQL field. Begin typing with custom field’s name, and a hint will appear for you to click on and use:
Sales Activity calendar - Adding a color rule based on custom fields
After your JQL query is complete, click + button, and the rule will be added to the list of color rules down below:
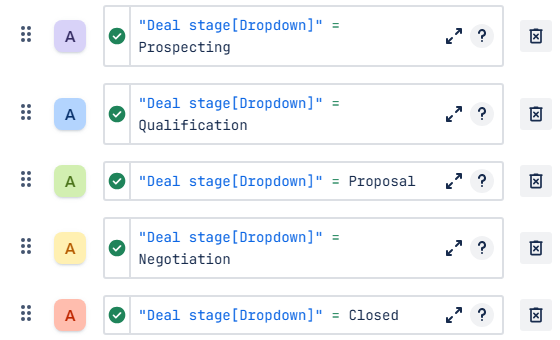
Sales Activity calendar - Color rules added
Once you’ve added the colors for all stages, click Save tab settings. Have a look at your calendar:
Sales Activity calendar - Card colors added
Once you’re familiar with the color coding used for the deal stages, feel free to remove the Deal stage field from the Issue card fields in the settings of your calendar.
To see what color rules are used in the calendar, head over to the bottom of the sidebar and click Legend button:
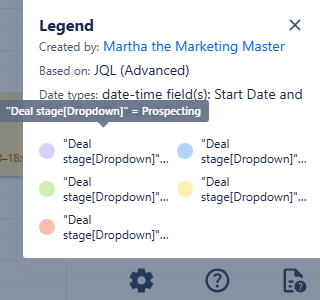
Sales Activity calendar - Legend
It will show you the colors and the JQL used to create a color rule. Simply hover your mouse over one of the rules to see the details.
Quick Filters
Quick Filters are a powerful tool for instantly accessing and visualizing targeted information, especially when combined with your custom fields. For this Sales Activity calendar, utilizing Quick Filters based on the Sales Rep field is vital for workload distribution analysis. This allows managers to quickly isolate each specialist's schedule to evaluate how evenly the team's capacity and activities are balanced throughout the week.
To set this up, navigate to the calendar's settings, then go to the Quick filters tab.
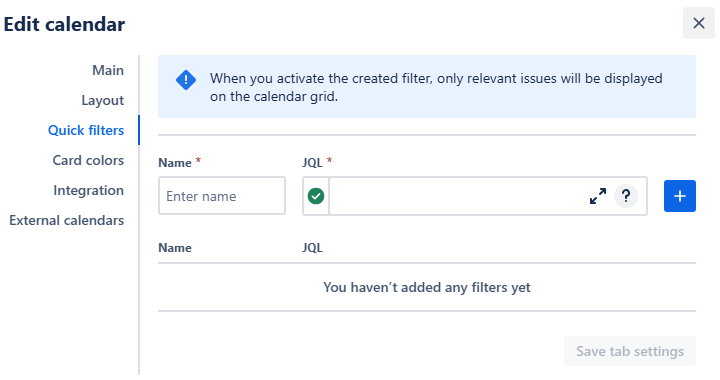
Sales Activity calendar - Quick filters settings
Name the filter after the Sales Rep it targets. When composing the JQL, be sure to reference the correct field. Use the custom Sales Rep field we created for this use case, or, if your project is configured for it, use the default Assignee field. This precision is essential for isolating the correct set of scheduled activities. Click the + button to add the rule to the list of rules:
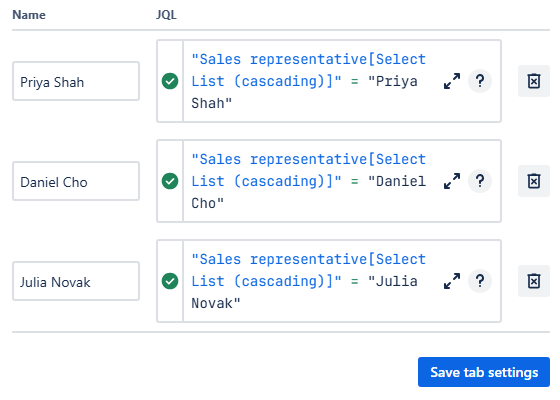
Sales Activity calendar - Quick filters added
Click Save tab settings to finalize your filters. Your quick filters will then appear as a row of buttons above your calendar.

Sales Activity calendar - Quick filters ready to use!
Feel free to add more quick filters based on what you’d like to have readily accessible to you—for example, individual clients.
Connecting External Calendars
Integrating external calendars is crucial for a sales team looking to build stronger client relationships. The awareness of their schedule, including their holidays, not only prevents ineffective communication but also demonstrates a high level of professionalism and attention to detail.
Our Calendar for Jira app provides the necessary tools to achieve this. By subscribing to an external calendar feed from your client's team, or, as a simpler solution, adding their national holidays calendar to yours, you gain valuable insight into their possible availability. This allows you to plan your outreach strategically. Let’s do exactly that as a part of our demo!
To get started, obtain the iCal link (.ics URL) of a desired country’s national holidays calendar. A simple internet search will yield an ICS-subscription link. Here’s an external calendar example we’ve found on the internet:
https://ics.calendarlabs.com/46/35952e90/Germany_Holidays.ics
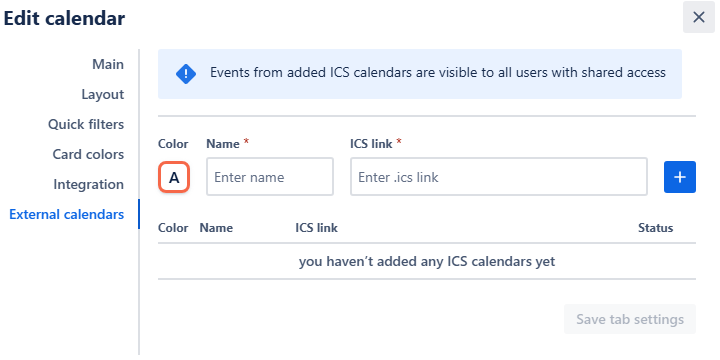
In your Calendar for Jira app, go to the calendar settings in the bottom of the sidebar on the right side of your screen. In the settings, navigate to External calendars tab.

Sales Activity calendar - External calendar settings
Choose a color hue and provide a clear name associated with the country you're tracking. Paste the iCal link into the ICS link field, then click the add + button.
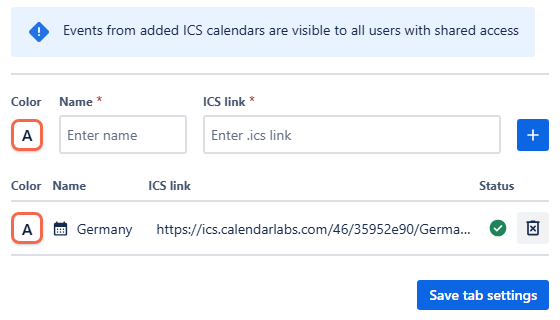
Sales Activity calendar - External calendar added in settings
Once the calendar is successfully added to the external calendar list, click Save tab settings. The events from the external calendars will then appear in All day section of your calendar:
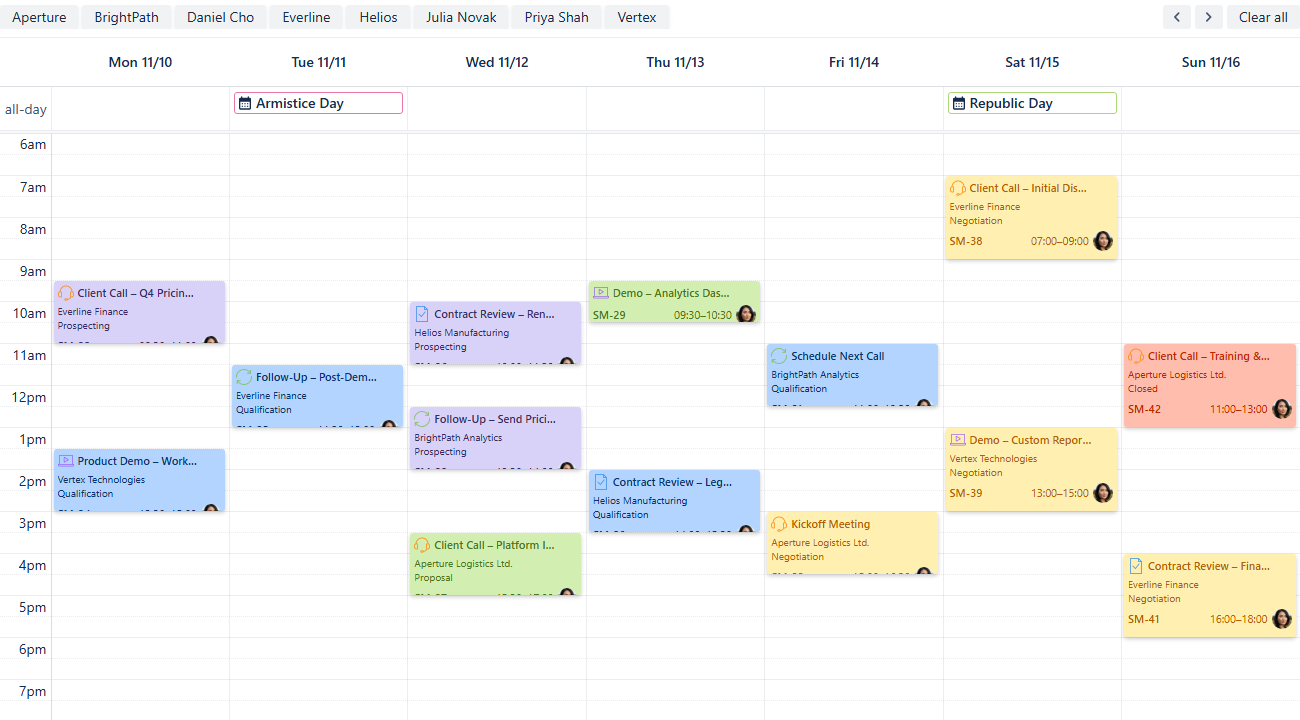
Sales Activity calendar - External events on the grid
The external calendars' names will now be visible in your sidebar under External calendars.
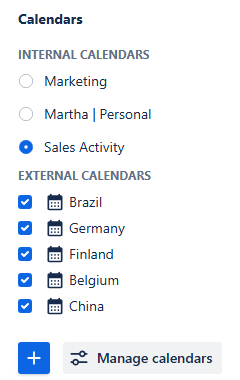
Sales Activity calendar - External calendars added
To toggle the visibility of events from a calendar subscription, simply check the box next to its name to display them on your grid, or uncheck the box to hide them. Use these external calendars to quickly verify the client's availability before scheduling a new sales activity.
Note: If you request an iCal subscription link from a client, it's crucial to inform them how the ICS-subscription technology works. By sharing the link, they're creating a live connection between their calendar and yours. This means that any changes or updates they make to their original calendar will be automatically reflected in your calendar, ensuring your information stays current.
This transparency helps build trust and ensures they are comfortable with sharing their calendar.
Creating Non-Jira Events
The Custom or Non-Jira Events (NJE) feature is great for scheduling important sales-related activities that don't need a Jira issue. This could include scheduling travel time, prospecting blocks, or internal prep sessions.
To get started, click on the desired date on the calendar.
Sales Activity calendar - Picking a date
In the pop-up menu, select New Event. An event creation window will appear:

Sales Activity calendar - Adding a custom event/
Fill in the start&end dates and times, choose a color for the event’s card and give the event a name like Client Meeting Prep.
Add a description and click Save. Your non-Jira even will then appear on your calendar grid.
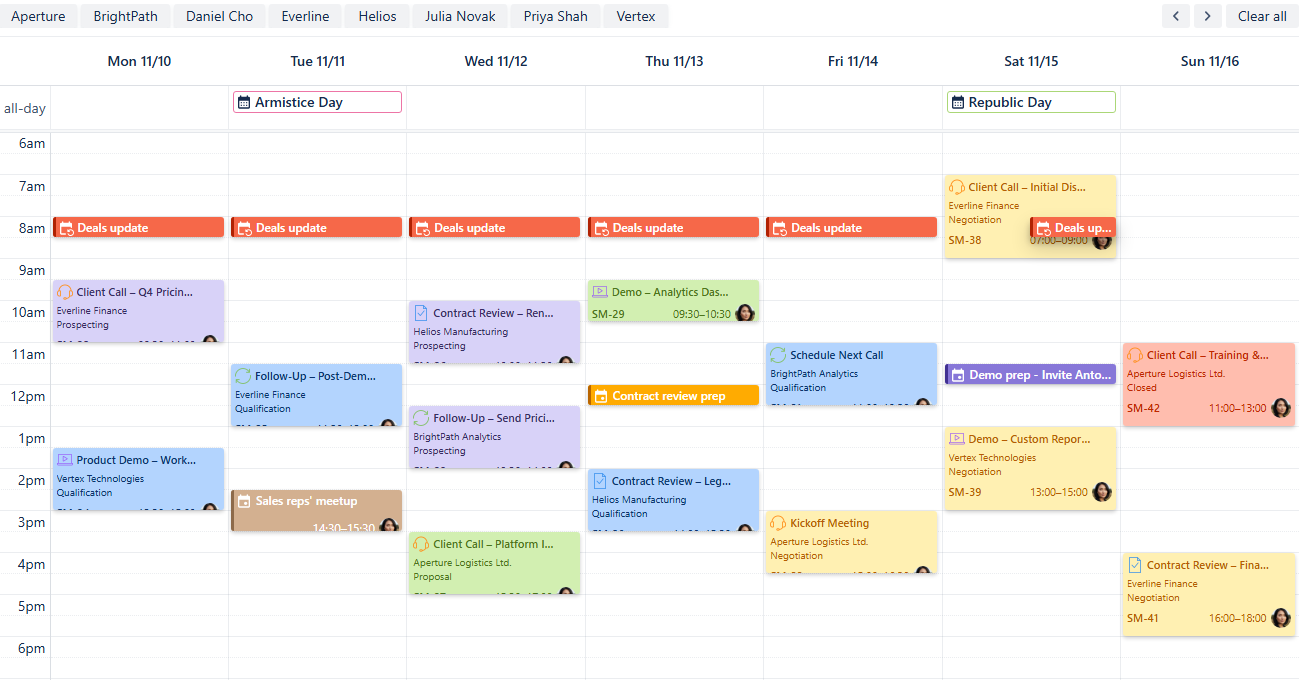
Sales Activity calendar - Custom events added
Adding Reminders
If your team uses the Reminders for Jira app, you can display these reminders directly on your calendar grid. This is an effective way to keep everyone on top of crucial tasks like call prep, follow-ups, or quarter-end deadlines. Seeing the reminders alongside your scheduled work items provides visual confirmation that the necessary notifications are set and will be sent exactly when you need them.
To create a reminder, click on the issue card to bring up the issue preview:
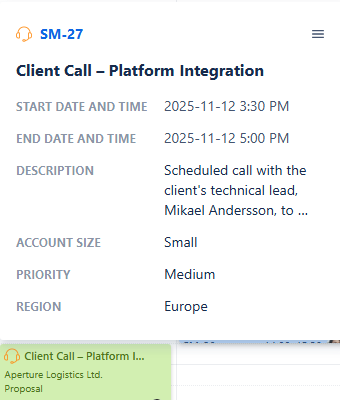
Sales Activity calendar - Issue preview
From there, click on the issue key link, and the issue window will open:
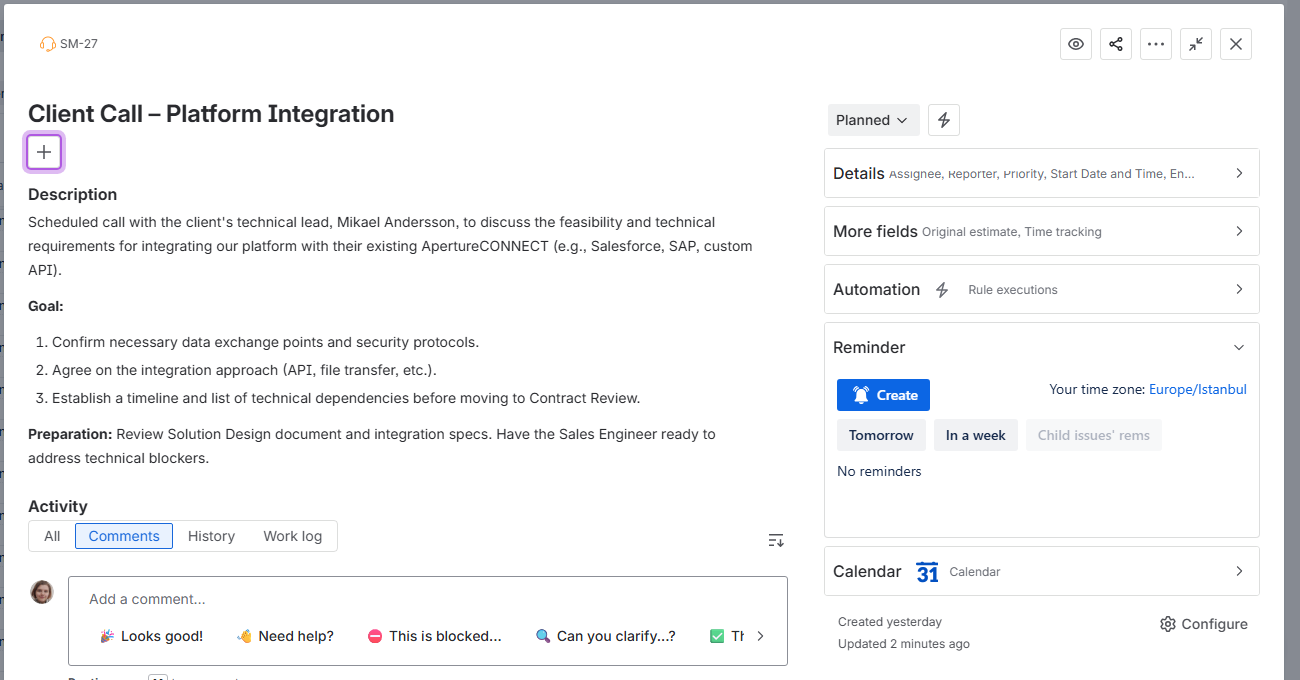
Sales Activity calendar - Accessing work item from the calendar
Within the work item’s window, locate the Reminder dropdown menu, under the issue’s context fields. In there, you can click Create button to begin adding a reminder. Alternatively, press the R-key on your keyboard.
The reminder creation window will look like this:
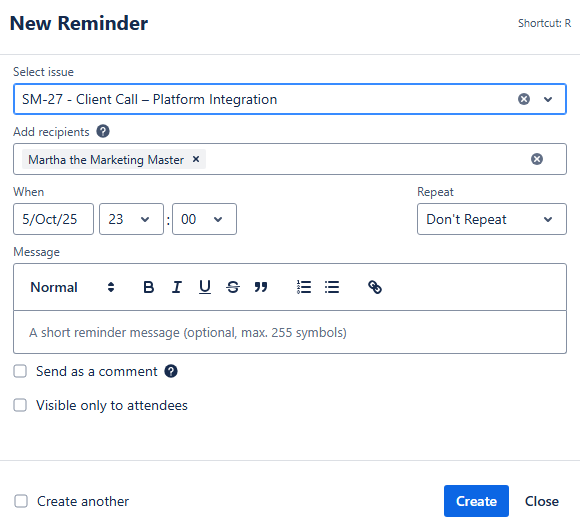
Sales Activity calendar - Adding a reminder
Fill out the necessary fields like when the reminder should happen, what issue it is associated with, who will receive the reminder and whether it’s going to be public or private. Choosing Send as a comment option will send a comment from Reminder App right underneath the work item when the reminder goes off.
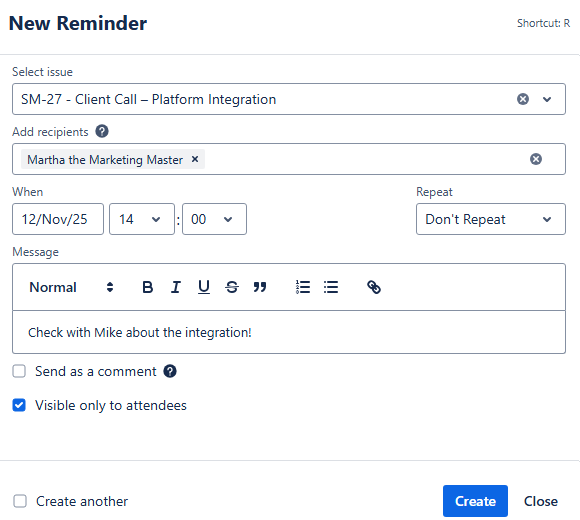
Sales Activity calendar - Adding a reminder
Once you’re happy with the reminder’s configuration, click Create, and the reminder will be created. You will be able to see it in the Reminder drop down menu within the work item:
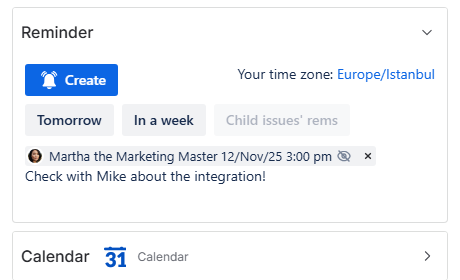
Sales Activity calendar - Reminder added
Now, to display the same reminder in your calendar grid, you have to enable the Reminders integration for your calendar. To do so, go to the calendar settings, and then to the Integration tab.
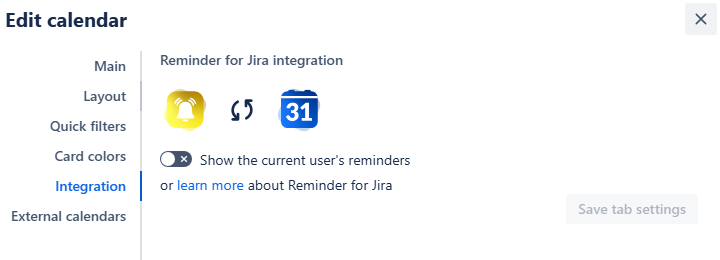
Sales Activity calendar - Integration settings
Switch the Show the current user’s reminders toggle to on, turning it green. After that, click the Save tab settings. Your reminders will then appear on the calendar grid alongside your issues:
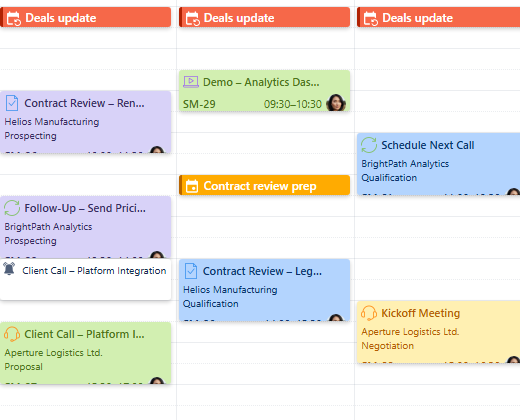
Sales Activity calendar - Reminders displayed on the calendar
Sharing your calendar
After you’ve customized the calendar, you can share it with your team and leadership to improve collaboration.
On the calendar interface, find the Share button. It's located to the right of the Today link, between the Search and Instant filters buttons:

Sales Activity calendar - Share button
Click this button, and a share window will pop up:
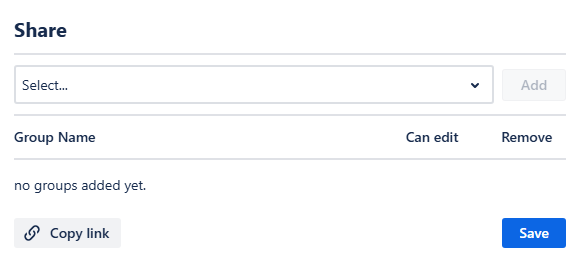
Sales Activity calendar - Share window
From this window, you can select the user group that represents your sales team. Click Add, and then choose if the group members should have editing rights by checking the box next to the user group’s name.
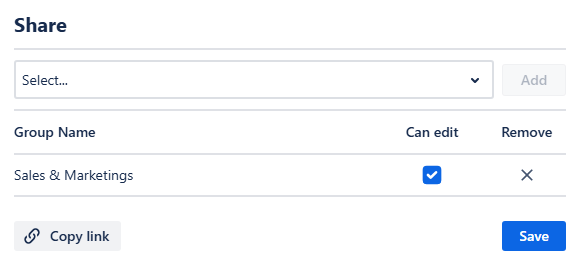
Sales Activity calendar - Sharing the calendar
You can get the direct link to the calendar by clicking Copy link in the share window.
Finally, click Save. Your team members will be able to access the calendar from the Shared with me section of the Calendars menu.
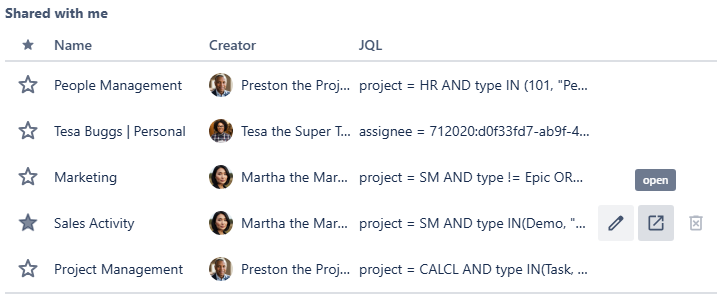
Sales Activity calendar - Shared with me calendars