.png)
SLA 2.0
Overview
HelpDesk lets you set clear time targets—Service Level Agreements (SLAs)—for handling customer request (issues). For example:
First Response: within 1 hour
Full Resolution: within 5 business days
In addition to tracking each ticket from start to finish, you can enable Team SLAs. This optional feature lets you:
Assign specific time goals to individual teams (e.g., diagnosis by tech support, refund processing by billing)
See at a glance which team is on track and which needs attention
With both overall and team-level SLAs, you keep every step of your support process visible and on schedule.
At the Team-Level SLAs, the key entity is the Team—a group of people solving issues (e.g., first-line support, QA, developers). In addition to your overall issue SLA, you can set a time target for each team.For example, you might give first-line support up to 30 minutes to handle any steps they can, leaving the rest of the SLA time for other teams.
You can see exactly how much time each team spent on a ticket in the Activity tab.
Service Level Agreement (SLA)
Defines what you promise your customers—i.e., how quickly you’ll handle their requests.
Team-Level SLAs
Break the overall SLA into chunks owned by different teams inside your company. This ensures each team does its part so the main SLA is met.
Example: Critical (“blocking”) bug – Overall SLA = 5 h
Support team: 30 min to clarify details and route the ticket
QA team: 1 h to reproduce the issue
Development team: 3 h 30 min to implement and deploy the fix
Field Appearance
If the SLA fields have been added to that screen you’ll see:
the SLA field showing its due date, a colored progress bar, and the exact remaining time.
breakdown by team — each line shows the team name, its own mini progress bar, and that team’s remaining SLA time.
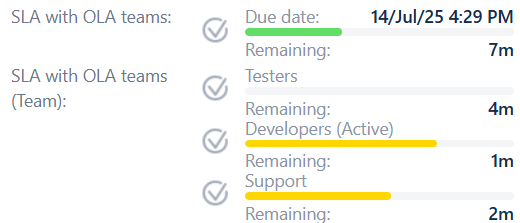
You can hover over any of these fields to reveal more details
Field Condition (Icon)
condition | not breached | breached |
|---|---|---|
not started or been reset |  | – |
in progress within the working schedule |  |  |
in progress out of the working schedule |  |  |
paused (intentionally) |  |  |
stopped |  |  |
Elapsed Time
Once an SLA countdown starts, Elapsed Time shows how long has passed (excluding scheduled pauses and manual holds) until the SLA is stopped. The progress bar fills up as time goes by and can change color based on your custom scheme.
Remaining Time
Remaining Time = SLA Goal – Elapsed Time.
You can hover over the field to see more detailed breakdown.
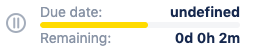
SLA Due Date
Due Date = Current time + Remaining Time (accounting for any pauses).
If you see UNDEFINED, that means the countdown is on hold and we don’t yet know when it will resume—for example, you’re waiting on more info (for example, a customer reply). Once the SLA starts again, the actual due date will appear.
Sorting by the field
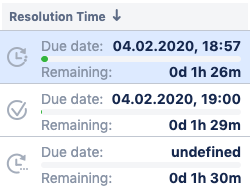
When you sort your issue list using an SLA field, Jira arranges tickets in ascending order of their due dates — those with the soonest upcoming deadlines appear first. Issues whose SLA due date is currently UNDEFINED (typically because the timer is paused or hasn’t started) are treated as if they have the furthest possible deadline, so they always fall to the bottom of the list.
SLA History
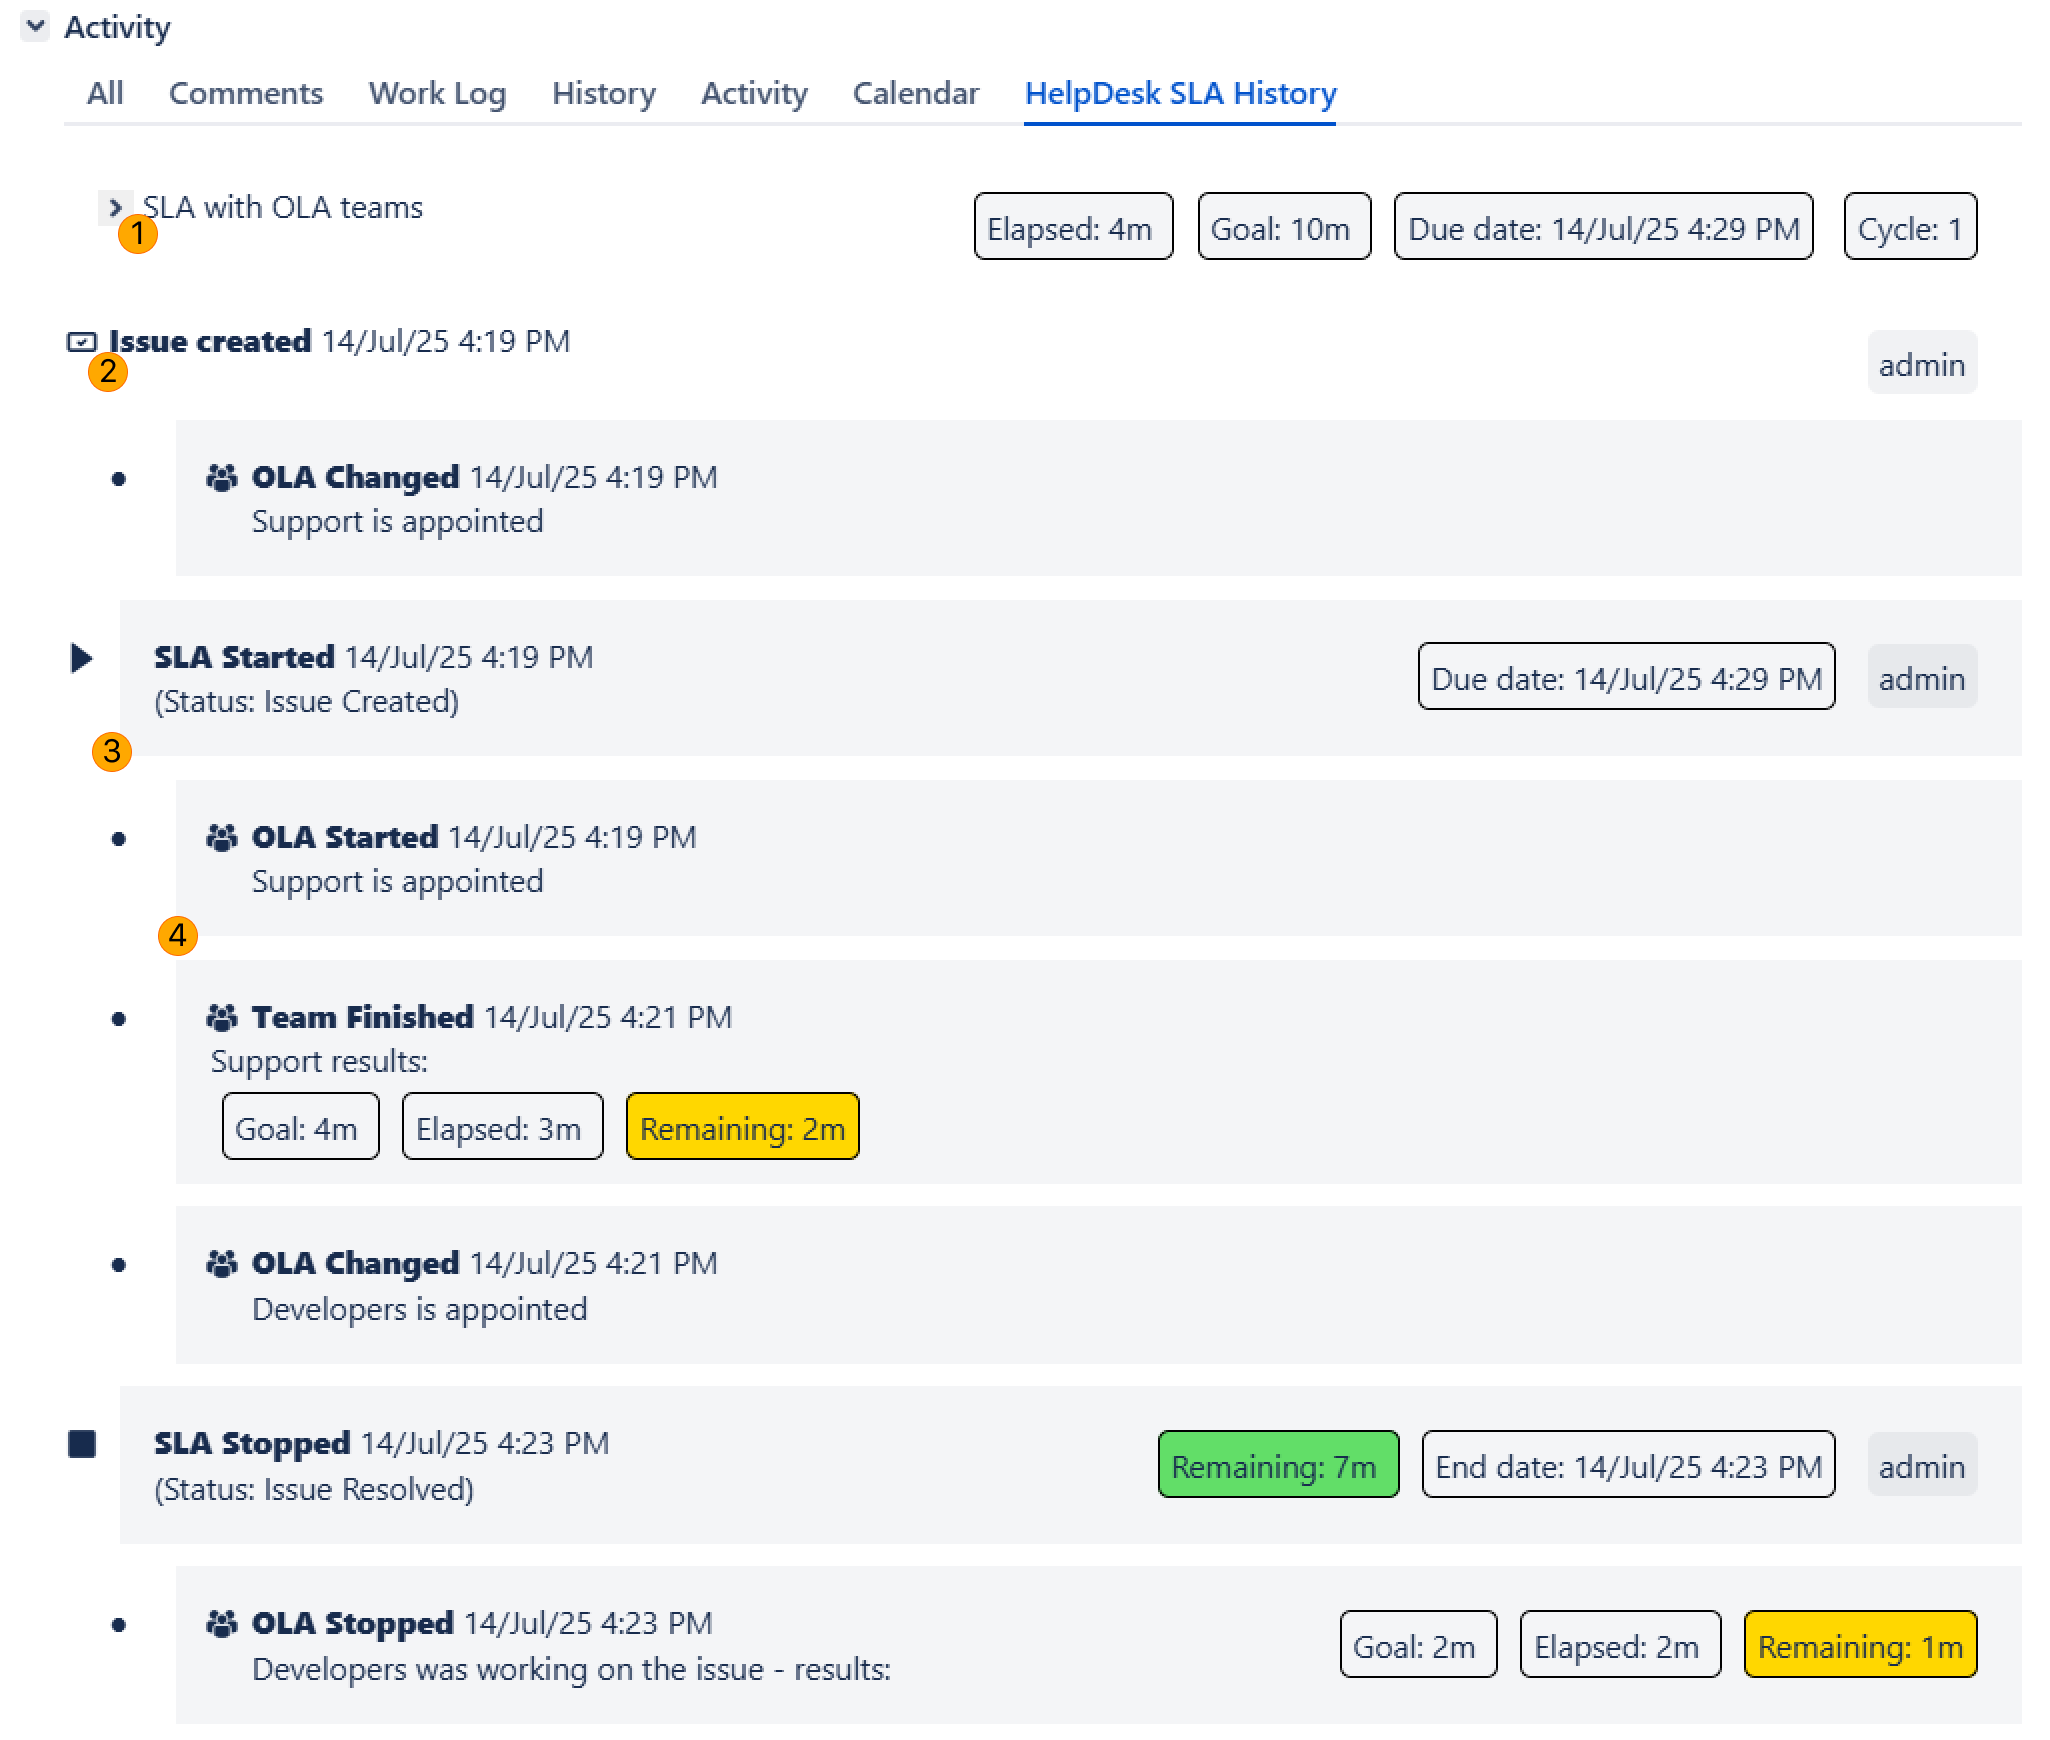
When you switch to the HelpDesk SLA History tab on an issue’s Activity panel, you get a full, timestamped record of every SLA and OLA event that’s occurred—broken down by cycle and by team. Here’s what you’ll see:
Overview Bar with general SLA information and Expandable Details.
Chronological Event List which consists of SLA and OLA Events.
SLA Events: Actions that start, pause, resume, stop, or reset the overall SLA timer.
OLA Events: Team-level events — when each team’s clock starts, pauses, or stops.
Below is a breakdown of each element you’ll find in the HelpDesk SLA History tab:
Overview Bar (top of the timeline)
Elapsed: total time counted so far in the current SLA cycle
Goal: the SLA target for this cycle
Due date: when this cycle is scheduled to finish (or “UNDEFINED” if paused)
Cycle: which SLA cycle you’re viewing. Currently only a single cycle is supported, but future releases will allow multiple cycles per issue.
Chronological Event List
Issue created
Marks when the ticket first met your SLA’s start condition.SLA Events
Each entry logs Start, Stop, Pause, and Reset events—showing the exact timestamps, elapsed or paused durations, and the name of the user who triggered each event.Team Finished (or OLA Finished)
Records when a team-level SLA goal completed — displaying that team’s goal time, elapsed time, and remaining time.OLA Changed
Indicates which team has just been assigned (or reassigned) to work on the issue.OLA Stopped
Captures when each team’s OLA timer ended, showing the last working team’s final goal, elapsed, and remaining times.
Setting Up
Before you start defining SLAs, you need to establish your SLA Project Scope in Jira Administration → HelpDesk → General Settings. This scope determines:
Which projects allow project admins to see and configure project-specific SLAs
Which issue types can be targeted by those SLAs
Which custom field represents your teams for OLA (team-level SLA) setup
Once you save these settings, the HelpDesk SLA tab appears under Project → Add-ons → HelpDesk SLA in every enabled project—letting project administrators create and manage SLAs without affecting issues outside the defined scope.
By default, the SLA scope is not configured. This means SLA calculations will run on all applicable issues, which in some cases could negatively impact Jira's performance. It's recommended to define a clear SLA Project Scope to avoid unnecessary processing.
Jira Administrator can set up SLAs in Jira Administration → HelpDesk → SLA → SLAs or Project Admin can set up project-specific SLAs in Project → Addons→ HelpDesk SLA. Here you can create your SLAs and set up the time countdown rules for them. Setting up an SLA involves five main steps:
SLA Basics
General details about the SLA configuration.SLA Goals
Define your targets (e.g., "First response within 1 hour," "Resolve within 5 days").
Set filters to select the specific issues each goal applies to.
OLA Goals (Team-Level SLAs) (Optional)
Specify team-level goals within your overall SLA (e.g., Support, QA, Development teams).
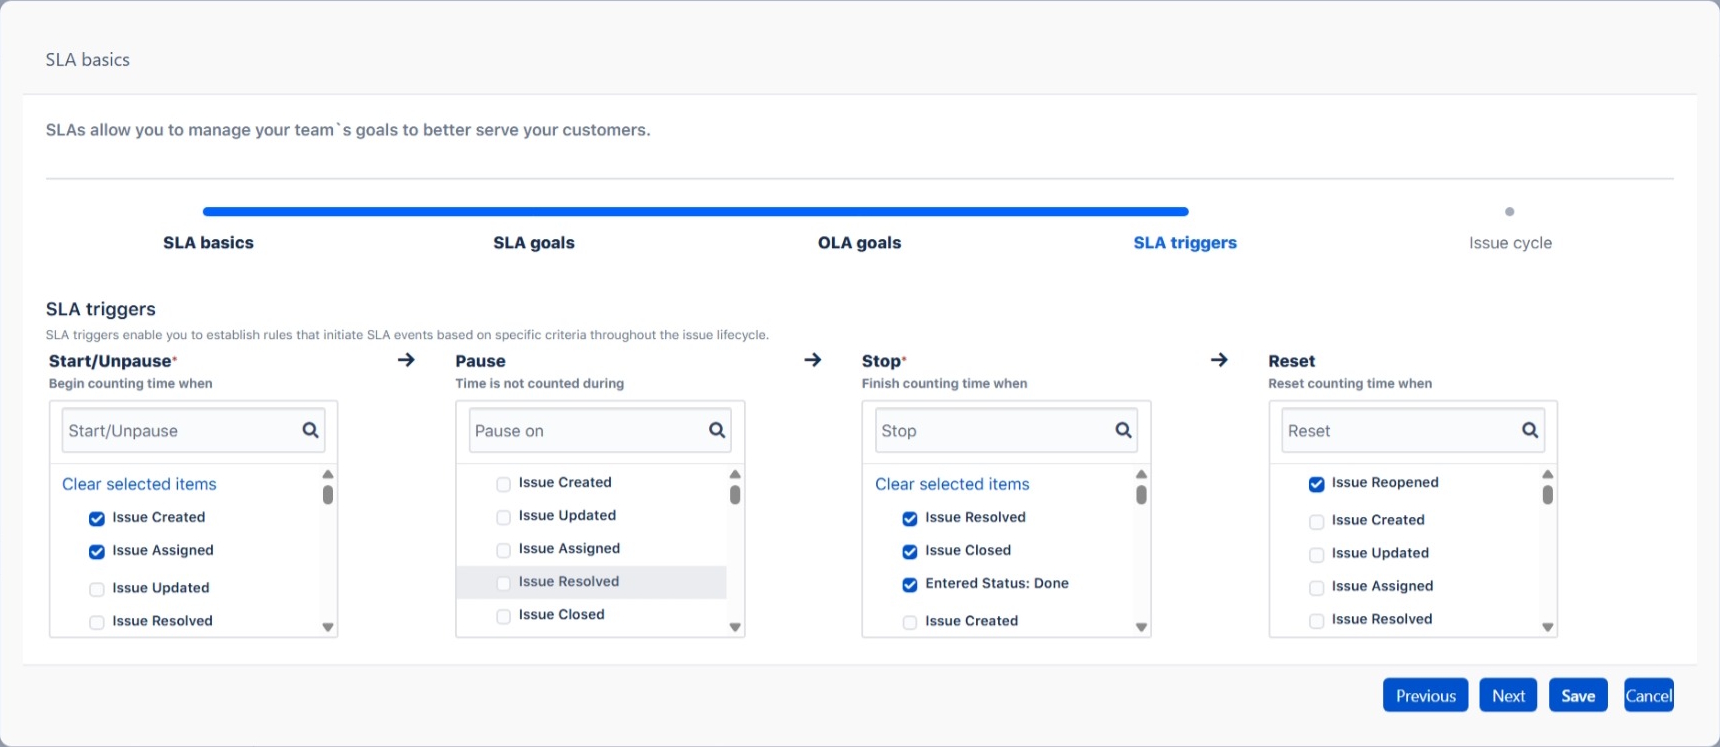
SLA Triggers
Define the conditions for timer behavior:Start: What action begins the countdown.
Pause: What temporarily stops the clock.
Stop: What ends the SLA timer.
Reset: What restarts the timer from zero.
Issue Cycles (In Development)
Define specific issue lifecycle periods that count towards the SLA timer. (Feature coming soon)
The SLA field translation is not available so far. Upcoming in the future versions.
Below is a detailed walkthrough of each of the five steps.
1. SLA Basics
When you enter into SLA creation at the first step you’ll have to configure:
SLA Name
This will also be used as a name of the custom SLA field.Description
Add any additional details or notes for this SLA.
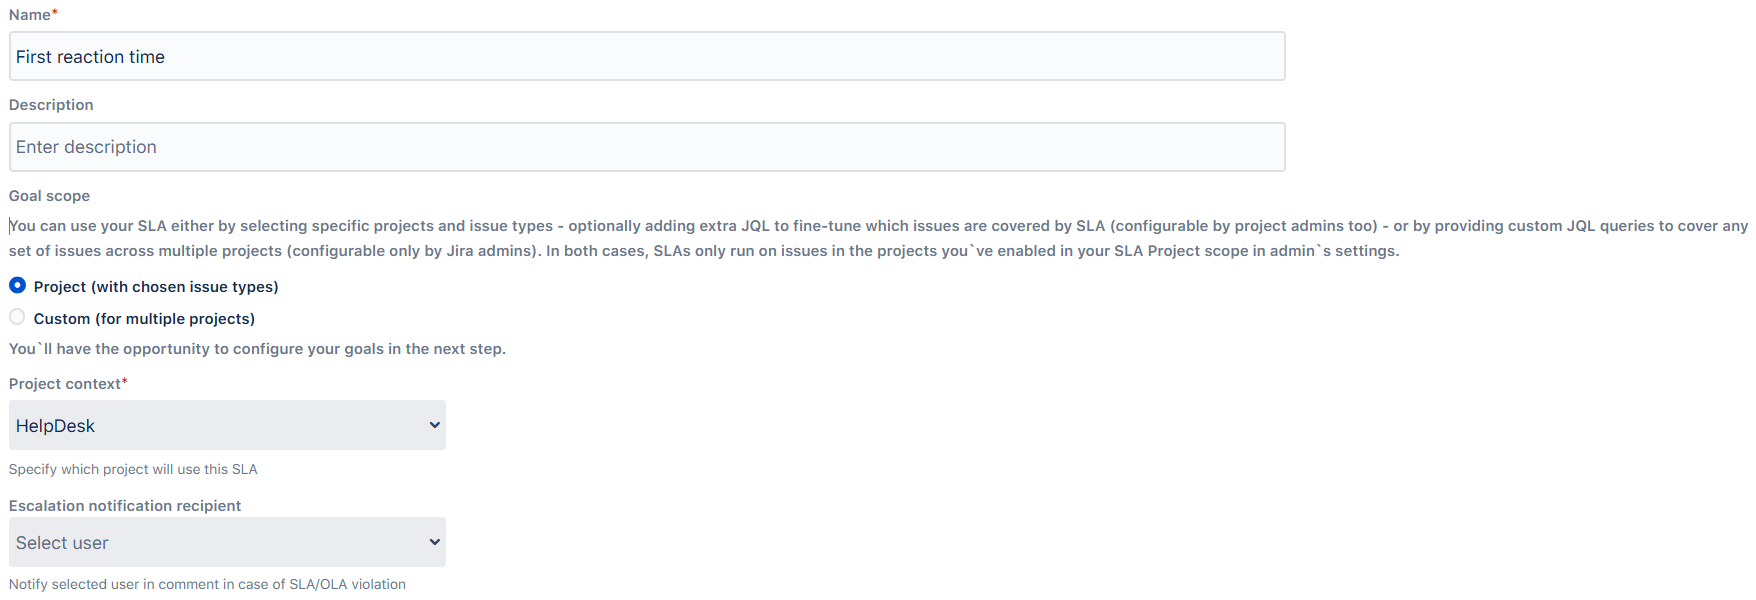
Escalation notification recipient
Choose the user who will receive escalation alerts for SLA and OLA events. This user will be tagged in internal comments on the relevant task when an escalation occurs. When an SLA transitions into a “pre-breach” or “breach” state (according to the color-coding scheme), the system will automatically add an internal comment to the task and tag the selected user.Comment Templates for SLA:
Pre-Breach (Critical Stage):
@{username} SLA {sla_name} has entered the critical stage.Breach:
@{username} SLA {sla_name} has been breached.
Similarly, when an OLA enters a “pre-breach” or “breach” state (as per the color code), an internal comment will be added to the task tagging the chosen user.
Goal Scope
There are two ways to define which issues your SLA goals apply to:
By Project and Issue Type (Configurable by project admins)
Choose specific projects and their relevant issue types. You can optionally refine this further with additional JQL queries to narrow down which tickets the SLA applies to.Custom Scope (Multiple Projects) (Configurable only by Jira admins)
Define a fully customized JQL query that covers issues across multiple projects.
In both scenarios, the SLA timer only runs for issues belonging to projects you've explicitly included in your SLA Project Scope (configured in admin settings).
You'll set up your specific SLA goals in the next step.
Time conversion
Specify the Working Days/Weeks Converting rules. The SLA goal hours will be converted to days and weeks according to these rules. For example, if you select the working day = 8h, the 10h SLA goal will be displayed as 1d 2h.
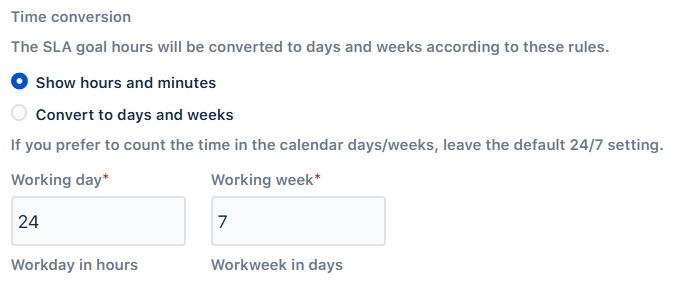
If you prefer to count the time in the calendar days/weeks, leave the default 24/7 setting.
2. SLA goals
Each SLA includes specific goals that determine whether the SLA has been successfully fulfilled. Depending on where you set up your SLA, you'll see different configuration methods.
If configured by Jira Administrator (via Jira Administration → HelpDesk → SLA → SLAs Goal Scope) there will be two configuration variants:
with JQL field to create the scope for the goal which can cover issues across multiple projects.
with Issue Types of the chosen project with optional JQL field to narrow the SLA further with additional query
If configured by Project Administrator only the latter variant will be available. With this variant you'll select a specific Issue Type within selected project and can optionally narrow the SLA further with additional JQL queries.
For example:
Tasks where priority = LowTasks where priority = MediumTasks where priority = High
Below is an example of similarly configured variants; the one on the right isn’t limited to a specific project or issue type.
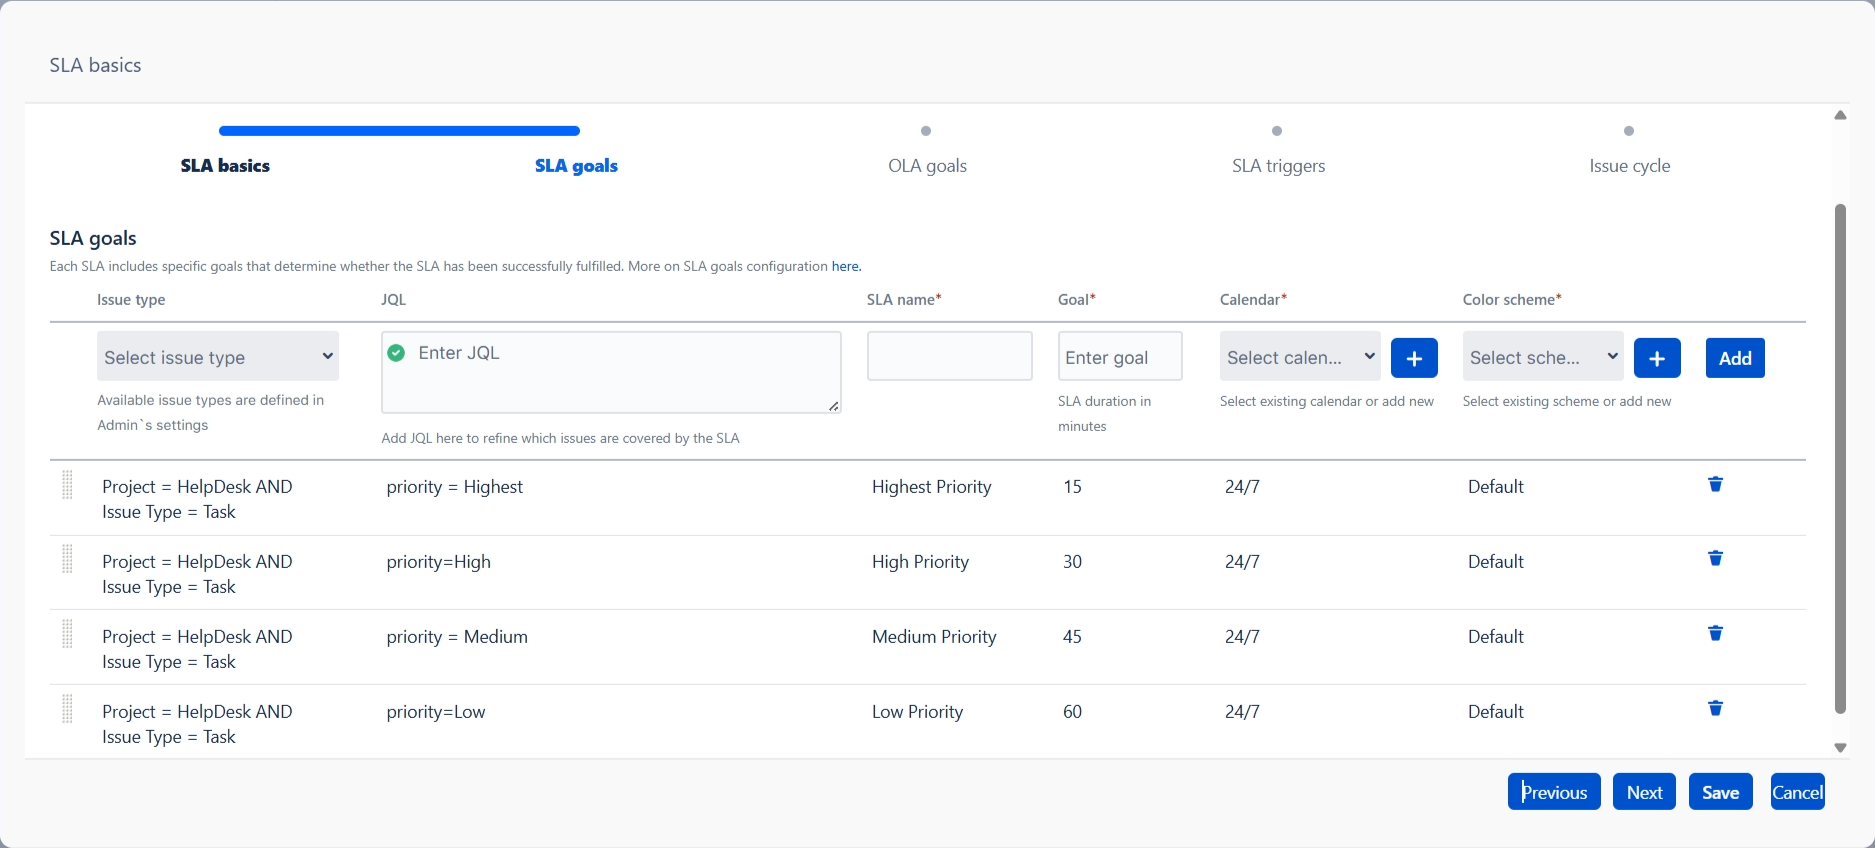
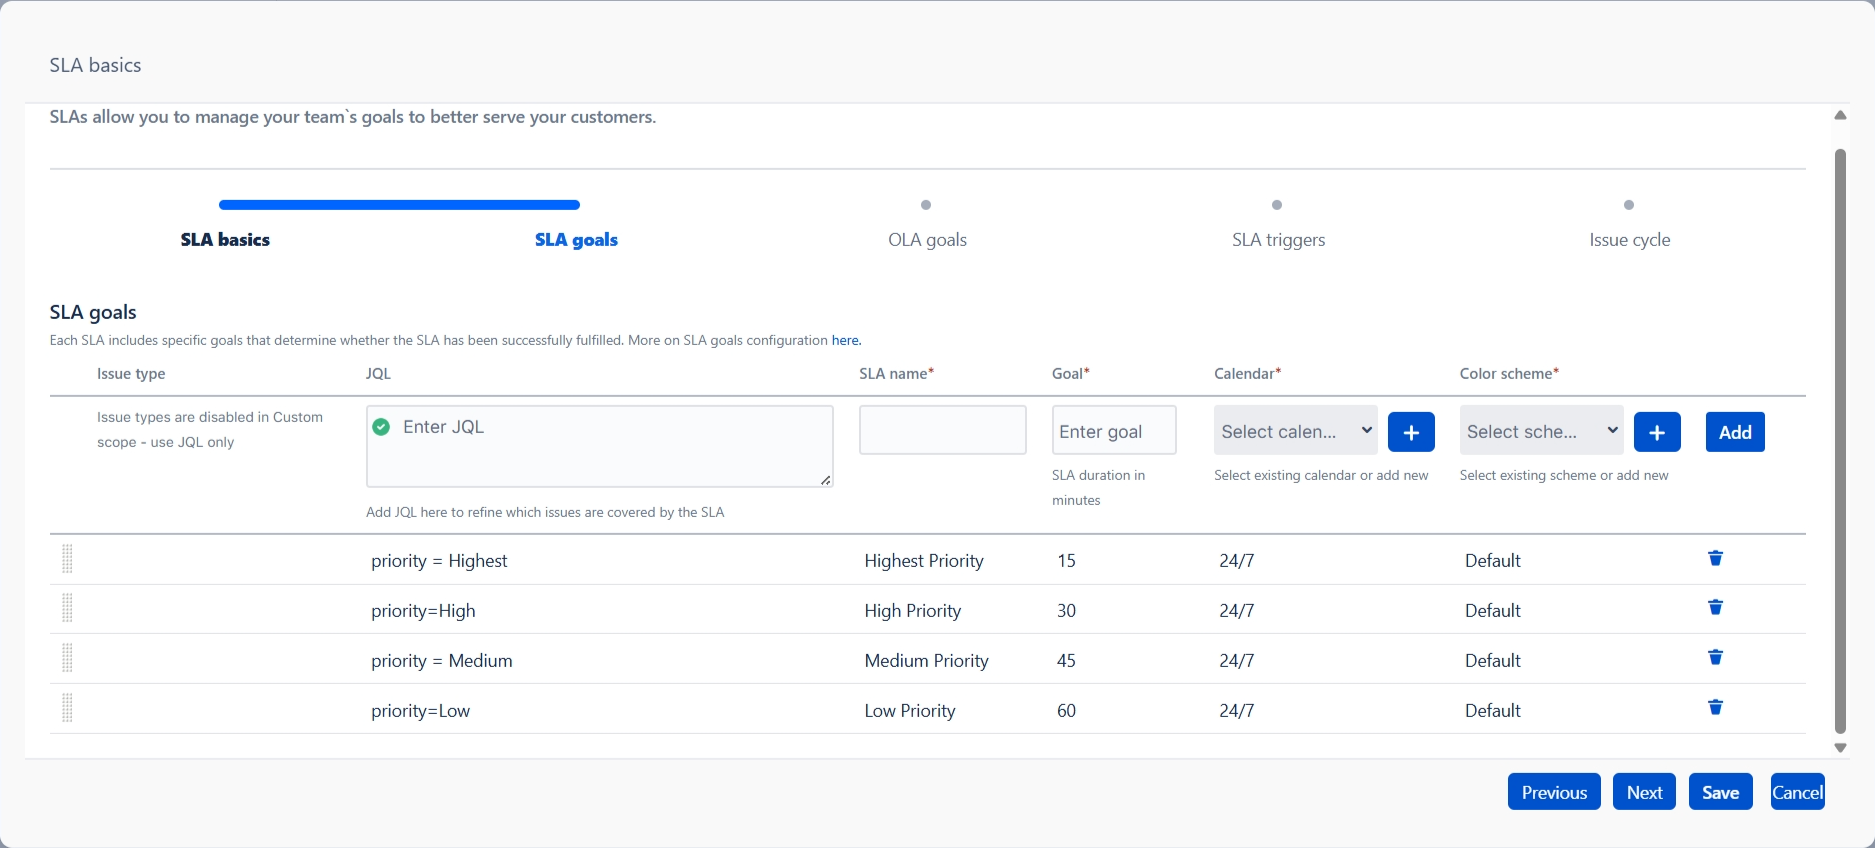
In both cases, SLAs only run on issues in projects you’ve enabled under SLA Project Scope in Jira admin settings.
Other settings on this step include:
SLA name
Enter a concise, descriptive title that clearly identifies what this SLA goal measures.Goal
Specify the target duration (in minutes) that must be met for this goal.
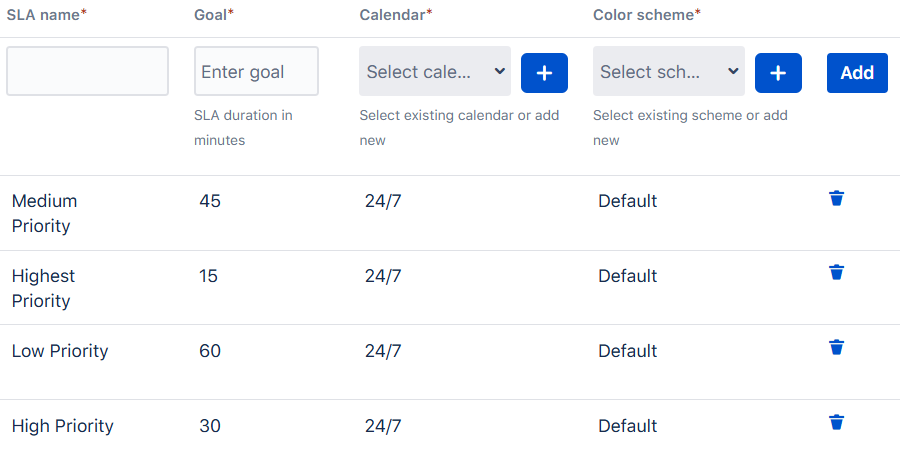
Calendar
Select the work schedule that defines which hours count toward the SLA. You can select the existing calendar or create a new one. For details on configuring calendars, see this page.
Color scheme
Pick a color scheme to visually indicate SLA status based on remaining time and issue conditions. You can select the existing scheme or create a new one. For more on setting up color rules, see this page.
3. OLA goals
For each SLA goal, you can define one or more OLA (Operational Level Agreement) goals. An OLA specifies the responsibilities and delivery timeframes between your internal support teams. Keep in mind that the total OLA duration must not exceed the parent SLA target. In this section, you can configure:
OLA Teams Source field
Which is a field that stores values of teams that you have. You can select any available single select field which is enabled in SLA Project Scope by Jira admin.OLA breach rule
Choose the implications for other teams` goals if one of the OLA teams fails to meet their target. Decide what happens to other teams’ OLA goals if one team misses its target:Unaffected: Other teams’ goals stay the same.
Proportional adjustment: Remaining teams’ goals are adjusted proportionally to cover the delay.
OLA goals
Define specific time targets for each team involved in resolving the issue.
If you’re working under a specific SLA goal, ensure the sum of all OLA times equals the SLA time.
SLA triggers
SLA Triggers let you define the rules that control when an SLA timer starts, pauses, stops, or resets during an issue’s lifecycle. You can create multiple trigger conditions to precisely tailor how and when SLA measurements are applied.
4. Issue cycle (In Development)
The ability to choose between different calculation methods is currently under development, and we hope to deliver it soon. The chosen cycle type determines which periods in the issue’s lifecycle count toward the SLA:
First cycle (coming soon)
The SLA timer starts the first time an issue meets the start condition and stops the first time it meets the end condition. If the start condition is met again afterward, the timer begins a new cycle.All cycles (available now)
The SLA clock begins whenever the issue meets the start condition and only stops when it meets the final end condition. If the issue re-enters the start condition after the end condition, timing resumes from the accumulated total rather than restarting from zero.
To track just the issue’s most recent cycle, use a Reset trigger.
5. Once you’ve finished configuring all settings, simply click Save to create (or apply changes) your SLA.
New custom fields are automatically created and added to your custom-fields list. Simply add this field to any view screens where you want SLA or OLA information to appear.