.png)
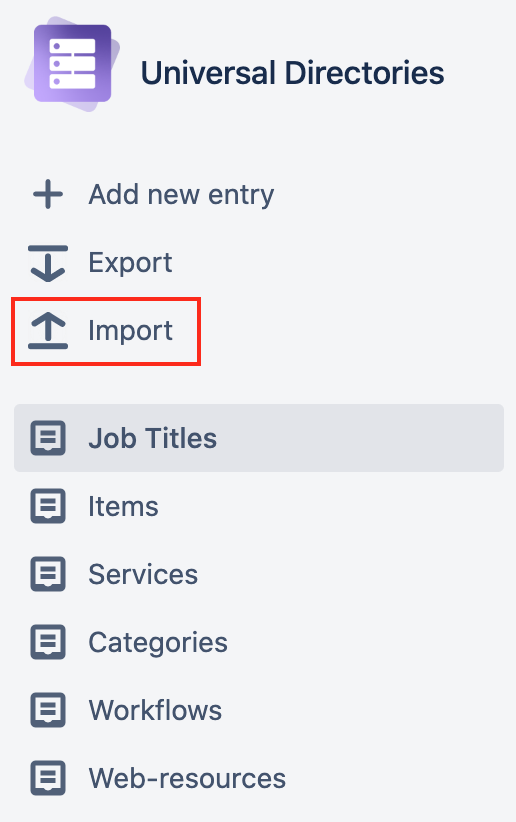
Import
Import is a great option to create or update multiple entries at once. This operation might be complicated for a regular user so we recommend advanced users such as administrators to perform it.
Import is a great option to create or update multiple entries at once. This operation might be complicated for a regular user so we recommend advanced users such as administrators to perform it.
The ability to import data to directories depends on user permissions. If you cannot see the import button contact your Jira Administrator.
The main principles of import:
A user can only import to one directory per import.
The read-only attributes cannot be imported.
Attribute validation (data format) works during import the same way as during the manual creation/update of an entry.
Uniqueness is being checked during the import only for the system attribute (entry name).
An option cannot be created via import, all references (such as Jira users, list options, linked objects, etc.) must exist for import to work.
An empty value during the entry update will delete the existing value.
An issue link cannot be created via import to Universal Directories.
Perform export to get a template for your import.
Import Directory Entries
1. Creating/updating/both?
Define if you are going to create or update entries or do both. For each entry in the import file:
If the existing id is specified, the relevant entry will be updated.
If there is no id a new entry will be created.
If the id is incorrect an entry will not be created/updated.
Export entries to get their IDs. Also, you can find the entry ID within the path to the full view.

2. Data consistency check
Select a directory you want to import to and do the following checks within the .csv file:
References. Check the data you are going to import – are there are any references like users, groups, other selected objects? Ensure that all those objects already exist in Jira. If not – create these objects in the first place.
Data format. Check the format of the data you are going to import. If not sure, try to input the value manually in the relevant field.
 Note that the Checkbox attribute allows the True value to set checked and any other value to set unchecked. Note that the Date attribute allows one of the following formats: Jira-format / dd.MM.yy / dd.MM.yyyy Note that several options in one column must be delimited by the delimiter opposite to the .csv delimiter (use a comma if the .csv-delimiter is semi-colon and vice-versa).
Mandatoriness. Check mandatoriness of attributes. You won't be able to create/update an entry if the mandatory attribute value is empty.
Uniqueness. Check the values for each attribute that must be unique according to the directory settings to prevent duplicates.
Editability. Check if all attributes you are going to import values to are editable (not read-only). Some of the attributes (like Linked Directories Entries, Linked Issues) are always read-only, others can be set as read-only by admin.
All these checks (excluding the uniqueness check) will be performed during import for each entry. An entry should pass them all to be created/updated.
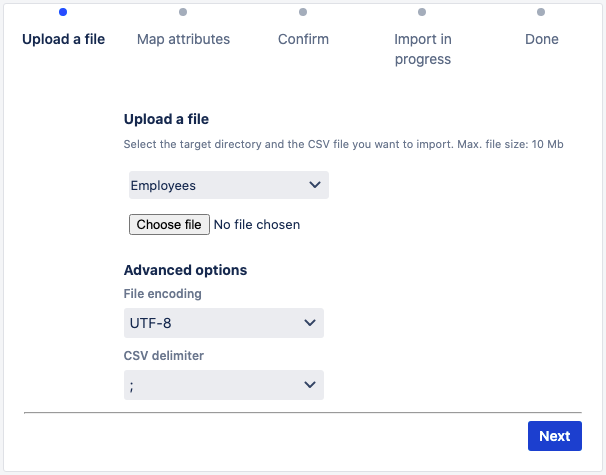
3. Upload a file
Click Import to start the import wizard. Select the target directory and choose a .csv file from your computer.
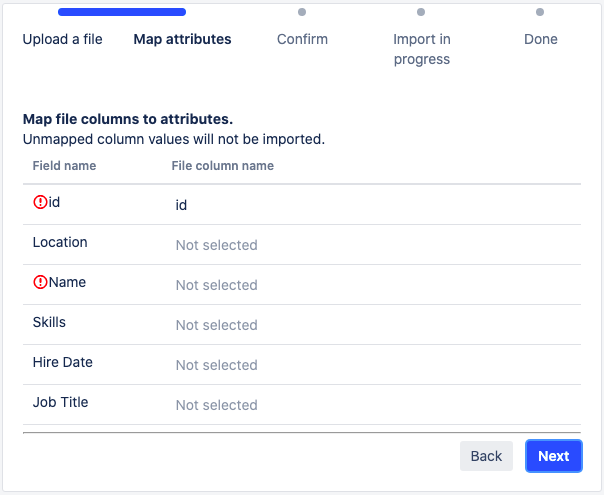
4. Map columns and attributes
The wizard will show you all the attributes that can be imported. Select which column content should go to which attribute. The mandatory attributes are highlighted, you will not be able to proceed if they are unmapped. The unmapped column values will not be imported.
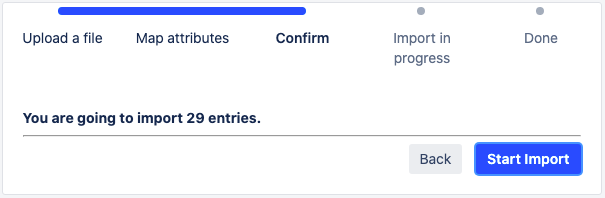
5. Confirmation
Review the number of entries you are going to import and confirm the import.
6. Control the progress
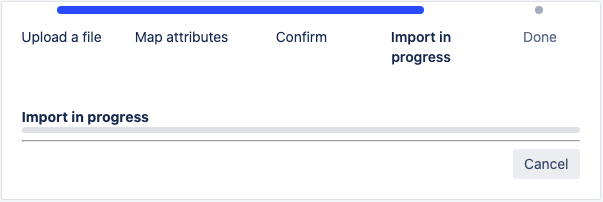
You can cancel the import during progress if required, all changes will be annulled. The same principle works if you close the tab.
Note that the Cancel button will not be available immediately (~2s) so you may not be able to cancel the small number of changes (to be improved).
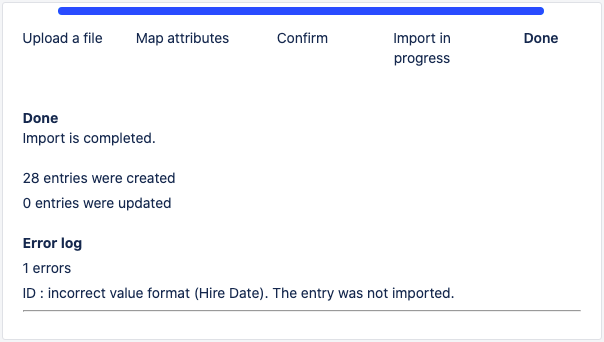
7. Observe the results
Check the number of created and updated entries and observe the error log. The import is finished.
Note that the displayed error might not be the only one for the entry, it's the first one met by the wizard.
Import Issue Links
Import Directory Entries
Import Issue Links
You may need to import issues linked to directories objects. Since different issues have different linked objects, the bulk update cannot help. Use Jira import from CSV to create/update issues linked to Directories objects. Jira Administration → System → External system import
⚠ Ensure the referenced object exists in Directories, otherwise the link will not be created.