.png)
SLA 2.0 Update
With the 3.0.0 release, we’re retiring SLA v1 entirely — only SLA v2 will remain. Simultaneously, SLA 2.0 is receiving major updates across the UI/UX, backend, and configuration options. To ensure a smooth transition, please review and update your SLA configuration after upgrading.
What’s new in SLA v2?
Project-specific SLAs
Before: Only Jira administrators could manage SLAs via Jira Administration → HelpDesk → SLA 2.0 → SLAs.
Now: We added a possibility to configure SLA which is bound to specific project. Project admins can also configure this type of SLA in the relevant project under Project → Add-ons → HelpDesk SLA. After migrating, your existing SLAs should continue running with previous configuration — but you can review and fine-tune their scope if you need to. If you decide to use new scope configuration, you’ll need to update each SLA goal JQL so that its criteria align with the new project-based contexts.
Scope configuration
Before: To limit where SLAs are calculated SLAs custom fields context configuration was used to improve perfomance.
Now: On top of the custom fields context configuration we added Jira Administration → HelpDesk → General Settings SLA scope configuration which will prevent SLAs calculations where you don’t need it (because calculations may affect perfomance).
Up-to-date SLA data
Before: SLA data was refreshed only when opening an issue.
Now: Now SLAs are data is refreshed in the background which allows you to use Jira Filter Subscription with JQL Functions to keep an eye on the current state of opened SLAs and get notifications if SLA in certain issues are going to be breached
SLA violation alerts for the Project Manager
UI and UX improvements
What you can do after the update
1. Configure SLA Project Scope
In Jira Administration → HelpDesk → General Settings, you set up your SLA Project Scope, which consists of:
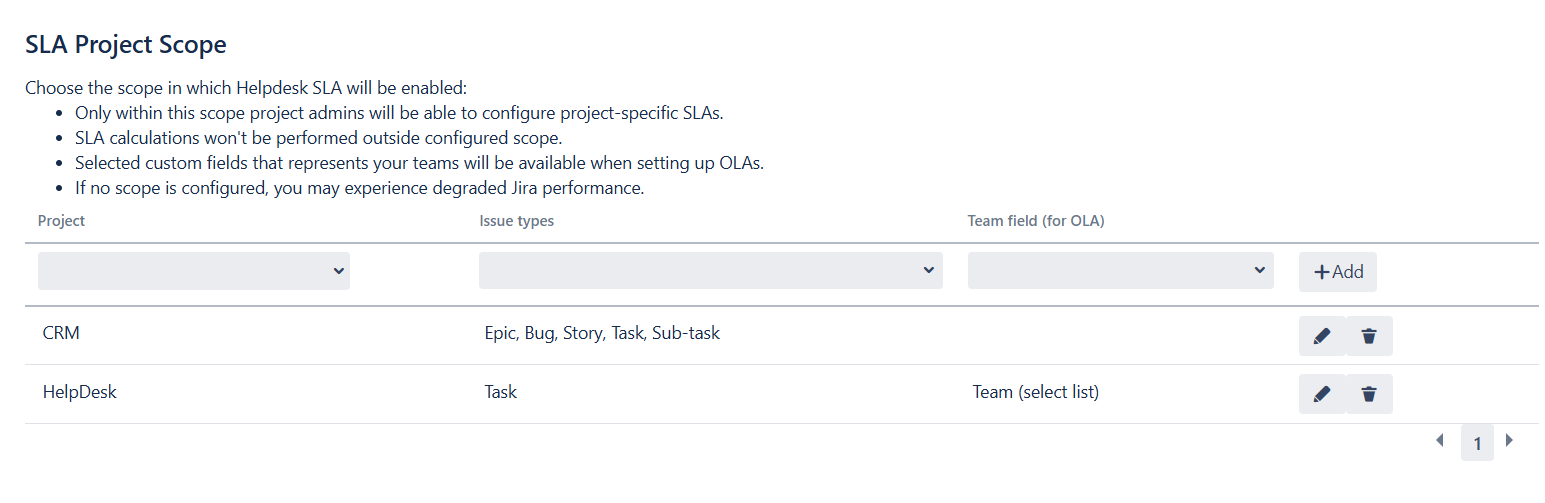
Projects
Select the projects in which the SLA settings will be visible to project administrators.Issue Types
Choose which issue types can be targeted when creating SLA goals.Team Field
Specify the custom field that represents your support teams—this will constrain which team fields are available when configuring OLAs.
Once saved, a HelpDesk SLA tab appears under Project → Add-ons → HelpDesk SLA for each selected project, allowing project admins to configure SLAs as needed. SLA calculations will only run inside this defined scope; if no scope is set, SLAs will be evaluated on all applicable issues, which may affect Jira’s performance.
2. Check your SLA settings
If you used SLA previously, before the 3.0.0 release, you will find your SLAs in Jira Administration → HelpDesk → SLAs. They would continue to function as before.
In case you want to connect your SLA to single project you’ll need to do the following:
In the Goal Scope field, select the project where this SLA will apply.
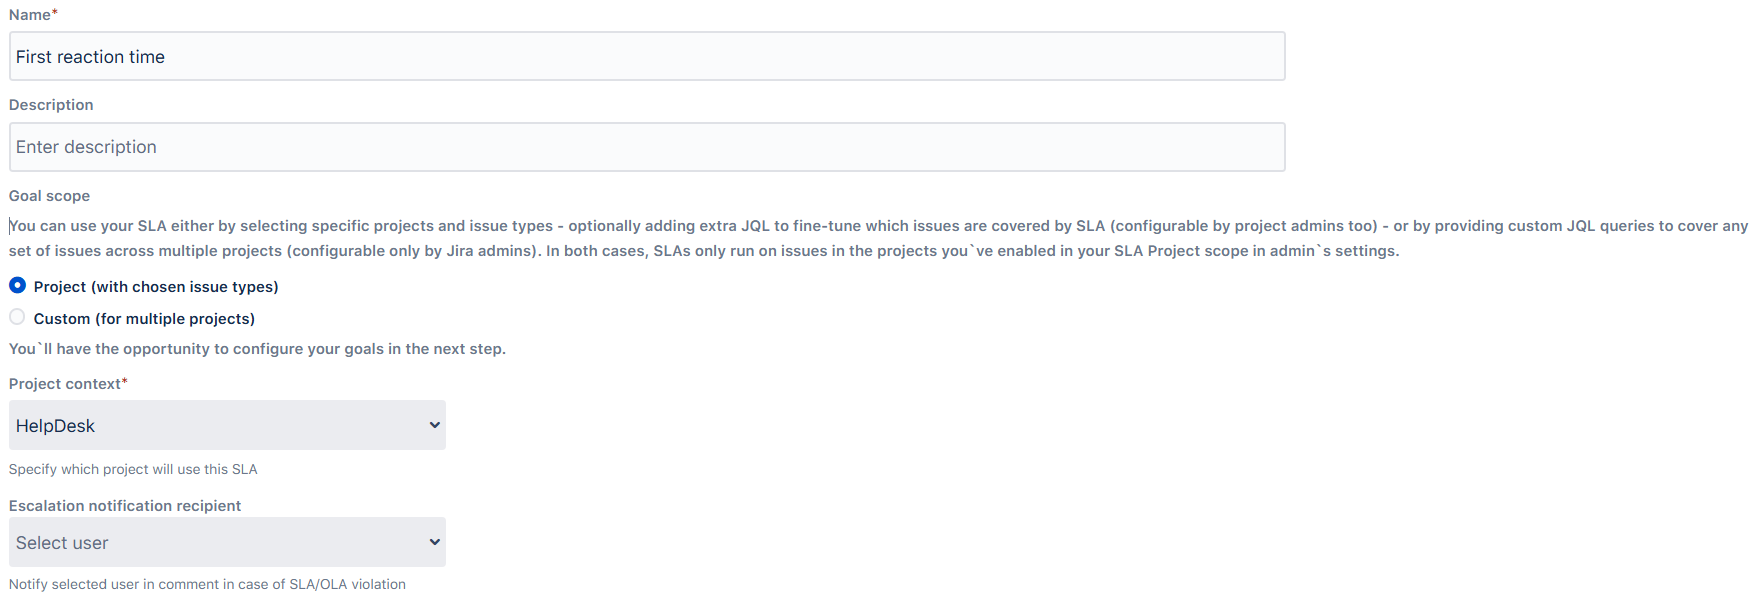
Then, on the SLA Goals step, pick the Issue Type you want to target and, if needed, enter a JQL query in the Additional JQL field to precisely define which issues fall under that SLA goal.

In the next step, map each SLA goal to its corresponding OLA goals (if applicable).
 Ensure that the combined targets of the OLA goals exactly match the value of the selected SLA goal.
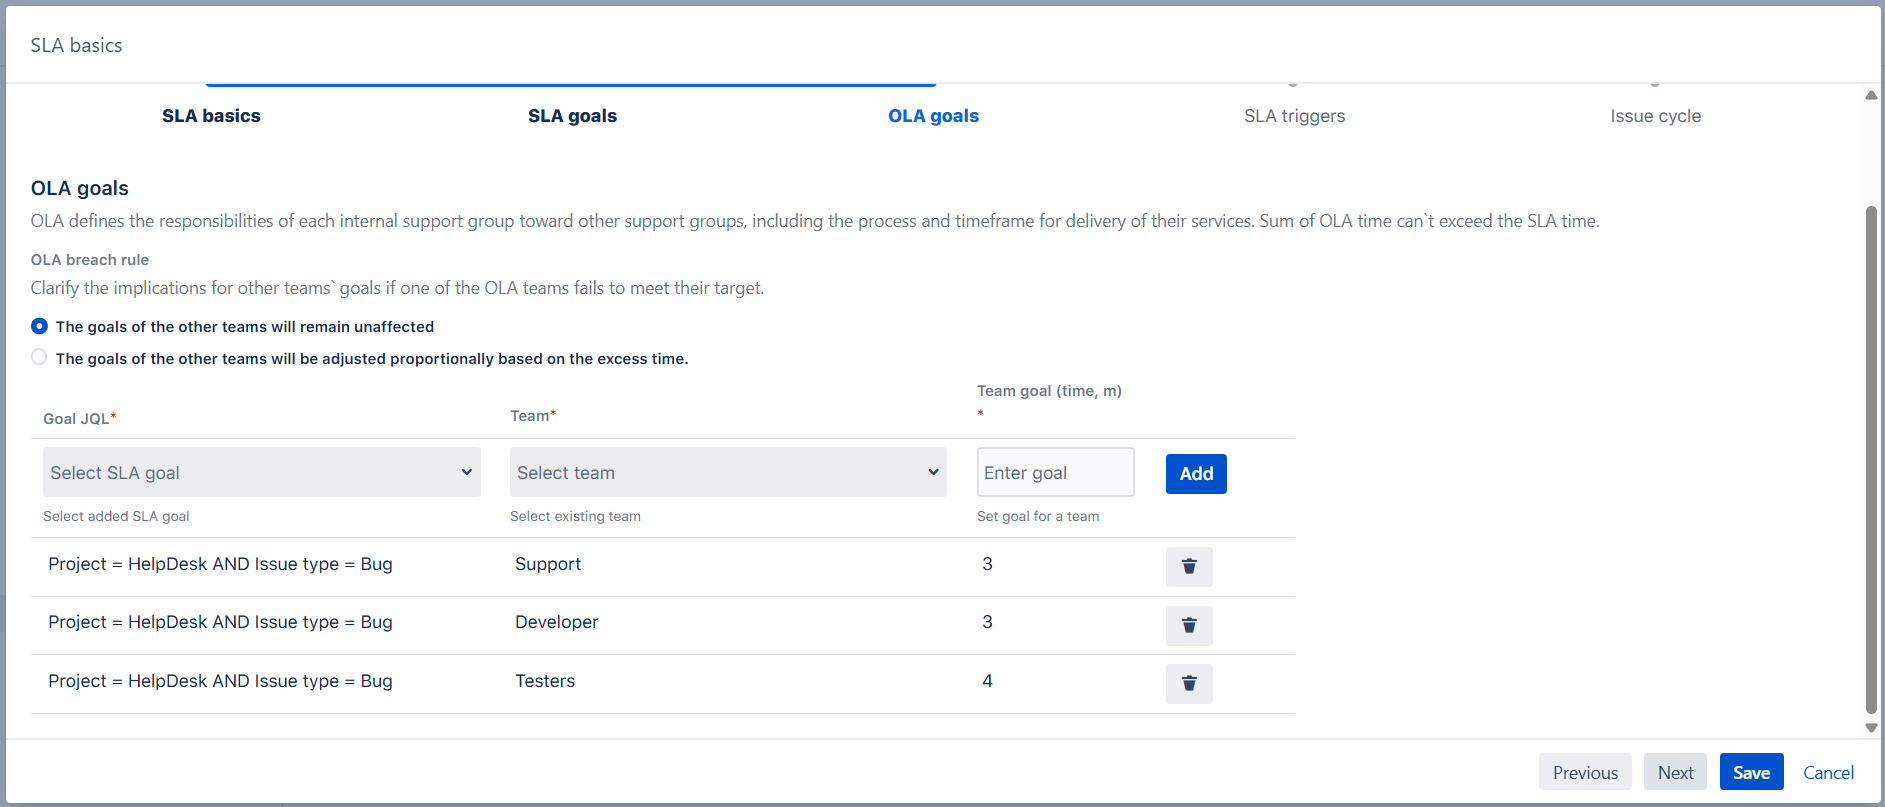
SLA triggers remain unchanged—there’s nothing you need to adjust here. Just click Save, and your new settings will take effect immediately.
3. Choose prefered timezone for your calendars
You can now assign a specific timezone to each calendar. Immediately after migration, the Timezone setting will be blank, causing the calendar to inherit your JVM system timezone by default (viewable under Administration → System → System info). To change calendar’s this:
Open the calendar’s settings.
Choose your preferred timezone from the dropdown.
Click Save.
By explicitly setting a timezone, you ensure all SLA timers and holiday pauses align with your team’s local hours — regardless of where your Jira server’s system clock is configured.
4. Review your OLA goals (Optional)
After migrating, it’s important to confirm that all of your OLA goals and related team configuration carried over correctly:
Inspect each OLA goal: Go to your SLA configuration and open the OLA Goals section. Make sure that every goal you previously defined still lists the correct target times and is associated with the proper overall SLA.
Verify team mappings: Check that the custom select-list field you use to identify teams (e.g., “Support Group” or “Assigned Team”) is still linked correctly. Each team you expect to see—first-line support, QA, development, etc. — should appear in OLA goals exactly as before.
Validate filters and conditions: For each team-level goal, review any JQL or conditional logic you added. Ensure that the filters still correctly select the intended subset of issues.
Test a sample ticket: Pick an example issue and simulate its progress through multiple teams. Watch the Activity tab or SLA timer to confirm that each team’s timer starts, pauses, and stops in line with your OLA definitions.
Additionally, you can choose the implications for other teams` goals if one of the OLA teams fails to meet their target. Decide what happens to other teams’ OLA goals if one team misses its target:
Unaffected: Other teams’ goals stay the same.
Proportional adjustment: Remaining teams’ goals are adjusted proportionally to cover the delay.
5. Subscribe to a filter (Optional)
If you’d like to receive regular updates on the status of your SLAs, you can subscribe to a Jira filter that uses our SLA JQL functions. Once set up, Jira will email you (or your team) on a schedule you choose—daily, weekly, or any other cadence—listing every issue that matches your criteria (for example, those nearing breach or already breached).
6. Add Escalation notification recipient (Optional)
Choose the user who will receive escalation alerts for SLA and OLA events. This user will be tagged in internal comments on the relevant task when an escalation occurs. When an SLA transitions into a “pre-breach” or “breach” state (according to the color-coding scheme), the system will automatically add an internal comment to the task and tag the selected user.
7. You’re all set—your SLA configuration is now complete following the migration!
For an in-depth look at all the new features check out our full documentation here.