.png)
Step by Step with HelpDesk
Install the app
1. At first, the HelpDesk application should be added to your Jira. Read how to find, add and manage the Server apps (Atlassian documentation).
Select a super-user
You will need a technical account that will perform various actions such as new user (customer) creation on signup, transferring requests, files and comments from the portal to your Jira, etc.
This user must have the Jira administrator permissions to operate with users. Let us name it hdbot.
Navigate to HelpDesk Settings → Customer Area → General Settings and set hdbot as the HelpDesk Super User:
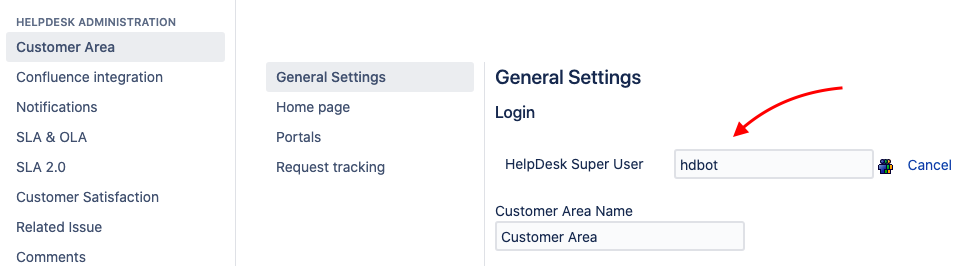
Please, note - HelpDesk Super User can't be your real Jira admin user (due to technical requirements and restrictions), you need to create a brand new user for this purpose.
Define your customers & agents
3. As HelpDesk permissions are mostly group-related, we must create a user group for our customers. Let us name it helpdesk_users. Add the hdbot user to this group as well.
To divide permissions within a project lets create the following roles (Jira Settings → Project Roles):
Customers project role.
Agents project role.
Those two roles will participate in the HelpDesk-projects.
Read more: Managing groups (Atlassian), Managing project role membership (Atlassian)
Prepare your projects
4. Create projects or find the existing ones
Define which projects you are going to use to organize the service desk. Those may be one or more core/software projects. If you don't have the support-related projects create them as usually in Jira. Use any available project template – no matter if you have Jira Core, Jira Software or both.
5. Set issue security levels for target projects
As we want to allow our customers access only the issues they reported, we should set up the issue security scheme for the project.
Navigate to Jira Administration → Issues → Issue Security schemes and create a new scheme. Let us name it Support. We will only add one security level here that allows Reporter and Agents to access an issue:

Set this level as default and apply the scheme to your HelpDesk-projects (Project Settings → Issue Security)
If you already have issues in the projects, and there are no security levels – use the batch operation to set the security level for existing issues.
Read more: Configuring issue-level security, Change a field configuration
6. Define the project permissions of your customers & agents
Navigate to Project Settings → Users and Roles and add the helpdesk_users group to the Customers role in your HelpDesk-projects and jira-core-users (or jira-software-users or any internal group) to the Agents role.
Navigate to Project Settings → Permissions and define what permissions should have the Customers role within the project:
Browse projects
Create issues
Add comments
Create attachments
Also, define permissions for your agents.
You should not use the Any logged user option for the HelpDesk-related projects' permissions scheme as it will grant your customers the relevant permissions as well.
7. Define comments security levels
Navigate to JIRA Settings > System > General Configuration for "Comment visibility" and make sure it's set to"Project Roles only".
HelpDesk provides two levels of comments security: visible to customers and internal ones. Navigate to HelpDesk Settings → Comments → Comments Security and specify which role will be treated as internal for your HelpDesk projects:
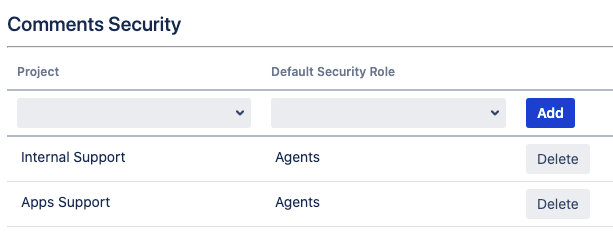
Now our Agents will be able to add internal comments.
Set up request receiving via email
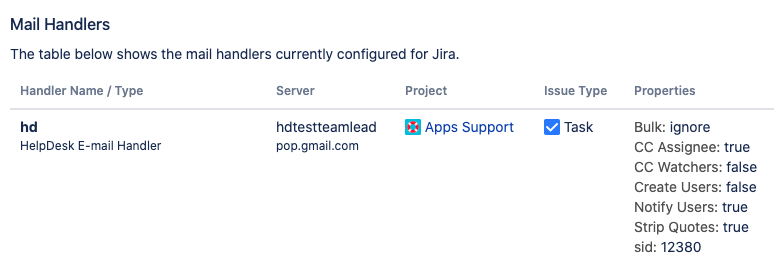
8. Navigate to Jira Administration → System → Incoming Email
Add a mail server you will fetch your requests from. Add a HelpDesk mail handler to the list of mail handlers and select the mail server as the target.
In the example below handler will fetch emails from hdtestteamlead server and transform them into tasks in the Apps Support project (or comments).
Read more: Configuring Jira applications to receive email from a POP or IMAP mail server (Atlassian), Mail Handling – Helpdesk Mail Handler
Set up Customer Area
9. Define general settings
Navigate to HelpDesk Settings → Customer Area → General Settings and specify:
the Customer Area name (name of the link from your Jira)
Projects accessible via Customer Area. Here we select the "Only Selected" option so we will not need to adjust other projects: their issues won't be displayed in the Customer Area.
HelpDesk start page. As we are going to create the united Portal, we will make it the start page.
Ability to log into the Customer Area.
Select helpdesk_users there and yourself to do some testing.
Grant permission to yourself till you ensure the Customer Area is ready for Customers.
Public signup. We are going to allow public signup and enable captcha. ⚠️ Don't forget to specify the Groups for self-signed up users so they will be automatically granted the relevant permissions.
Read more: General Settings of Customer Area
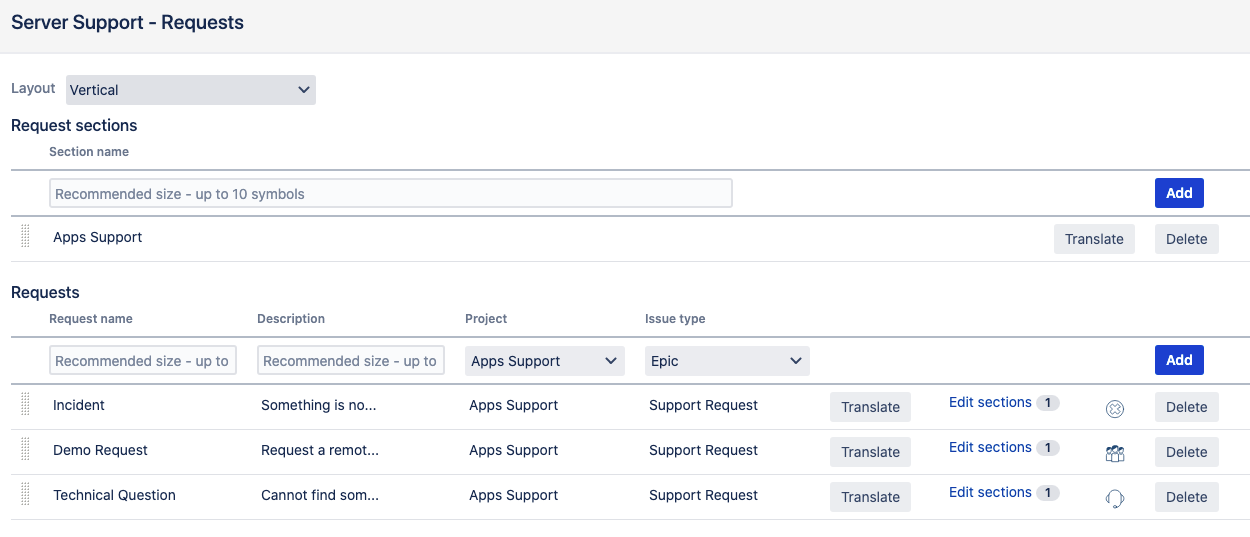
10. Set up Portal content
Portal is the place where your customers can create requests. Navigate to HelpDesk Settings → Customer Area → Portals. Name the Portal and go to its Requests.
Add requests specifying the target project and issue type. If required, change the list of fields available upon creating an issue via HelpDesk.
Read more: Request Types
11. Add the Request Type field in issues
Add the Request Type custom field provided by HelpDesk to issue screens to track and manage the rules an issue will behave in HelpDesk.
Read more: Request Types, Issue View & Actions in Customer Area, Editing Issues in HelpDesk
12. Set up Portal appearance
Navigate to the portal Appearance section to set up a banner, footer, header content and logo. HTML & CSS knowledge are required here and for now, images are only displayed from a link.
The HelpDesk global sections (request racker, profile) inherit settings from the default portal.
You can play around with the following settings for the banner and footer:
Read more: Look & Feel
13. Set up an issue tracker
There is one more section within the Customer Area that must be set up – the Issue Tracker for your customers. It is a place a customer can browse their requests. As an admin, you can organize all requests into tabs with their own set of columns.
This is how it may look for our customer:
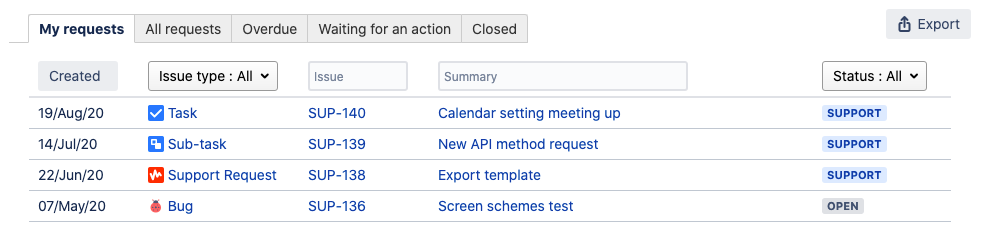
Read more: Request Tracking – My Issues Section
Set up Customer Notifications
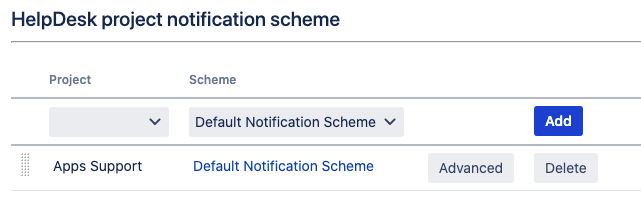
14. The usual notifications will not suit your Customers as they contain links to Jira where they cannot log in to. To set the HelpDesk-notification, create a new notification scheme (Jira Administration → Notification Scheme) and – as your Customer only appears in the Reporter field – set the notification rules for the reporter only.
Don't forget to delete Reporter from the regular project notification scheme to avoid duplicative notifications.
Then, navigate to HelpDesk Settings → Notifications and map your new scheme to your HelpDesk project. These notifications will work in addition to the regular ones but their links will direct your customer not to Jira but to Customer Area issue view.
Read more: Creating a notification scheme, HelpDesk Notifications
15. Do some testing!
Create a test customer, add them into helpdesk_users group (or sign up as a new customer) and try to:
Log in to Customer Area
Create a request via email
Comment on the request via email
Create a request via Portal
Check the available requests, comment on them, add some files.
16. Share the link to your Customer Area and helpdesk-related email with your customers.
That is pretty much all of the basic settings! Dive into the documentation to learn the details and set more specific cases.