.png)
Sales Activity Calendar
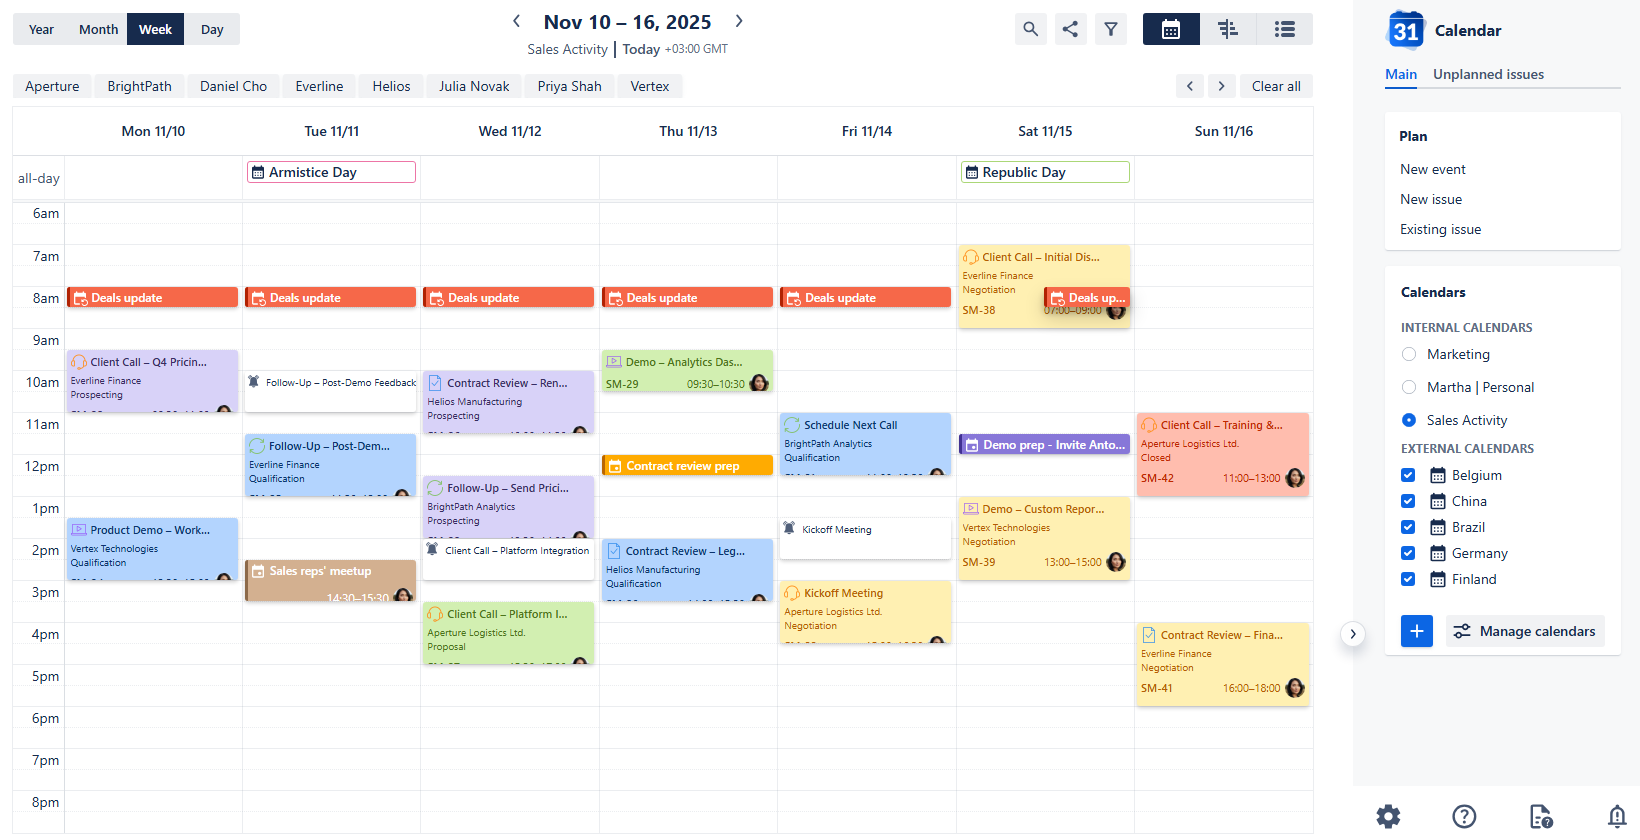
Sales Activity calendar
Use case description: This calendar is designed to help sales teams manage and visualize their upcoming activities, such as client calls, product demos, and follow-ups. It provides a weekly overview for planning and coordination, and it enables managers to monitor team bandwidth.
Primary Actor: Account Executive or Sales Ops.
Calendar Shared With: Sales team, leadership.
This guide outlines the steps to set up a Sales Activity calendar within the Calendar for Jira app. Its purpose is to assist sales teams in managing their activities and ensuring all essential tasks are tracked. Make sure to check out the setup steps down below to make the explanation given in the manual more clear; following them isn’t required.
Create relevant work types:
You can create specific issue types to better track your sales activities, such as Client Call, Follow-up, Demo and Contract Review:
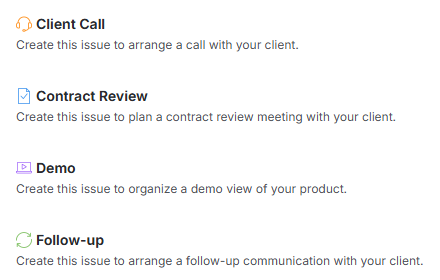
Sales Activity calendar - Work types
Set up workflows for issue types:
A simple, effective workflow for sales activities might go as Open → Planned → Completed. Generally speaking, default Jira workflows should be more than sufficient to configure these work types, however, a more complex approach is also possible if it is required by your workplace.
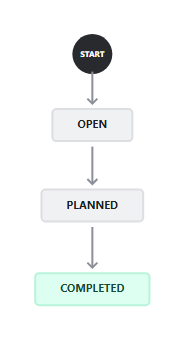
Sales Activity calendar - Workflow
Add Custom Fields (Optional)
In a sales calendar, you're not just tracking generic tasks; you're tracking a complex sales process. Custom fields allow you to tag each work item with specific, sales-oriented data like account size, the deal stage, the client or the region they’re from to make sure your sales activity efforts are directed exactly where you want.
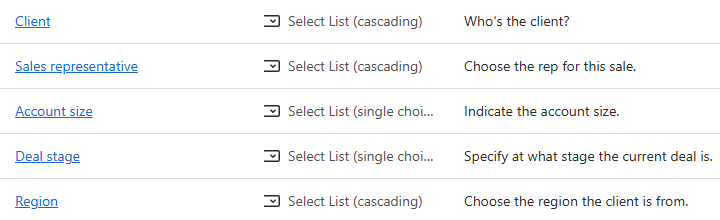
Sales Activity calendar - Custom fields
For this demo, we've also created a custom Sales Rep field instead of using the default Assignee field. While a real-world setting would likely map the sales representative to the Assignee, creating a separate custom field gave us greater flexibility within the calendar use case.
With our project now fully configured, we are ready to dive into the demo!
Creating the Calendar
Now that the preliminary setup is complete, let’s build our sales calendar.
Open the Calendar for Jira app from the Jira Apps menu. In the sidebar on the right side of the screen, find the Calendars menu and click the + create button.
Sales Activity calendar - Creating a calendar
In the calendar creation window, give your calendar a clear and descriptive name. If you plan to share the calendar with others—as is often the case in a sales environment—including key details in the name will make it much easier for colleagues to find and understand its purpose in the future.
Select what the calendar is based on. For many organizations, treating the sales process for a specific product, service, or activity as its own project is a common practice. This approach allows your calendar to display and manage all the relevant issues and activities tied to that specific project, giving you a focused view of your sales pipeline. To specify both the project and the work types, the best option is to use JQL.
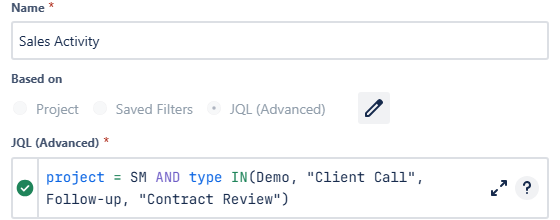
Sales Activity calendar - Name & Based on settings
Your calendar's data can be based on a single sales project or multiple projects. While choosing a single project provides a focused view, selecting multiple projects allows you to pull from a wider range of data and then use our app's filtering features to narrow your view as needed.
Since sales activities primarily consist of scheduled client calls and meetings, you'll need the flexibility to set precise times. In the Date field type settings, be sure to select the date-time fields option for both your Start and End date fields.
To make scheduling quicker, choose the "as planned" option for Display issues with empty end dates. This allows you to schedule a meeting using only the Start date and time—the issue will still be visible on the calendar even if you don't yet know the exact end time.
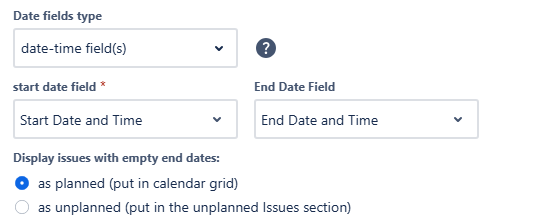
Sales Activity calendar - Date fields
For the Layout settings, set the default view to Week View. This is perfect for sales teams who need a clear, actionable overview of their daily and weekly schedules.
Since sales availability often requires accommodating different time zones, ensure you enable Weekends and set a broad Grid time range to visualize all potential client call hours.
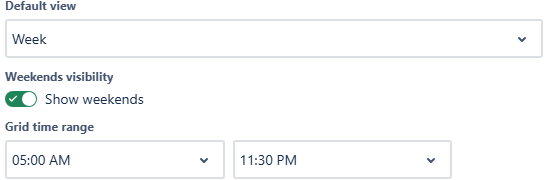
Sales Activity calendar - View, Weekend and Grid time range
For Issue card fields, display the most essential data—Client, Deal stage and Region—directly on the scheduled event block. Use Issue preview fields area—what you see when you click on the card—to include relevant secondary information, such as Description, Account Size or Priority. It will give you quick access to the full sales context without opening the work item.
Don't hesitate to display the same fields in both the card and the preview if that fits your workflow best. The goal is to set up the calendar in the way that provides you with the fastest access to the information you need most often.
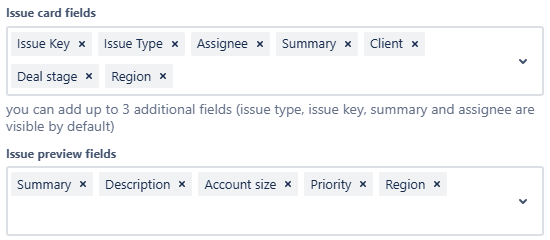
Sales Activity calendar - Issue cards & Issue preview fields
After confirming your settings, click Create. Have a look at the initial appearance of your calendar:
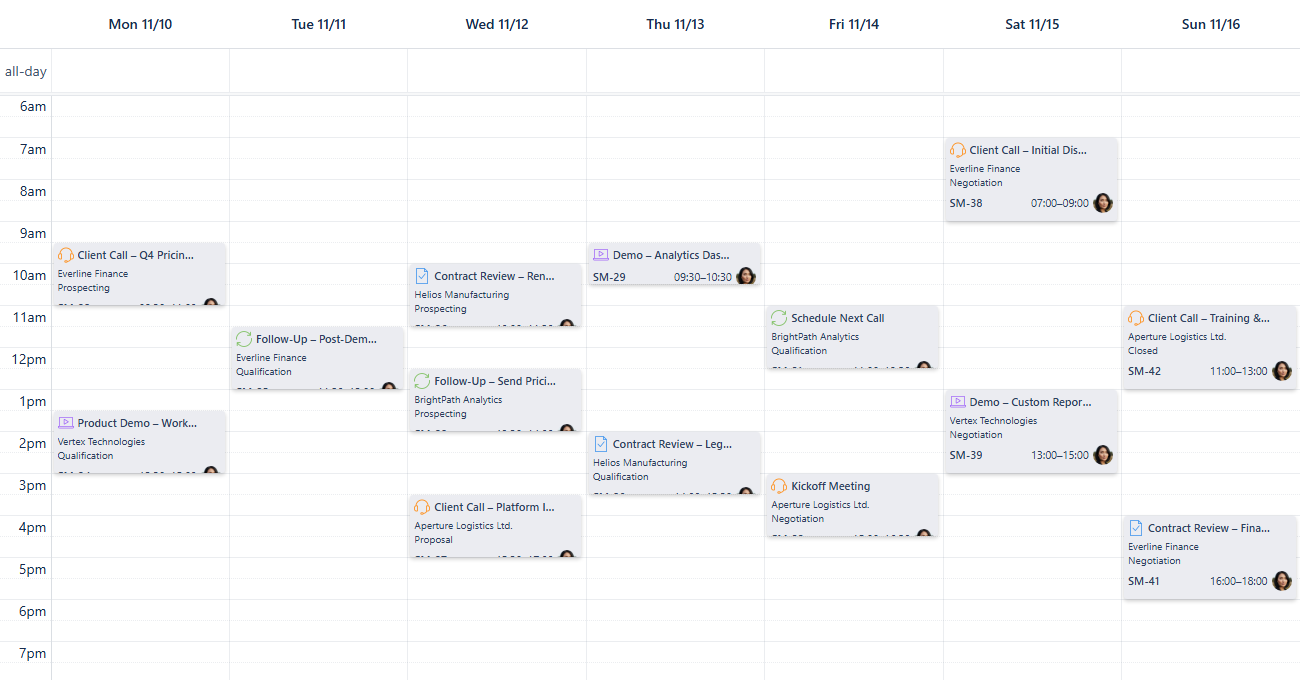
Sales Activity calendar - First look
Card Colors
Using color coding is a powerful way to enhance your calendar's readability and quickly interpret the data displayed on the grid. It allows you to integrate a smart visual hierarchy that reduces information clutter on the issue cards. By assigning colors based on a critical field—such as Deal Stage—you can instantly identify the status and urgency of every sales activity.
Let's establish the color rules for each Deal Stage now.
First, open the calendar's settings at the bottom of the sidebar and select the Card colors tab.
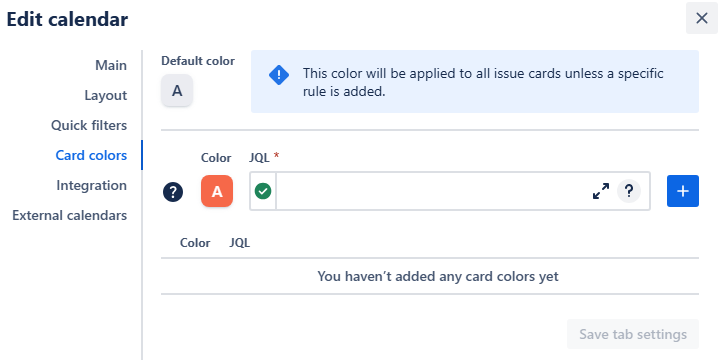
Sales Activity calendar - Card color settings
Select the color for the initial deal stage and provide a text input into the JQL field. Begin typing with custom field’s name, and a hint will appear for you to click on and use:
Sales Activity calendar - Adding a color rule based on custom fields
After your JQL query is complete, click + button, and the rule will be added to the list of color rules down below:
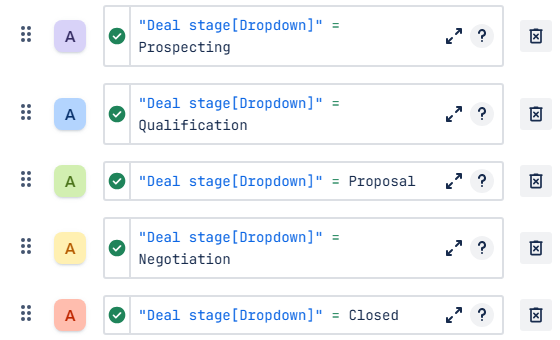
Sales Activity calendar - Color rules added
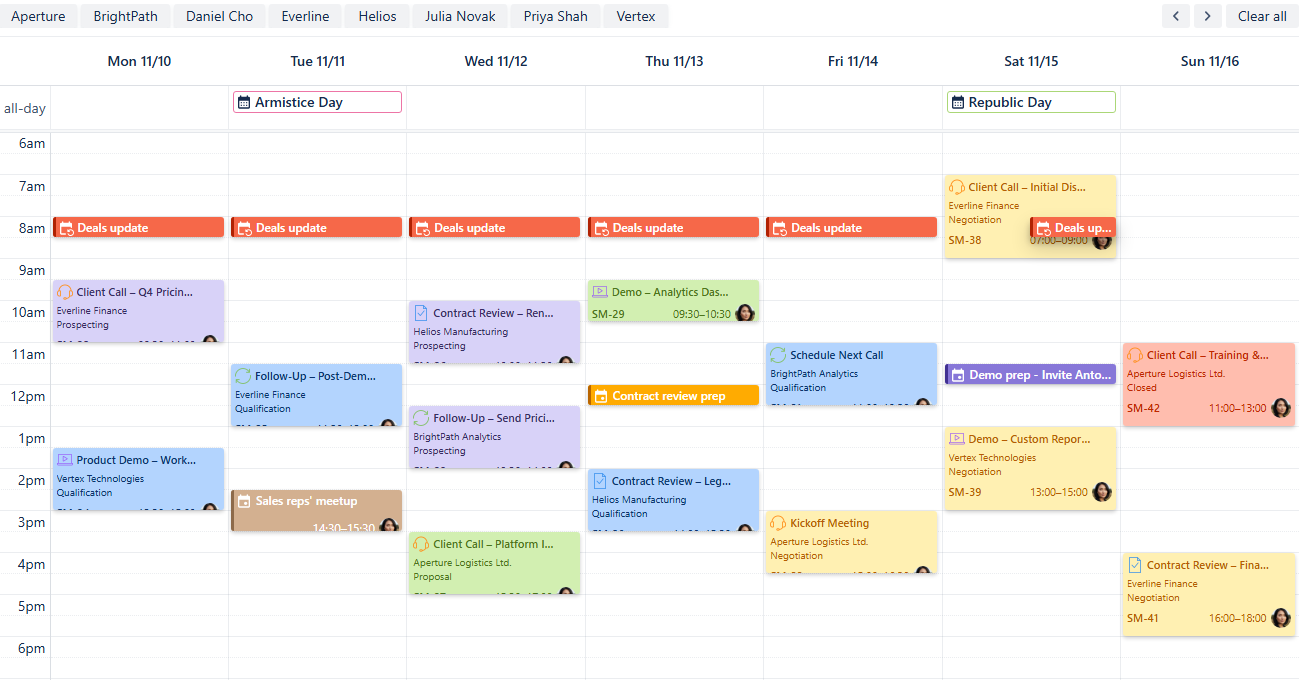
Once you’ve added the colors for all stages, click Save tab settings. Have a look at your calendar:
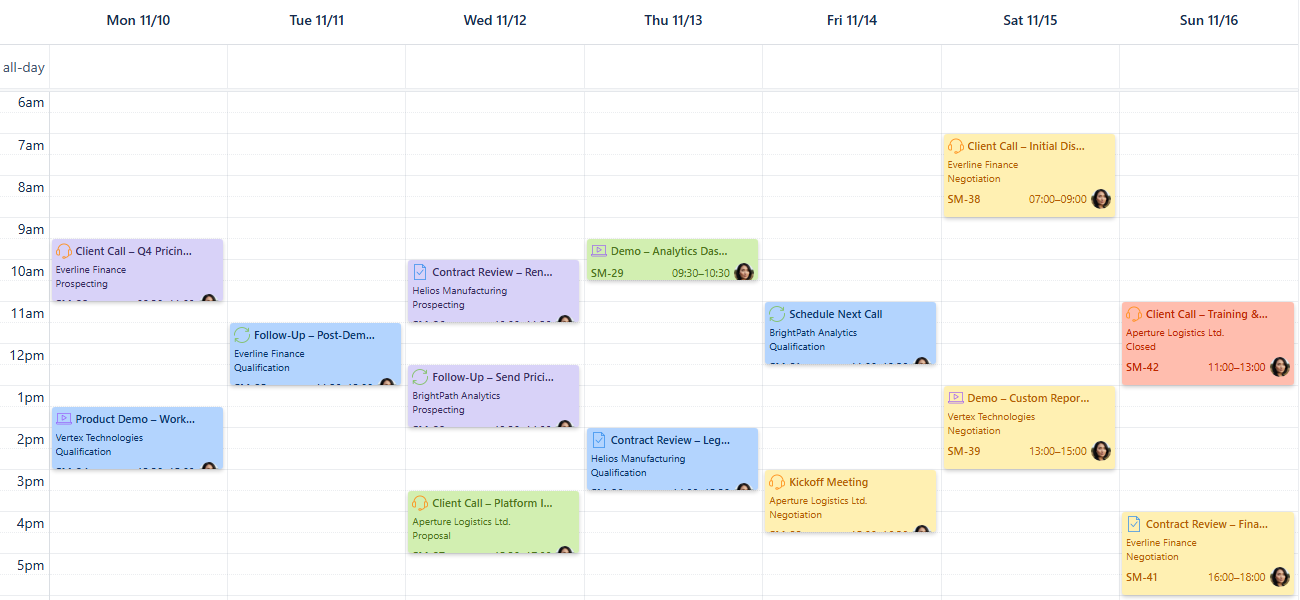
Sales Activity calendar - Card colors added
Once you’re familiar with the color coding used for the deal stages, feel free to remove the Deal stage field from the Issue card fields in the settings of your calendar.
To see what color rules are used in the calendar, head over to the bottom of the sidebar and click Legend button:
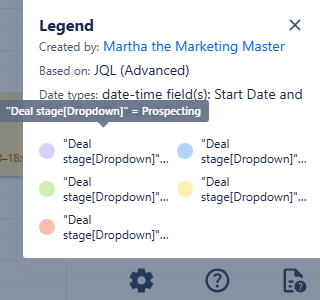
Sales Activity calendar - Legend
It will show you the colors and the JQL used to create a color rule. Simply hover your mouse over one of the rules to see the details.
Quick Filters
Quick Filters are a powerful tool for instantly accessing and visualizing targeted information, especially when combined with your custom fields. For this Sales Activity calendar, utilizing Quick Filters based on the Sales Rep field is vital for workload distribution analysis. This allows managers to quickly isolate each specialist's schedule to evaluate how evenly the team's capacity and activities are balanced throughout the week.
To set this up, navigate to the calendar's settings, then go to the Quick filters tab.
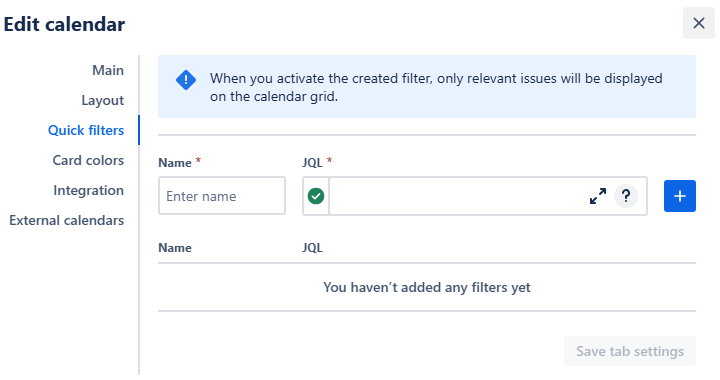
Sales Activity calendar - Quick filters settings
Name the filter after the Sales Rep it targets. When composing the JQL, be sure to reference the correct field. Use the custom Sales Rep field we created for this use case, or, if your project is configured for it, use the default Assignee field. This precision is essential for isolating the correct set of scheduled activities. Click the + button to add the rule to the list of rules:
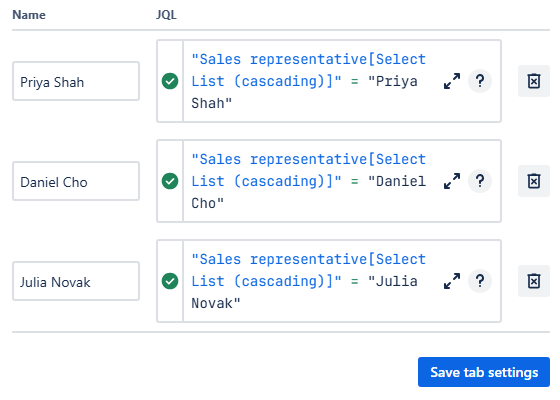
Sales Activity calendar - Quick filters added
Click Save tab settings to finalize your filters. Your quick filters will then appear as a row of buttons above your calendar.

Sales Activity calendar - Quick filters ready to use!
Feel free to add more quick filters based on what you’d like to have readily accessible to you—for example, individual clients.
Connecting External Calendars
Integrating external calendars is crucial for a sales team looking to build stronger client relationships. The awareness of their schedule, including their holidays, not only prevents ineffective communication but also demonstrates a high level of professionalism and attention to detail.
Our Calendar for Jira app provides the necessary tools to achieve this. By subscribing to an external calendar feed from your client's team, or, as a simpler solution, adding their national holidays calendar to yours, you gain valuable insight into their possible availability. This allows you to plan your outreach strategically. Let’s do exactly that as a part of our demo!
To get started, obtain the iCal link (.ics URL) of a desired country’s national holidays calendar. A simple internet search will yield an ICS-subscription link. Here’s an external calendar example we’ve found on the internet:
https://ics.calendarlabs.com/46/35952e90/Germany_Holidays.ics
In your Calendar for Jira app, go to the calendar settings in the bottom of the sidebar on the right side of your screen. In the settings, navigate to External calendars tab.
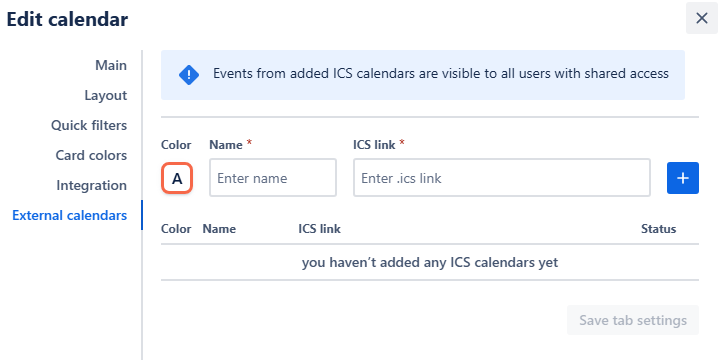
Sales Activity calendar - External calendar settings
Choose a color hue and provide a clear name associated with the country you're tracking. Paste the iCal link into the ICS link field, then click the add + button.
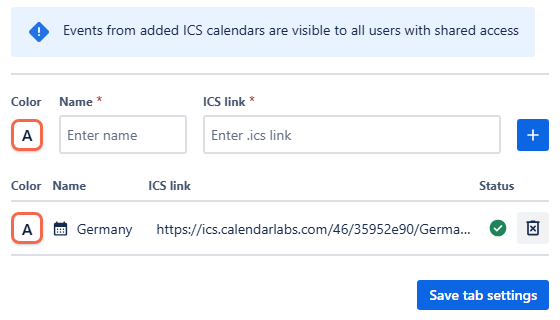
Sales Activity calendar - External calendar added in settings
Once the calendar is successfully added to the external calendar list, click Save tab settings. The events from the external calendars will then appear in All day section of your calendar:
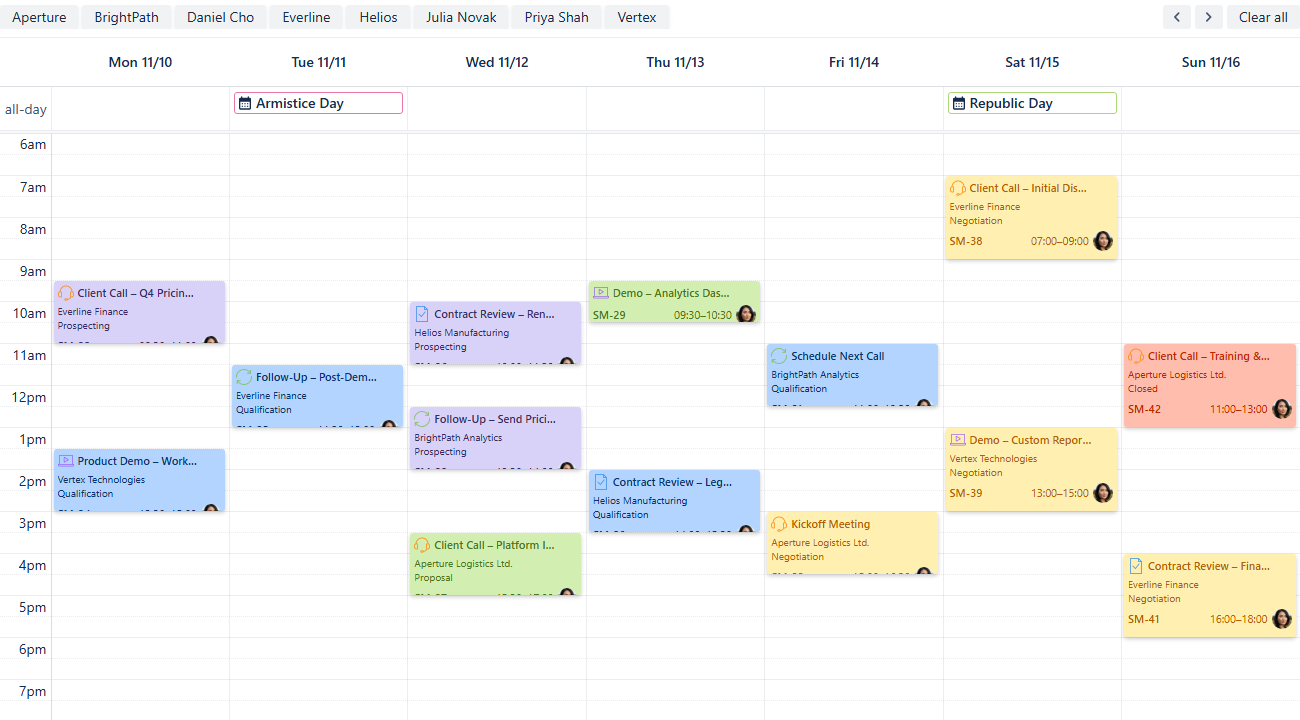
Sales Activity calendar - External events on the grid
The external calendars' names will now be visible in your sidebar under External calendars.
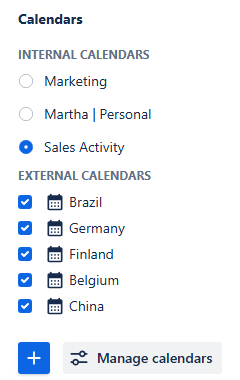
Sales Activity calendar - External calendars added
To toggle the visibility of events from a calendar subscription, simply check the box next to its name to display them on your grid, or uncheck the box to hide them. Use these external calendars to quickly verify the client's availability before scheduling a new sales activity.
Note: If you request an iCal subscription link from a client, it's crucial to inform them how the ICS-subscription technology works. By sharing the link, they're creating a live connection between their calendar and yours. This means that any changes or updates they make to their original calendar will be automatically reflected in your calendar, ensuring your information stays current.
This transparency helps build trust and ensures they are comfortable with sharing their calendar.
Creating Non-Jira Events
The Custom or Non-Jira Events (NJE) feature is great for scheduling important sales-related activities that don't need a Jira issue. This could include scheduling travel time, prospecting blocks, or internal prep sessions.
To get started, click on the desired date on the calendar.
Sales Activity calendar - Picking a date
In the pop-up menu, select New Event. An event creation window will appear:
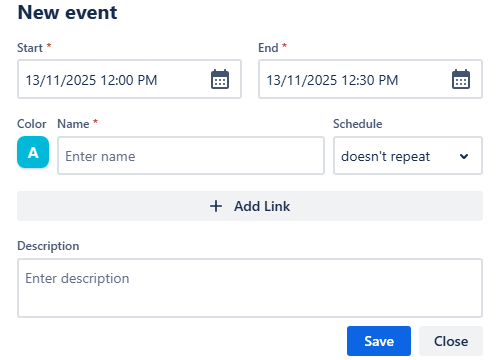
Sales Activity calendar - Adding a custom event/
Fill in the start&end dates and times, choose a color for the event’s card and give the event a name like Client Meeting Prep.
Add a description and click Save. Your non-Jira even will then appear on your calendar grid.
Sales Activity calendar - Custom events added
Adding Reminders
If your team uses the Reminders for Jira app, you can display these reminders directly on your calendar grid. This is an effective way to keep everyone on top of crucial tasks like call prep, follow-ups, or quarter-end deadlines. Seeing the reminders alongside your scheduled work items provides visual confirmation that the necessary notifications are set and will be sent exactly when you need them.
To create a reminder, click on the issue card to bring up the issue preview:
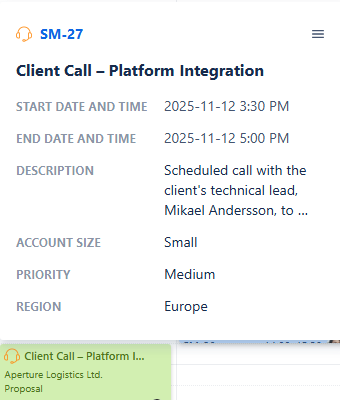
Sales Activity calendar - Issue preview
From there, click on the issue key link, and the issue window will open:
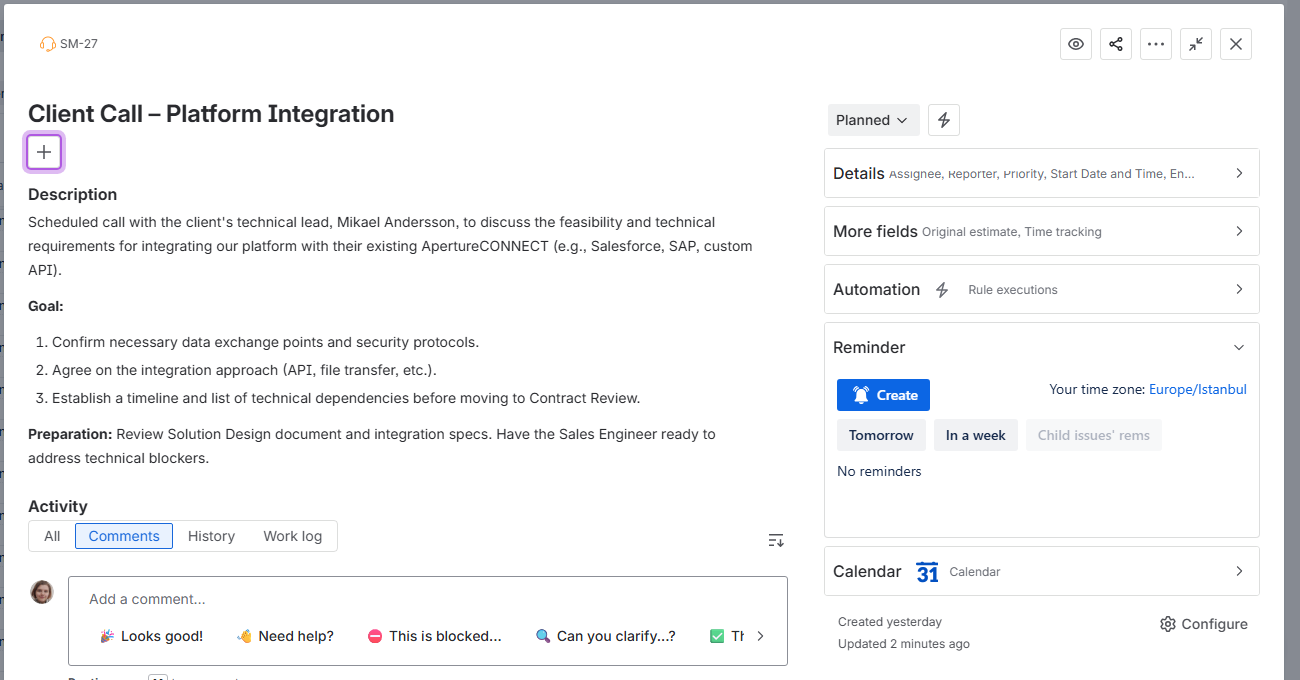
Sales Activity calendar - Accessing work item from the calendar
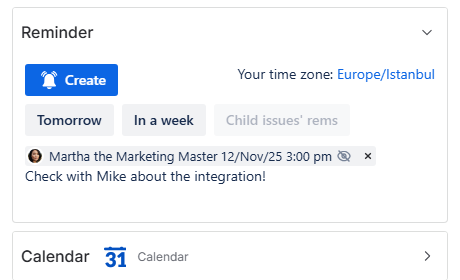
Within the work item’s window, locate the Reminder dropdown menu, under the issue’s context fields. In there, you can click Create button to begin adding a reminder. Alternatively, press the R-key on your keyboard.
The reminder creation window will look like this:
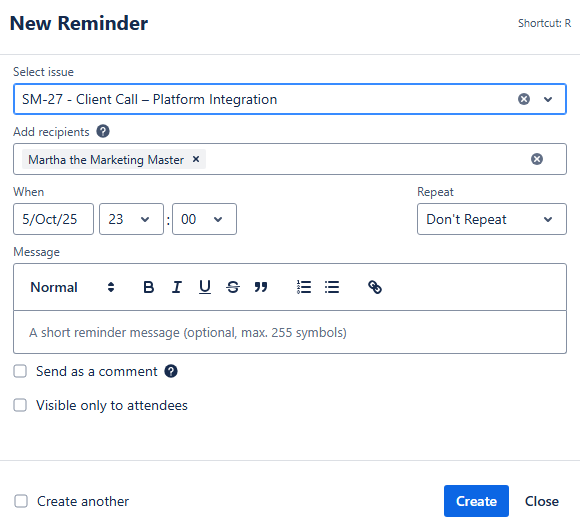
Sales Activity calendar - Adding a reminder
Fill out the necessary fields like when the reminder should happen, what issue it is associated with, who will receive the reminder and whether it’s going to be public or private. Choosing Send as a comment option will send a comment from Reminder App right underneath the work item when the reminder goes off.
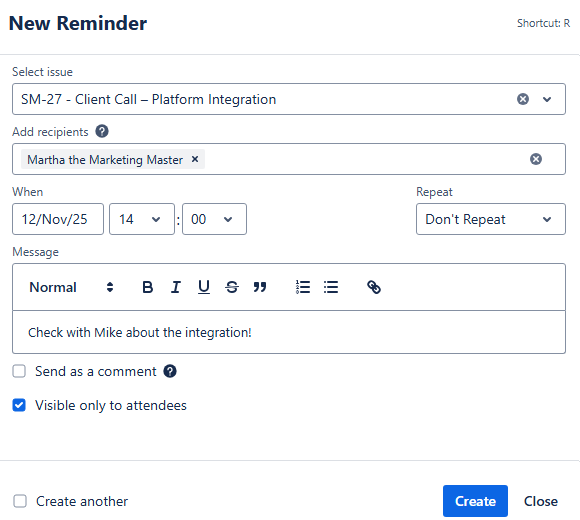
Sales Activity calendar - Adding a reminder
Once you’re happy with the reminder’s configuration, click Create, and the reminder will be created. You will be able to see it in the Reminder drop down menu within the work item:
Sales Activity calendar - Reminder added
Now, to display the same reminder in your calendar grid, you have to enable the Reminders integration for your calendar. To do so, go to the calendar settings, and then to the Integration tab.
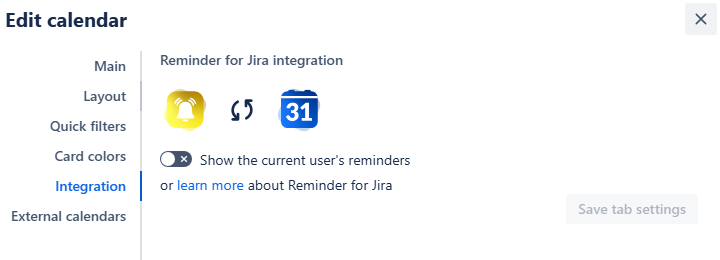
Sales Activity calendar - Integration settings
Switch the Show the current user’s reminders toggle to on, turning it green. After that, click the Save tab settings. Your reminders will then appear on the calendar grid alongside your issues:
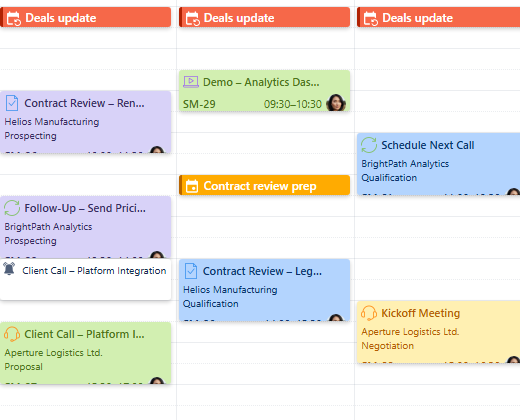
Sales Activity calendar - Reminders displayed on the calendar
Sharing your calendar
After you’ve customized the calendar, you can share it with your team and leadership to improve collaboration.
On the calendar interface, find the Share button. It's located to the right of the Today link, between the Search and Instant filters buttons:

Sales Activity calendar - Share button
Click this button, and a share window will pop up:
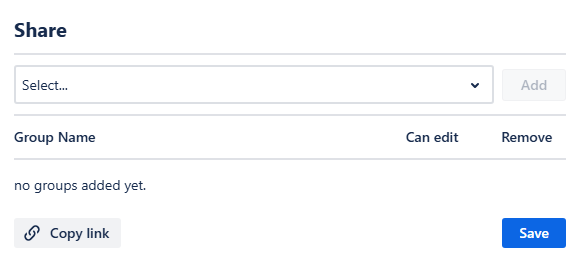
Sales Activity calendar - Share window
From this window, you can select the user group that represents your sales team. Click Add, and then choose if the group members should have editing rights by checking the box next to the user group’s name.
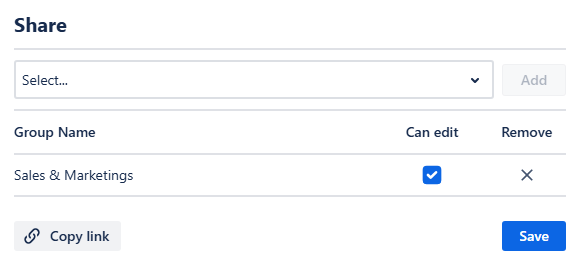
Sales Activity calendar - Sharing the calendar
You can get the direct link to the calendar by clicking Copy link in the share window.
Finally, click Save. Your team members will be able to access the calendar from the Shared with me section of the Calendars menu.
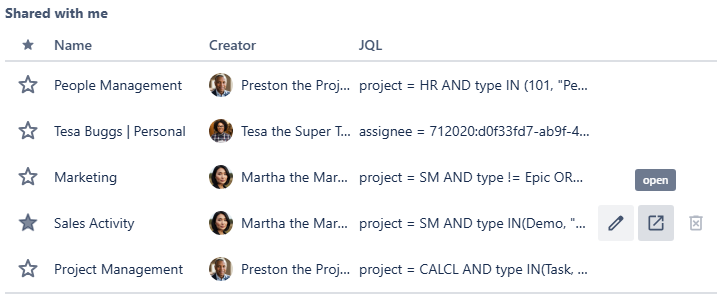
Sales Activity calendar - Shared with me calendars