.png)
SLA & OLA Custom Fields – Time Countdown Rules
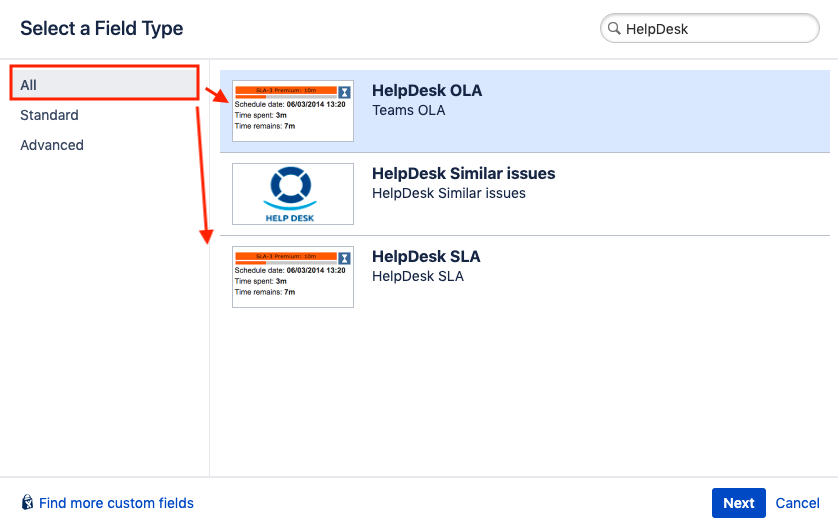
The HelpDesk app provides the following custom fields that perform the time countdown according to an applied rule:
HelpDesk SLA
HelpDesk OLA
Both fields look almost the same but act slightly differently. The HelpDesk SLA field keeps the history of overall time spent on an issue; the HelpDesk OLA field keeps the history of time spent by a particular team while displaying only current-team-related information.
The current logic of the HelpDesk OLA field supposes that only one Team works on an issue during the workflow step (till one transition to another).
Navigate to Jira Administration → Issues → Custom Fields and add the HelpDesk SLA and the HelpDesk OLA fields. You may need two SLA fields (in case you'd like to track time to response and time to resolution separately), but only one OLA field – to display the current team OLA.
Associate the fields with the relevant screens. The fields are read-only and you suppose to need them on the view screens.
Click the cogwheel and select Configure to configure the custom fields.
The field configuration is the place where you specify the rules of deadline date-time calculation for this field. You can set up as many rules as you need and specify in which conditions (JQL) the particular rule should be applied for the field.
HelpDesk SLA
Specify the following parameters for each rule:
SLA Name – free text. Name of the SLA rule that will be displayed in the field.
SLA Time (in minutes) – integer. Required time limits, used for deadline defining.
Calendar – selection from the list of work calendars. The deadline will be defined according to the SLA time and the selected calendar (the weekends, holidays and breaks are considered and the time countdown to be automatically paused during these periods). If no calendar selected, the 24/7 rule applied.
Color Scheme – selection from the list of color schemes. Affects the field color during the time countdown. If no color scheme selected, the blue color will be applied for any field value.
JQL Condition – the condition that should be met for the current scheme to be applied.
If the issue meets several JQL conditions at once, the first applicable rule will be applied. You can manually sort the rules by priorities.
Also, note that the SLA custom fields don't support the different contexts creating as all conditions can be specified within one – global – context. It means that if you want to make the SLA project-specific just write down the extra parameter in the JQL Condition field (AND project = <your target project name>)
Tick the Show hours in the field checkbox to display the SLA time in the field not in minutes but days and hours.
Tick the Show hours in the field checkbox to display the SLA time in the field not in minutes but days and hours.
SLA Settings Examples
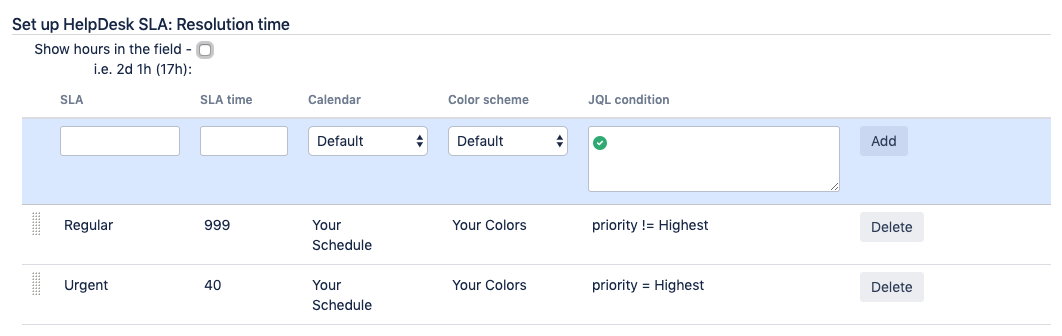
At the example above we can see that the highest priority issues are described as Urgent and have the resolution time SLA of 40 minutes. Other issues are described as Regular and have the Resolution time SLA of 999 minutes.
The calendar (user's availability to issues handling) is the same and the color scheme is the same.
If you have CRM for JIRA app and would like to control SLA by Company, use the following query: key = HDhasSimilar ('Company', 'YOUR OWN JQL').
For example, this particular SLA will be set if the reporter's Company is a company from your CRM:
Example
key = HDhasSimilar ('Company', 'project = SALE AND issuetype = Sale AND status = Delivering')HelpDesk OLA
The only difference of the HelpDesk OLA field setting is linking to a field where the team working on an issue on a step will be specified. This link is required so the field would be able to keep the history of time spent by particular teams separately. You can select the field of single select type to create this link through Team field.
Specify the following parameters for each rule:
OLA Name – free text. Name of the OLA rule that will be displayed in the field.
OLA Time (in minutes) – integer. Required time limits, used for deadline defining.
Calendar – selection from the list of work calendars. The deadline will be defined according to the SLA time and the selected calendar (the weekends, holidays and breaks are considered and the time countdown to be automatically paused during these periods). If no calendar selected, the 24/7 rule applied.
Color Scheme – selection from the list of color schemes. Affects the field color during the time countdown. If no color scheme selected, the blue color will be applied for any field value.
JQL Condition – the condition that should be met for the current scheme to be applied.
If the issue meets several JQL conditions at once, the first applicable rule will be applied. You can manually sort the rules by priorities.
Also, note that the OLA custom fields don't support the different contexts creating as all conditions can be specified within one – global – context. It means that if you want to make the OLA project-specific just write down the extra parameter in the JQL Condition field (AND project = <your target project name>)
Tick the Show hours in the field checkbox to display the OLA time in the field not in minutes but days and hours.
OLA Settings Examples
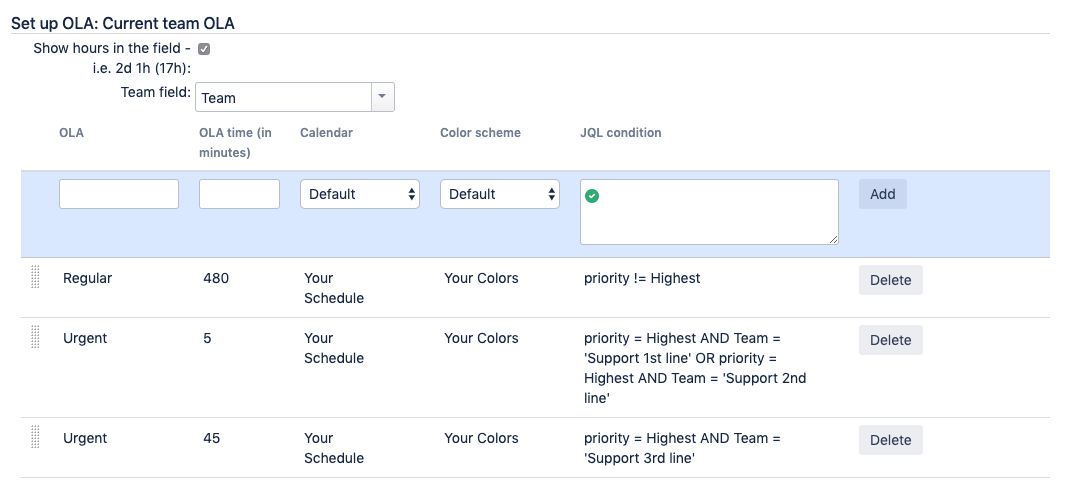
At the example above we can see that the highest priority issues are described as Urgent. The "Support 1st line" and "Support 2nd line" teams have 5 minutes and the "Support 3r line" has 45 minutes to handle such issues. All teams have the same time each – 480 minutes – to handle the Regular issues, which priority isn't defined as highest.
The calendar (user's availability to issues handling) is the same and the color scheme is the same.
How the fields look like
The fields look like the following:

The fields include:
the bar with the current SLA/OLA level name
the progress bar showing the ratio of the spent and remaining time
the icon showing the time countdown activeness on the current workflow step in accordance with the work schedule
the elapsed time – the time spent during the start of time countdown, considering the working calendar, breaks and holidays
the remaining time – the SLA/OLA time minus elapsed time
Due Date – the current date&time plus remaining time, considering the working calendar, breaks and holidays.
Team (for OLA type of field only) – current team
Note that Weeks and Days in Time Elapsed and Time Remaining are not the calendar days & weeks but the working days & weeks. That means it can display 3 days spent for one calendar day if the working day = 8 h. If you don't differ these metrics, just specify the working day = 24 h and the working week = 7 days in the Work Calendars section of the HelpDesk settings.